
I’ve seen too many installers burn through an entire 4G data plan just to set up a single camera on a remote site. It’s a costly mistake that is easy to avoid.
You can use the camera’s built-in RJ45 Ethernet port1 to perform a full offline configuration by connecting a laptop directly with a standard network cable. This method requires no SIM card, no internet access, and no 4G data. You simply set a static IP2 on your laptop, open a web browser, and access the camera’s local web interface to adjust all settings.
 RJ45 local port offline configuration for 4G solar PTZ camera
In this guide, I will walk you through every step. From the physical cable connection to IP setup, firmware updates, and expert-level tips that save you time and money in the field. Whether you are a system integrator deploying solar PTZ cameras on a farm or a project manager commissioning units on a construction site, this article gives you a clear, proven workflow. Let’s get into it.
Table of Contents
Can I Access the Camera’s Full Web Interface via a Direct LAN Cable Connection?
Many installers wonder if a direct cable connection gives them the same control as a cloud or 4G connection. The short answer is yes. But there are a few things you need to know first.
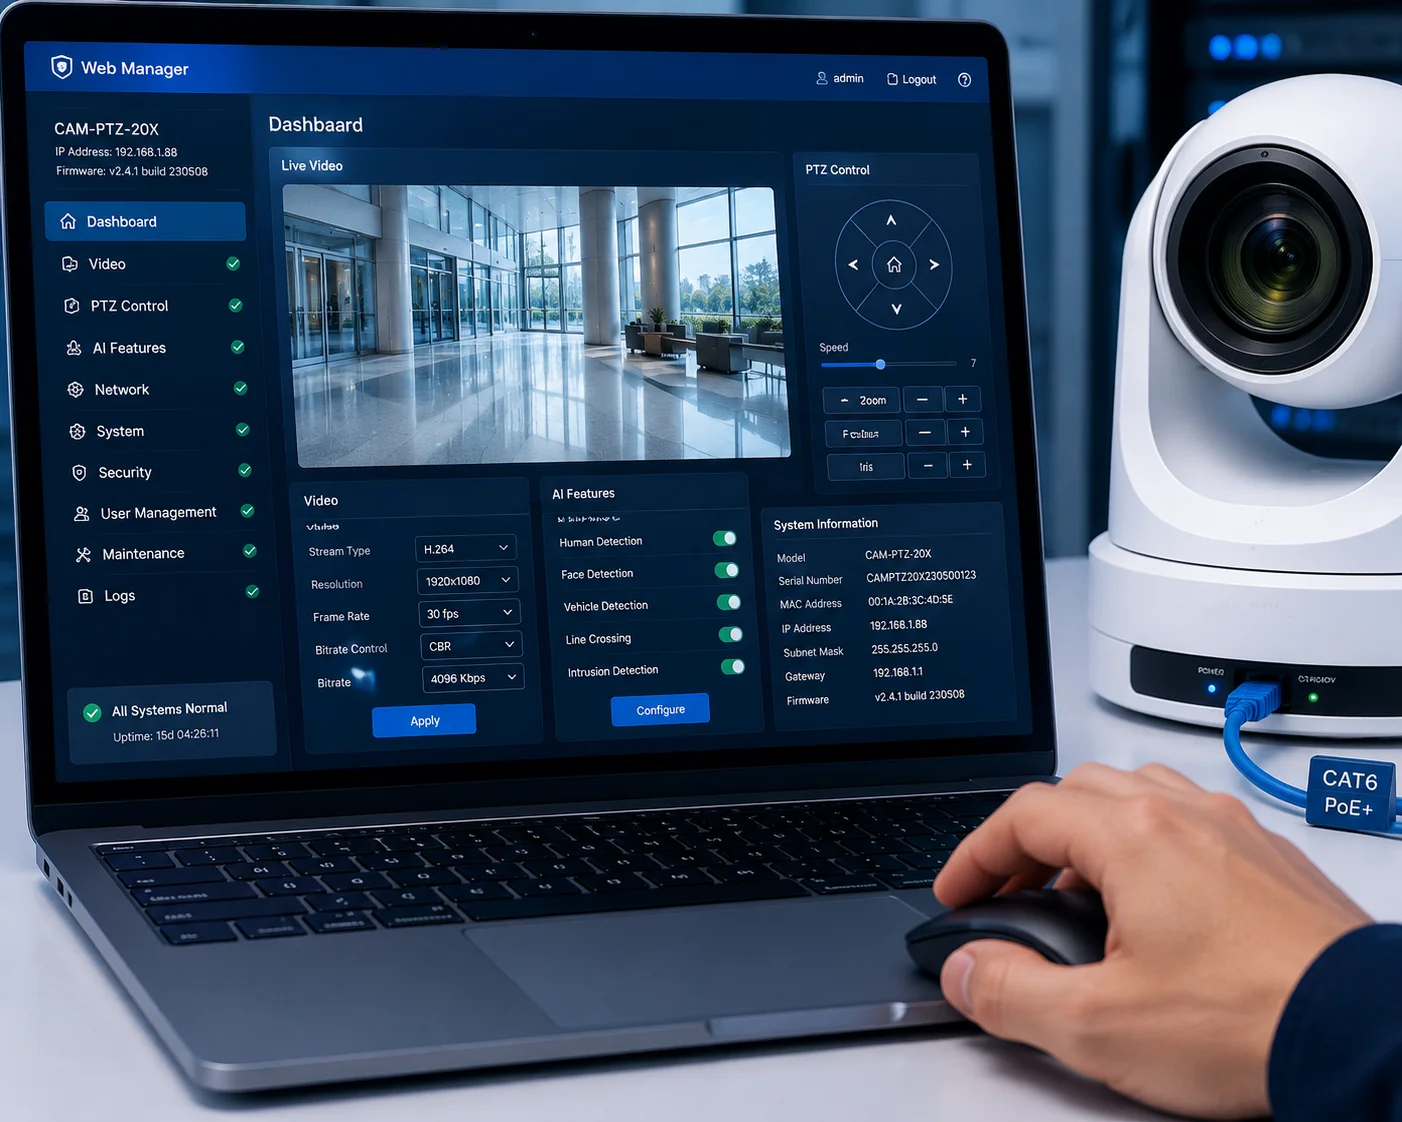
Yes, you can access the camera’s full web interface3 through a direct LAN cable connection. When you connect your laptop to the camera’s RJ45 port with a standard Ethernet cable, you get access to every setting. This includes video parameters, OSD, PTZ presets4, network configuration, storage management, and even firmware updates. No internet is needed.
 Direct LAN cable connection to PTZ camera RJ45 port
What You Get Through the Local Web Interface
When I say “full web interface,” I mean it. The local RJ45 connection does not give you a stripped-down version of the settings. You get the exact same interface that you would see if you connected through a network switch or a router. This is because the web UI is hosted on the camera itself. It does not live on a cloud server.
Here is what you can configure locally:
| Setting Category | Examples | Available via RJ45? |
|---|---|---|
| Video & Image | Resolution, bitrate, frame rate, day/night mode | ✅ Yes |
| OSD (On-Screen Display) | Camera name, timestamp, custom text | ✅ Yes |
| PTZ Control | Pan, tilt, zoom, presets, patrol routes, guard position | ✅ Yes |
| Network Settings | IP address, gateway, DNS, 4G APN, DDNS | ✅ Yes |
| Storage | SD card format, recording schedule, snapshot settings | ✅ Yes |
| AI Features | Human/vehicle detection, tracking sensitivity, ROI | ✅ Yes |
| System | Firmware update, reboot, factory reset, log export | ✅ Yes |
The Physical Setup Is Simple
You need three things: the camera, a laptop, and a Cat5e (or better) Ethernet cable. Plug one end into the camera’s RJ45 port. Plug the other end into your laptop’s Ethernet port. That’s it.
One important note: the RJ45 port on most industrial PTZ cameras is for data only. It does not supply power. Your camera still needs external DC 12V power from a solar controller, battery, or AC adapter. The only exception is if the camera’s spec sheet clearly states it supports PoE input. Most 4G solar PTZ models do not.
Why This Matters for Field Deployment
I talk to integrators like David every week. They tell me the same story. They drive two hours to a remote site. They insert a SIM card. They try to configure the camera over 4G. The signal is weak. The web interface loads slowly. A simple 10-minute setup takes an hour. And they burn 500 MB of data just loading preview streams.
With a direct LAN cable, there is zero latency. The web interface loads instantly. You can preview a full 4MP live stream without any buffering. And you use zero mobile data. For teams that deploy 10, 20, or 50 cameras per month, this adds up to real savings — both in time and in data costs.
Browser Compatibility Tip
Use Internet Explorer 11 or Microsoft Edge in IE mode for the best compatibility with industrial camera web interfaces. Many cameras use ActiveX plugins for live video preview. Chrome and Firefox may load the settings pages fine, but the live view might not render without a plugin. If you are on a Mac, try Safari or install a lightweight Windows VM.
Will the Camera Default to the RJ45 Port for Setup if No SIM Card Is Inserted?
This is a question I hear often from first-time buyers. They worry that without a SIM card, the camera might not “wake up” or might refuse connections. That concern is understandable but unnecessary.
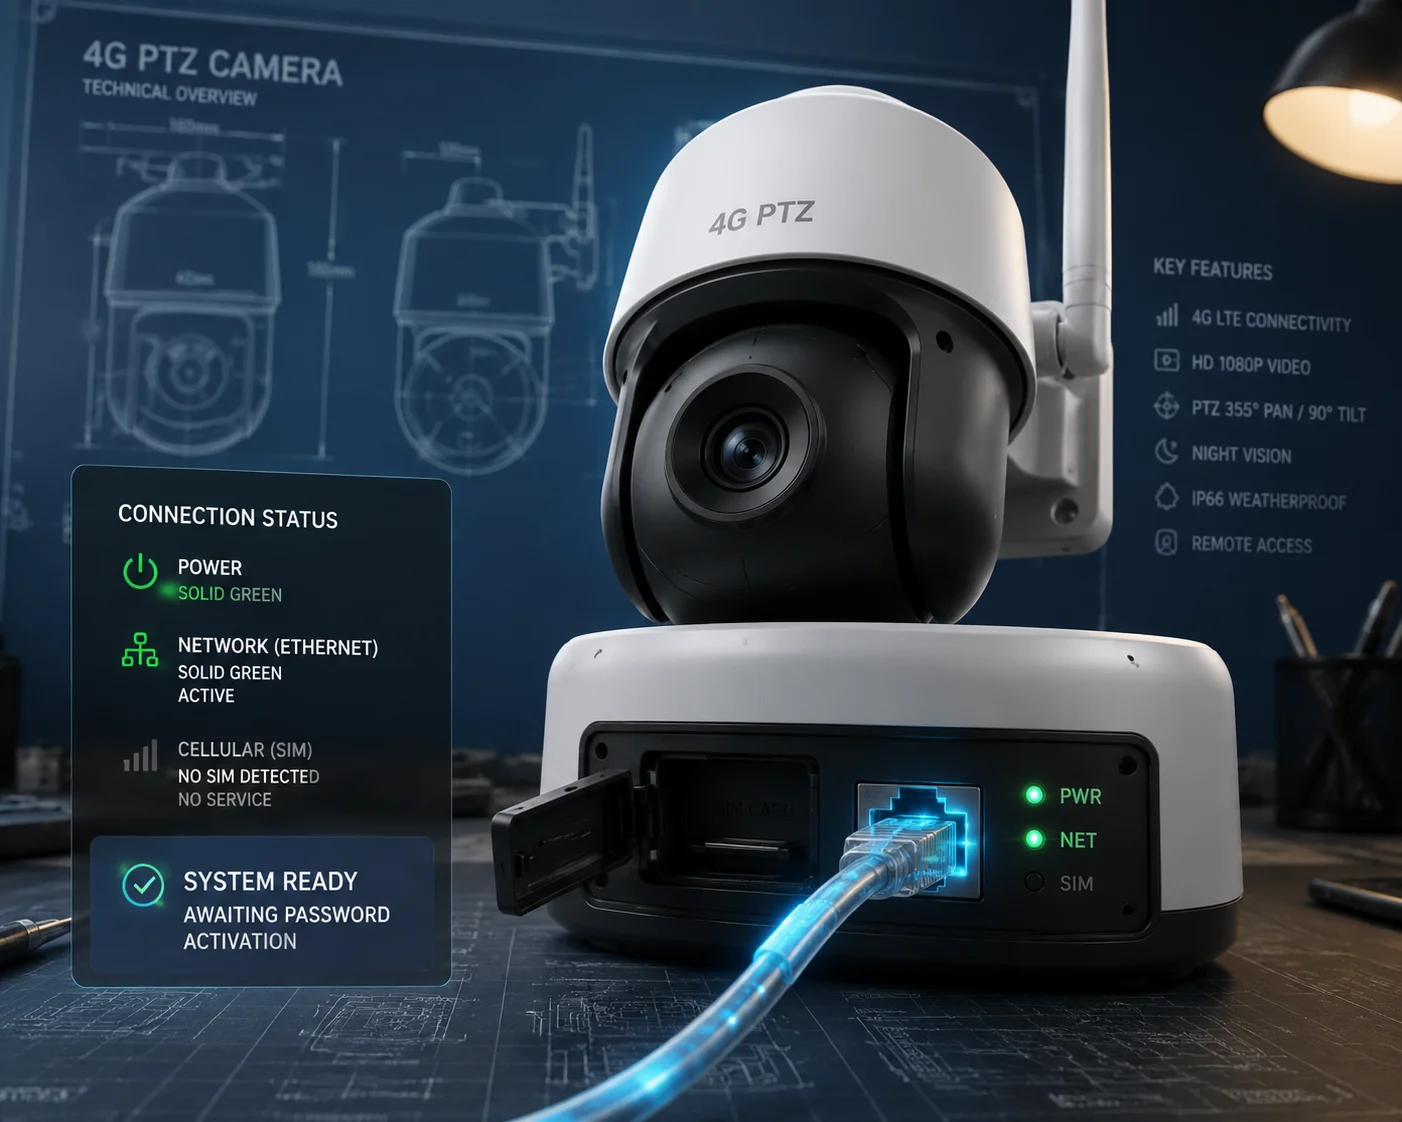
Yes, the camera will default to its RJ45 Ethernet port when no SIM card is inserted. The 4G module simply remains inactive. The local Ethernet interface is always available regardless of whether a SIM card is present. You can power on the camera, connect via RJ45, and begin configuration immediately.
 Camera defaulting to RJ45 port without SIM card
How the Camera Decides Which Network to Use
Industrial 4G PTZ cameras have two separate network interfaces. One is the 4G LTE module8. The other is the RJ45 Ethernet port. These two interfaces operate independently. They do not compete with each other.
When you power on the camera:
- The system boots up and initializes all hardware.
- The RJ45 port becomes active immediately with its default static IP.
- The 4G module checks for a SIM card. If no SIM is found, it stays idle.
- If a SIM is found, the 4G module attempts to dial the APN and establish a cellular connection.
The key point is this: the RJ45 port is always on. It does not depend on the 4G module. Even if you have a SIM card inserted and a live 4G connection, you can still connect via RJ45 at the same time.
The Activation Step You Must Not Skip
Here is something many people miss. Most professional-grade cameras ship in an “inactivated” state. Before you can do anything — before you can view video, change settings, or even connect via 4G — you must activate the camera by setting a strong admin password.
This activation step must be done through the local RJ45 port or a search tool on the same local network. You cannot activate the camera over 4G. This is a security feature, not a limitation.
| Camera State | RJ45 Access | 4G Access | What You Can Do |
|---|---|---|---|
| Not activated (factory new) | ✅ Yes | ❌ No | Set admin password, activate device |
| Activated, no SIM | ✅ Yes | ❌ No | Full configuration, preview, firmware update |
| Activated, SIM inserted | ✅ Yes | ✅ Yes | Full configuration via either interface |
What Happens After Activation
Once you set the password and activate the camera locally, everything opens up. You can configure all settings through the local web UI. When you are done, you insert the SIM card, and the camera connects to 4G automatically — if you pre-configured the APN correctly.
This is the workflow I always recommend to integrators:
- Power on the camera at your office or staging area.
- Connect via RJ45. Activate the device.
- Configure all settings: video, OSD, PTZ presets, APN, recording schedule.
- Disable auto firmware update.
- Pack the camera. Drive to the site.
- Mount the camera. Insert the SIM card. Power on.
- The camera connects to 4G and starts working immediately.
This approach means you spend zero time configuring in the field. You do all the brain work at your desk. On site, you only handle physical installation. This is how professionals do it.
How Do I Configure the Local IP Address if My Laptop Is Not on the Same Subnet?
You plugged in the cable. You opened your browser. You typed the camera’s default IP. Nothing loads. This is the most common problem during local setup, and it has a simple fix.
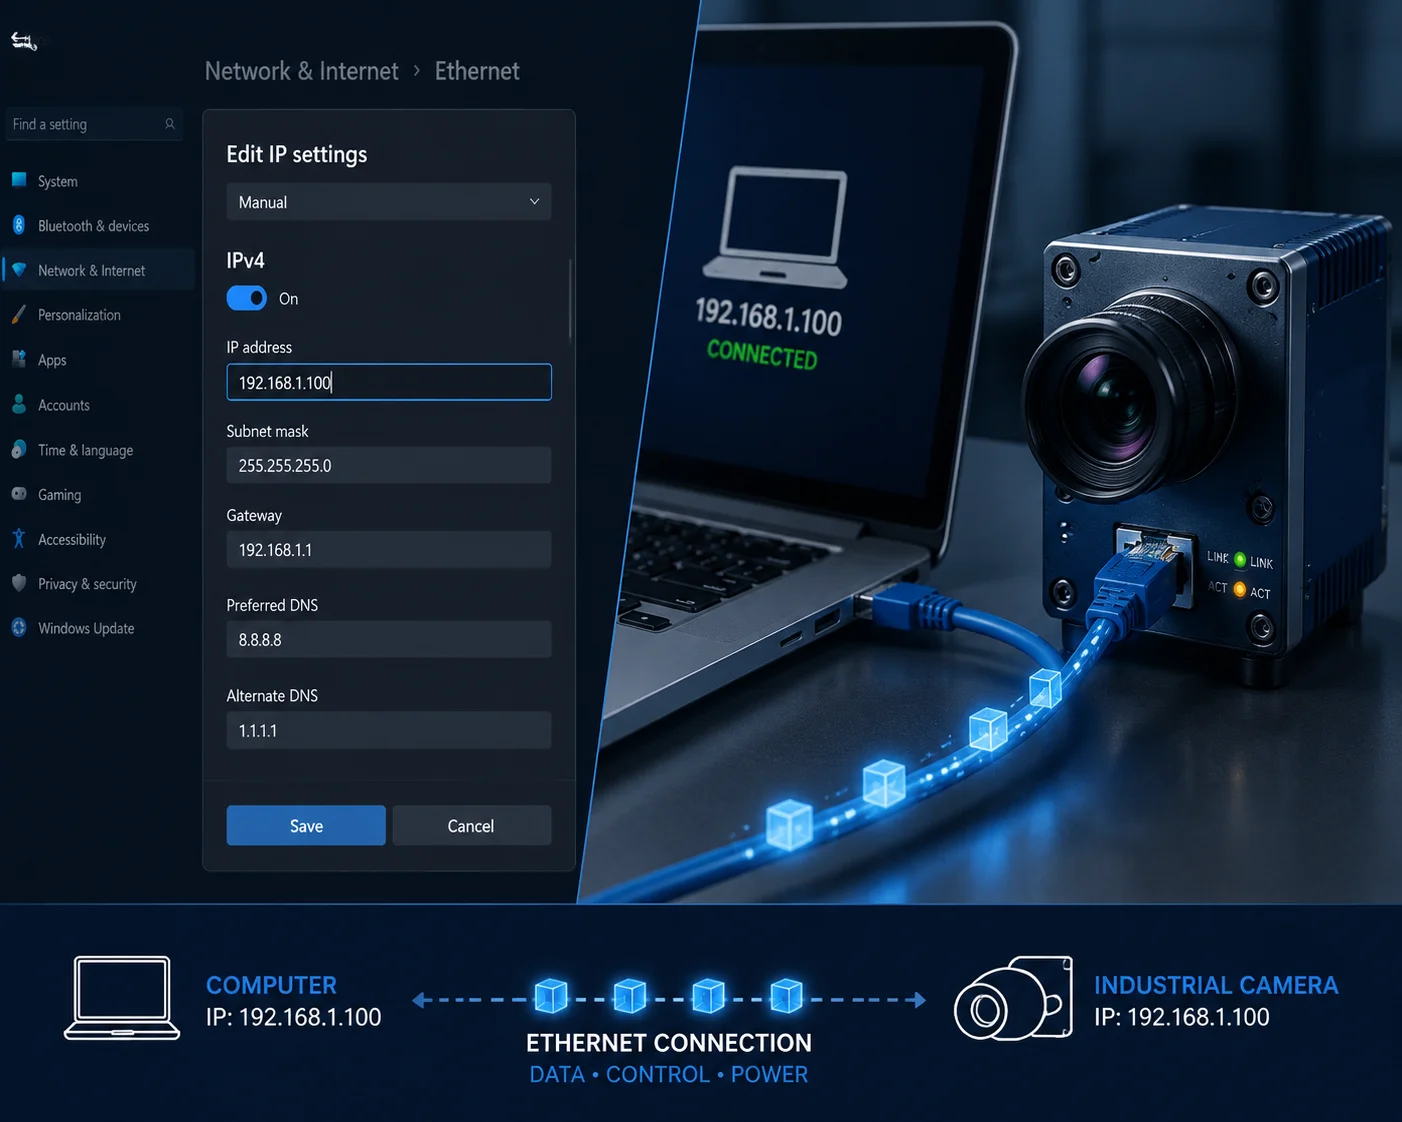
If your laptop is not on the same subnet5 as the camera, they cannot communicate. You need to manually set a static IP address on your laptop that matches the camera’s subnet. For example, if the camera’s default IP is 192.168.1.64, set your laptop to 192.168.1.100 with a subnet mask of 255.255.255.0.
 Configuring static IP address on laptop for camera connection
Understanding Subnets in Plain English
Think of a subnet like a street address. Two houses on the same street can talk to each other easily. But if one house is on Main Street and the other is on Oak Avenue, they cannot find each other without a router (like a post office) in between.
In networking terms, the “street” is the subnet. When you connect two devices directly with a cable, they must be on the same subnet. The subnet is defined by the first three groups of numbers in the IP address (when using a 255.255.255.0 mask).
- Camera IP: 192.168.1.64
- Your laptop must be: 192.168.1.X (where X is any number from 1 to 254, except 64)
If your laptop is set to DHCP7 (automatic), it will likely assign itself an address like 169.254.X.X. That is a completely different subnet. The camera and laptop cannot see each other.
Step-by-Step: Setting a Static IP on Windows
Here is the exact process:
- Press Win + R, type
ncpa.cpl, and press Enter. This opens the Network Connections window. - Right-click on Ethernet (not Wi-Fi) and select Properties.
- Double-click Internet Protocol Version 4 (TCP/IPv4).
- Select Use the following IP address.
- Enter the following:
- IP address:
192.168.1.100 - Subnet mask:
255.255.255.0 - Default gateway: leave blank
- Click OK twice.
Now open Command Prompt and type:
ping 192.168.1.64If you get replies, the link is working. Open your browser and type http://192.168.1.64 in the address bar. The camera’s login page should appear.
What if You Don’t Know the Camera’s Default IP?
This happens more often than you think. Maybe the camera was configured before and someone changed the IP. Maybe you lost the spec sheet. No problem.
Use a device search tool. These tools scan the local network at Layer 2 (using broadcast packets) and find all connected devices regardless of their IP address. Here are the most common ones:
| Tool Name | Manufacturer | Works Across Brands? | Download |
|---|---|---|---|
| SADP Tool | Hikvision | Mostly Hikvision devices | Free from Hikvision website |
| ConfigTool | Dahua | Mostly Dahua devices | Free from Dahua website |
| Loyalty-Secu Search Tool | Loyalty-Secu | Our cameras and compatible devices | Provided with product delivery |
These tools work without internet. They send broadcast packets over the Ethernet cable and listen for responses. Once the tool finds the camera, it shows you the current IP address, serial number, and firmware version. You can even change the IP directly from the tool without opening a browser.
A Common Mistake to Avoid
Do not forget to switch your laptop back to DHCP after you finish the local configuration. If you leave it on a static IP, your Wi-Fi and regular network connections may stop working. I have received support calls from integrators who thought their laptop was broken. It was just stuck on a static IP from a field visit the day before.
Can I Perform a Full Firmware Update Locally Through the RJ45 Port to Save Bandwidth?
Firmware updates over 4G are risky. The file is large. The connection can drop. A failed update can brick the camera. And you waste hundreds of megabytes of expensive cellular data. There is a better way.
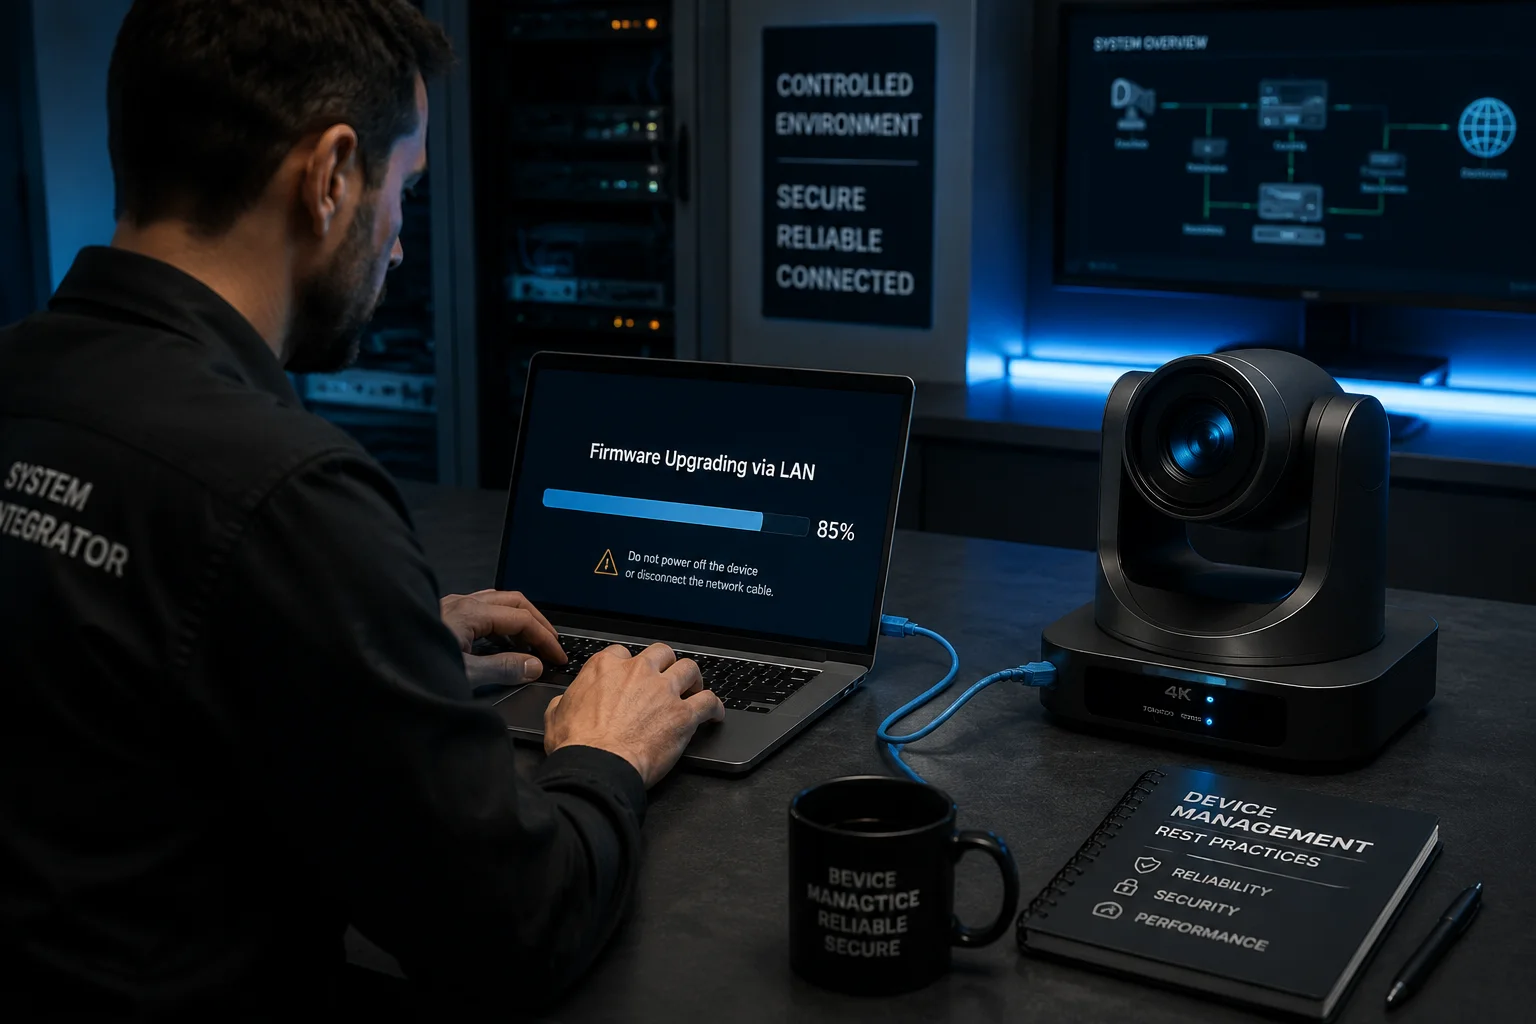
Yes, you can perform a full firmware update6 through the RJ45 port. Download the firmware file to your laptop in advance using a regular internet connection. Then connect to the camera locally via RJ45, open the web interface, navigate to the maintenance or upgrade page, and upload the firmware file directly. This uses zero 4G data and is far more reliable.
 Firmware update via local RJ45 connection on PTZ camera
Why Local Firmware Updates Are Safer
A firmware update is the most critical operation you can perform on a camera. If the process is interrupted — by a dropped 4G signal, a timeout, or a power loss — the camera can become unresponsive. In the industry, we call this “bricking” the device. A bricked camera on a remote hilltop means a truck roll, a ladder, and hours of wasted labor.
When you update firmware over a direct RJ45 cable, the connection is rock solid. There is no signal fluctuation. There is no packet loss. The transfer speed is typically 100 Mbps (Fast Ethernet), which means a 50 MB firmware file uploads in a few seconds. The entire update process — upload, verify, flash, reboot — usually takes less than 5 minutes.
Over 4G, the same process can take 20 to 30 minutes on a good day. On a weak signal, it might time out repeatedly and never complete.
The Correct Firmware Update Workflow
Here is the process I recommend to every integrator and project manager:
Step 1: Download the Correct Firmware
Before you go to the field, download the firmware file from your supplier. At Loyalty-Secu, we provide firmware files directly to our partners via email or a secure download link. Make sure you have the correct file for your exact camera model. Using the wrong firmware can cause serious problems.
Step 2: Connect and Log In
Connect your laptop to the camera via RJ45. Set your static IP. Open the browser. Log in with your admin credentials.
Step 3: Navigate to the Upgrade Page
Go to Configuration > System > Maintenance > Upgrade (the exact path varies by firmware version). You will see a file selection button and an “Upgrade” button.
Step 4: Upload and Wait
Select the firmware file from your laptop. Click “Upgrade.” Do not close the browser. Do not unplug the cable. Do not turn off the power. Wait for the progress bar to complete. The camera will reboot automatically.
Step 5: Verify
After the reboot, log in again and check the firmware version under System > Device Information. Confirm it matches the version you intended to install.
Disable Auto-Update — This Is Critical
Many cameras have an “Auto Update” or “Cloud Upgrade” feature. If this is enabled, the camera will check for new firmware as soon as it connects to the internet via 4G. If it finds an update, it will download it automatically. A single firmware file can be 50 to 200 MB. On a pay-per-MB data plan, this is a disaster.
I always tell my clients: turn off auto-update during local configuration. You control when and how firmware gets updated. Not the camera. Not the cloud. You.
Bonus: Use Local RJ45 for Diagnostics Too
The local connection is not just for setup and updates. It is also your best diagnostic tool. Here are a few things you can do locally that would waste 4G data if done remotely:
- Live preview at full resolution: View the 4MP or 5MP stream locally to verify image quality, focus, and color.
- SD card formatting: Format the microSD card through the web UI. This is faster and more reliable than doing it over 4G.
- Log export: Download system logs to your laptop for troubleshooting. Log files can be several MB.
- Configuration backup: Export the camera’s entire configuration as a file. You can import this file into other cameras of the same model. This is a huge time saver when deploying multiple units.
Expert Checklist for Offline Configuration
Before you leave the site, run through this checklist:
- ✅ Cable check: Re-seal the RJ45 waterproof cap tightly. Water ingress through an open port is a top cause of field failures.
- ✅ Password activation: Confirm the admin password is set and documented securely.
- ✅ APN pre-configured: Enter the carrier’s APN (e.g.,
vzwinternetfor Verizon) so the camera connects instantly when the SIM is inserted. - ✅ Auto-update disabled: Verify the cloud upgrade toggle is off.
- ✅ SD card formatted: Format the card locally. Confirm recording works by checking a short playback clip.
- ✅ Ping test passed: Run
ping 192.168.1.64from CMD before opening the browser. If the ping fails, the browser will fail too. - ✅ Static IP reverted: Switch your laptop back to DHCP before leaving the site.
Conclusion
The RJ45 port is your most reliable tool for offline camera setup. Use it to configure, update, and test every camera before the SIM card ever touches the slot. Save your 4G data for live monitoring — not for setup.
1. Learn about the RJ45 connector standard used for Ethernet networking. ↩︎ 2. Understand what a static IP address is and why it is necessary for direct device-to-laptop connections. ↩︎ 3. General explanation of a web-based user interface for configuring devices. ↩︎ 4. Understand PTZ presets and how they allow quick repositioning of the camera to predefined points. ↩︎ 5. Understand what a subnet is and why two devices on different subnets cannot communicate directly. ↩︎ 6. Official firmware update support page for Loyalty-Secu cameras (placeholder; adjust to actual URL if known). ↩︎ 7. Understand how DHCP automatically assigns IP addresses and why it interferes with direct connections. ↩︎ 8. Understand the 4G LTE cellular module inside the camera and its independent operation from the Ethernet port. ↩︎