
I’ve seen too many integrators lose hours fighting noisy night footage — all because their camera locked them out of manual DNR control.
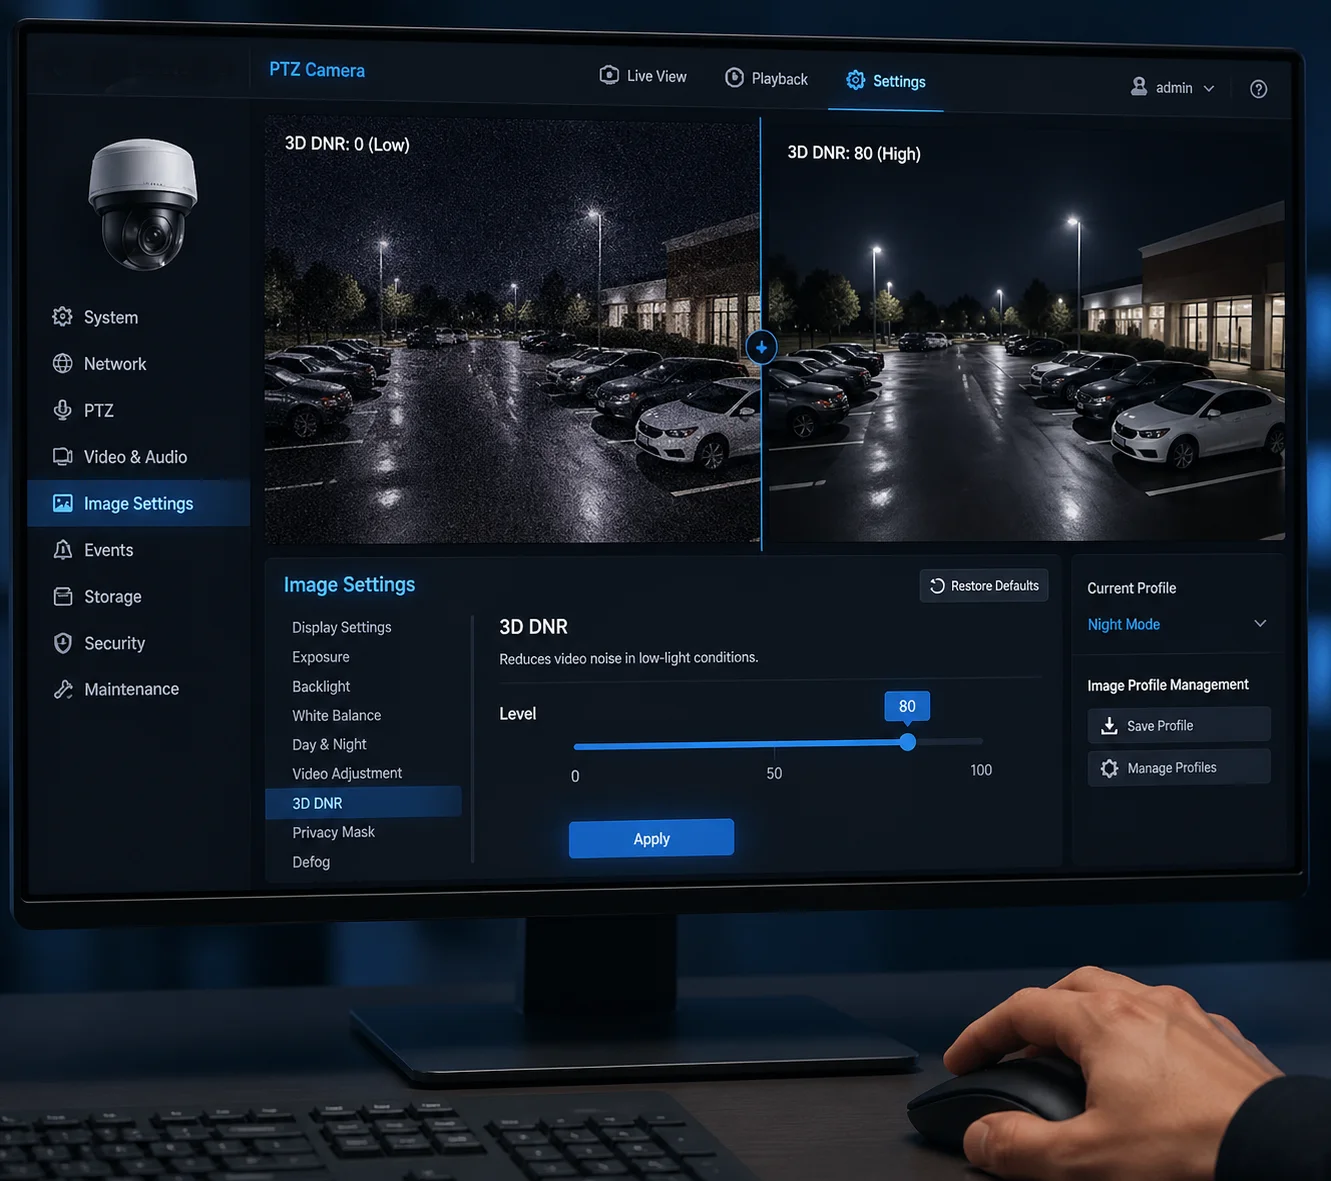
Yes, most professional-grade PTZ cameras from China-based manufacturers like Loyalty-Secu support full manual depth adjustment for 3D DNR. You can typically access a 0–100 linear slider or discrete level steps (e.g., 1–8) through the camera’s Web UI or OSD menu, letting you fine-tune noise reduction strength for your exact site conditions.
 3D DNR manual depth adjustment PTZ camera settings
The real question is not just whether manual adjustment exists — it is how deep you can go, and how each setting change affects your image quality, storage costs, and motion clarity. Below, I break down the most common 3D DNR tuning questions I get from integrators like you, with practical answers you can use on your next deployment.
How Can I Reduce the “Ghosting” Effect Caused by Aggressive 3D DNR on Moving Targets?
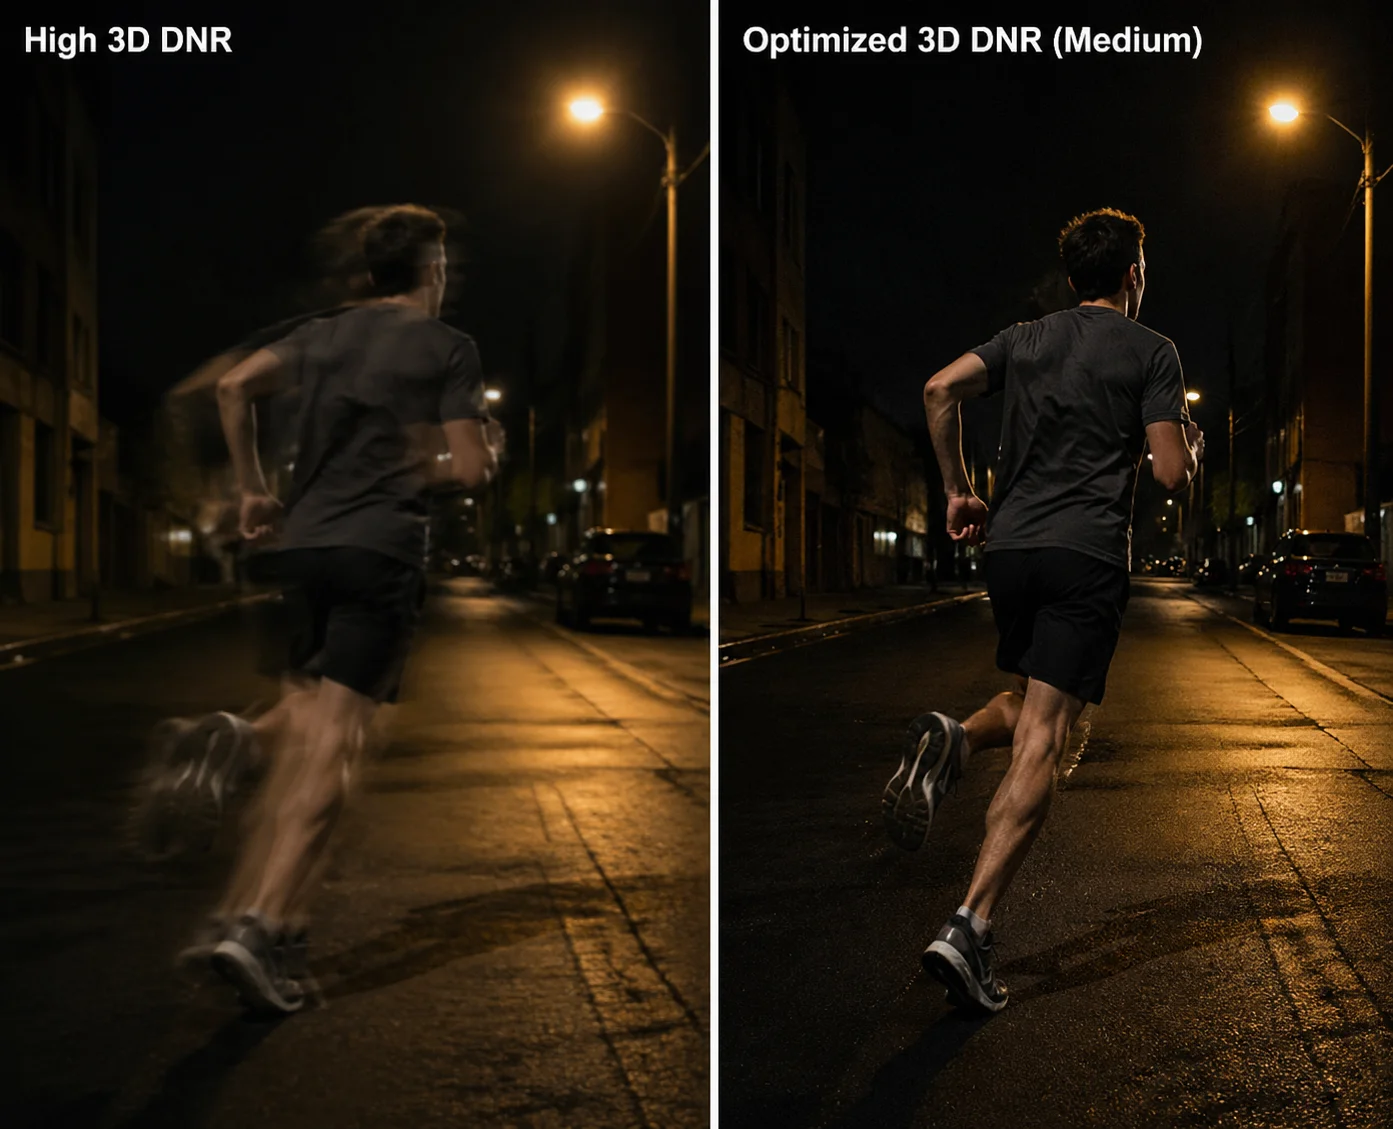
Ghosting on moving targets is the number one complaint I hear from field engineers after they crank up 3D DNR to clean up a noisy night image.
To reduce ghosting, lower your 3D DNR strength to a medium-low range (typically 30–45 on a 0–100 scale). This preserves motion edges and prevents the algorithm from blending moving objects into the background across multiple frames. You trade a slightly noisier image for much sharper moving targets.
 Reduce ghosting effect 3D DNR moving targets PTZ camera
Why Does Ghosting Happen in the First Place?
3D DNR 1 works by comparing multiple consecutive frames. It looks for pixels that change randomly — those are noise. It then averages them out. The problem is simple: when a person or vehicle moves through the frame, those pixels also change between frames. At high DNR levels, the algorithm cannot always tell the difference between real motion and random noise. So it treats part of the moving object as noise and tries to smooth it away. The result is a semi-transparent trail behind the object. That is ghosting.
The Practical Fix: A Step-by-Step Approach
Here is what I recommend to integrators during on-site commissioning:
- Start at zero. Set 3D DNR to 0 or “Off.” Look at the raw noise level. This is your baseline.
- Increase slowly. Move the slider up in steps of 10. At each step, have someone walk through the field of view at normal speed.
- Watch the edges. The moment you see the person’s outline start to blur or leave a faint trail, stop. Back down by 5–10 points.
- Lock it in. Save this value as your motion-priority profile.
Recommended 3D DNR Levels by Scene Type
| Scene Type | Suggested 3D DNR Level | Why |
|---|---|---|
| Highway / Perimeter with fast movement | 30 – 45 (Medium-Low) | Keeps license plates and faces sharp. Accepts some visible grain. |
| Parking lot with moderate foot traffic | 45 – 55 (Medium) | Balanced trade-off. Most ghosting stays invisible at walking speed. |
| Static warehouse or yard | 60 – 80 (Medium-High) | Very little motion. High DNR saves storage without visible ghosting. |
Don’t Forget 2D DNR as a Companion
3D DNR handles temporal noise — the flickering grain between frames. But 2D DNR 2 handles spatial noise — the static speckle within a single frame. In many cases, you get better results by using a moderate 3D DNR level combined with a moderate 2D DNR level, rather than pushing 3D DNR alone to the maximum. This way, you clean up the image without destroying motion edges. On our Loyalty-Secu pro-series firmware, both sliders are independent, so you can tune each one separately through the Web UI.
I always tell clients: “If you can still see a faint trail behind a walking person on playback, your 3D DNR is too high. Drop it until the trail disappears. The slight grain you see instead is almost invisible after H.265 compression 3 anyway.”
Can I Save Different Noise Reduction Profiles for Daytime and Nighttime Monitoring?
Switching DNR settings manually every morning and evening is not realistic — especially when you manage 200+ cameras across multiple sites.
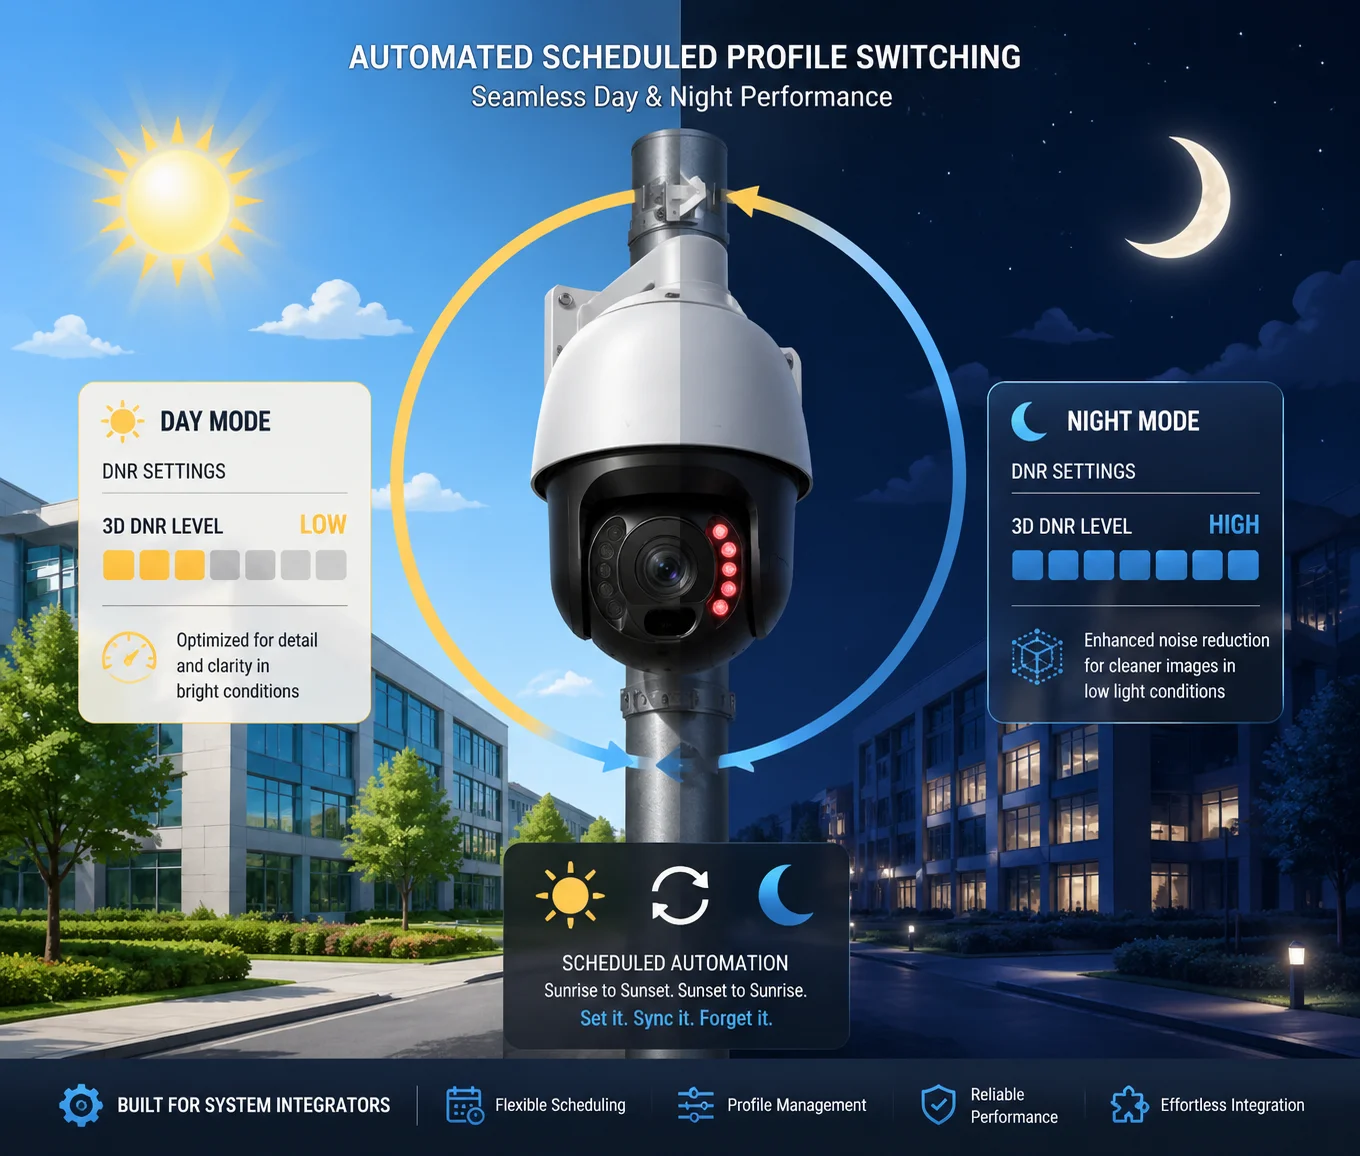
Yes, most mid-to-high-end PTZ cameras support scheduled or sensor-triggered profile switching. You can create a “Day Profile” with low 3D DNR and a “Night Profile” with higher 3D DNR, and the camera will switch automatically based on its built-in photoresistor or a time schedule you define.
 Day night noise reduction profile PTZ camera scheduling
How Automatic Profile Switching Works
The camera has a light sensor — usually a small photoresistor near the lens housing. When ambient light drops below a set threshold (for example, below 5 lux), the camera triggers its night mode. This is the same trigger that activates the IR LEDs and switches the image sensor to black-and-white mode. On cameras with profile support, this same trigger can also load a completely different set of image parameters, including 3D DNR level, 2D DNR level, sharpness, brightness, and exposure settings.
What Each Profile Should Look Like
Here is a starting template I share with integrators:
| Parameter | Day Profile | Night Profile |
|---|---|---|
| 3D DNR Level | 20 – 35 | 55 – 75 |
| 2D DNR Level | 10 – 20 | 30 – 50 |
| Sharpness | 60 – 80 | 40 – 55 |
| Exposure Mode | Auto, fast shutter | Auto, slow shutter allowed |
| IR LED | Off | On (auto intensity) |
Why This Matters for Your Bottom Line
During the day, light is abundant. Noise is minimal. You want maximum sharpness and detail, so you keep DNR low. At night, the sensor amplifies its gain to capture light, and that gain brings noise. You need higher DNR to keep the image usable and to keep your bitrate under control.
Without profile switching, you are stuck with one compromise setting that is never ideal for either condition. I have seen integrators save 25–35% on cloud storage costs just by using a properly tuned night profile, because the reduced noise means the H.265 encoder produces smaller files.
Where to Configure This
On Loyalty-Secu cameras, you access this through the Web UI under Image Settings → Scene Profile. You can name each profile, assign a trigger (light sensor threshold or fixed time schedule), and adjust every image parameter independently. Once saved, the camera handles the rest. No manual intervention needed. If your NVR 4 supports it, you can also push profile configurations in batch to multiple cameras — a huge time saver for large deployments.
One thing I always warn about: do not rely on the NVR’s built-in DNR slider for this. Many NVRs only expose a single, simplified DNR control that overrides the camera’s own settings. For full control, always configure profiles directly on the camera’s Web interface.
Does Adjusting the DNR Level Impact the Overall Sharpness of My PTZ Video Feed?
I get this question almost every week from project managers who notice their 38X zoom footage looks “soft” after enabling noise reduction.
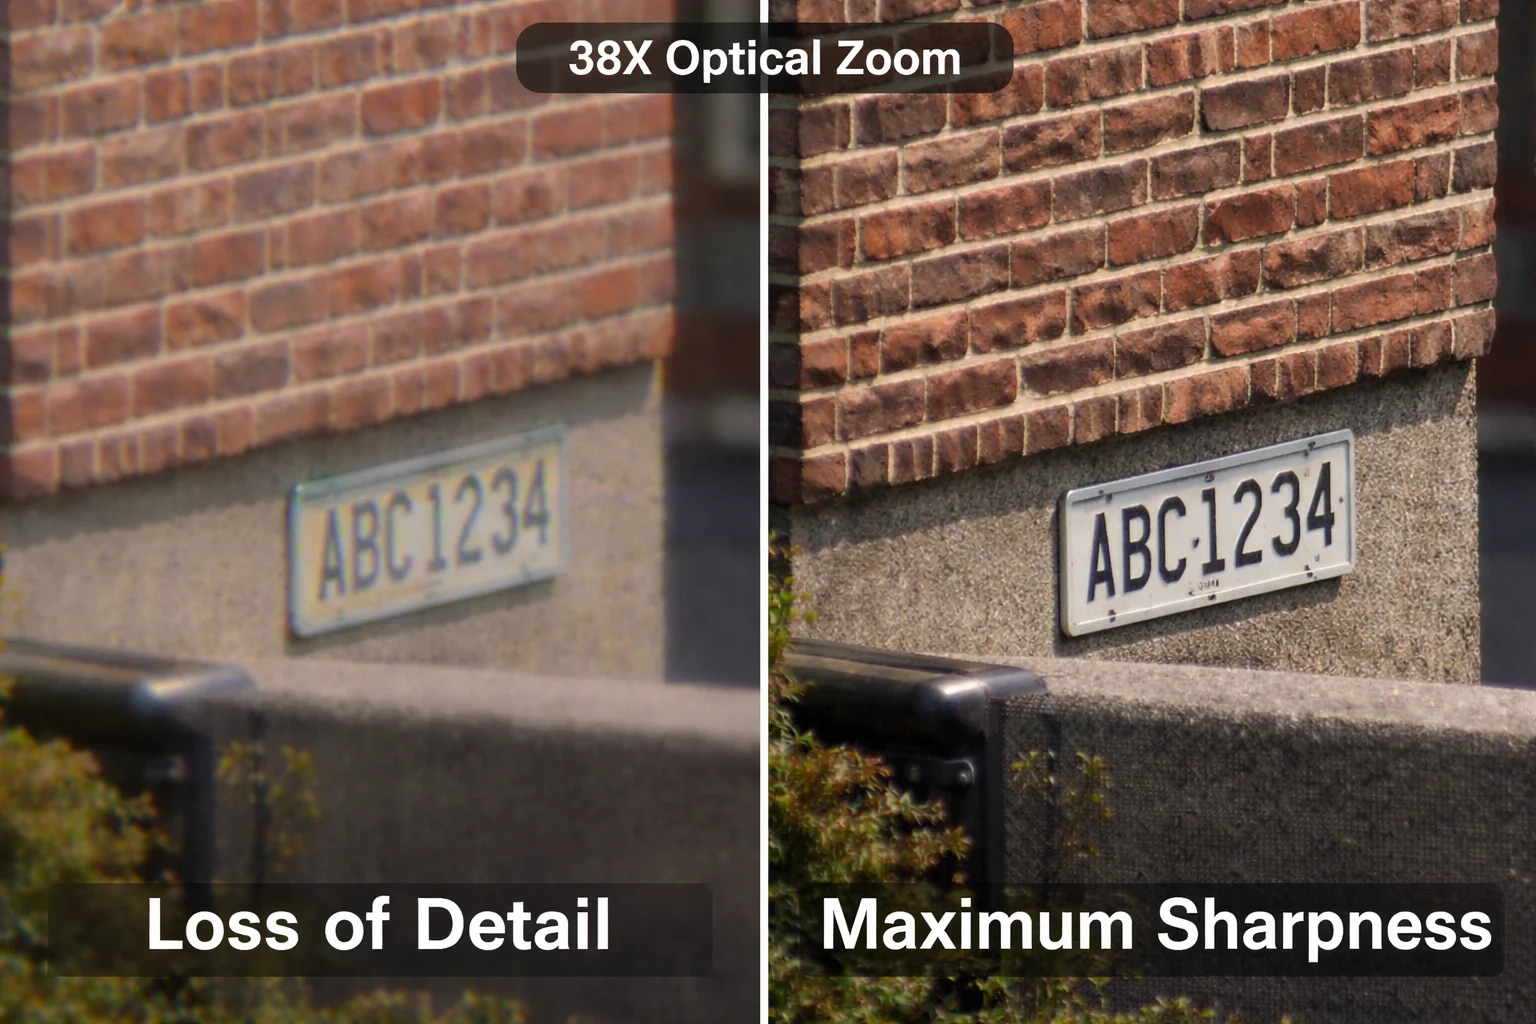
Yes, increasing the 3D DNR level will reduce perceived sharpness. The algorithm smooths out pixel-level variations to remove noise, but it also smooths out fine textures and edges. The higher you set it, the more detail you lose. This is a direct and unavoidable trade-off built into how temporal noise reduction works.
 3D DNR sharpness impact PTZ camera video quality
Understanding the Sharpness-Noise Trade-Off
Think of it this way. Noise is random pixel variation. Texture is also pixel variation — but it is structured and meaningful. A brick wall has a repeating pattern of light and dark pixels. Grass has fine, irregular detail. At a pixel level, these look similar to noise. When you push 3D DNR high, the algorithm becomes aggressive. It starts treating some real texture as noise and smooths it away. The result: the brick wall looks like a flat gray surface. The grass looks like a green smear.
This is not a defect. It is a fundamental limitation of all noise reduction algorithms. The question is always: how much detail loss is acceptable for your use case?
How to Compensate Without Losing Too Much
There are two main tools you can use alongside 3D DNR to recover some sharpness:
Sharpness Enhancement
Most cameras have a separate sharpness slider. After you set your DNR level, increase sharpness by 10–15 points to restore edge definition. Be careful — too much sharpness on a noisy image creates ugly artifacts. The order matters: reduce noise first, then sharpen.
2D DNR Instead of Higher 3D DNR
If you need to preserve fine detail (for example, reading text on a sign at 38X zoom), consider using more 2D DNR and less 3D DNR. 2D DNR works within a single frame and tends to preserve edges better, though it is less effective at removing temporal flicker. A balanced combination often gives you a cleaner result than relying on one method alone.
Real-World Impact on Zoomed-In Footage
This matters most when you are using high optical zoom. At 38X or 40X, you are already pushing the lens to its limit. Every pixel counts. If 3D DNR smears away 10–15% of your fine detail at that zoom level, you might lose the ability to read a license plate or identify a face. I have tested this in our lab: at 3D DNR level 80 and 38X zoom, small text on a sign at 200 meters becomes unreadable. At level 40, the same text is clear, even though there is visible grain in the dark areas of the frame.
The grain is cosmetically annoying, but the detail is operationally critical. For any deployment where identification is the goal, keep 3D DNR moderate and accept some noise.
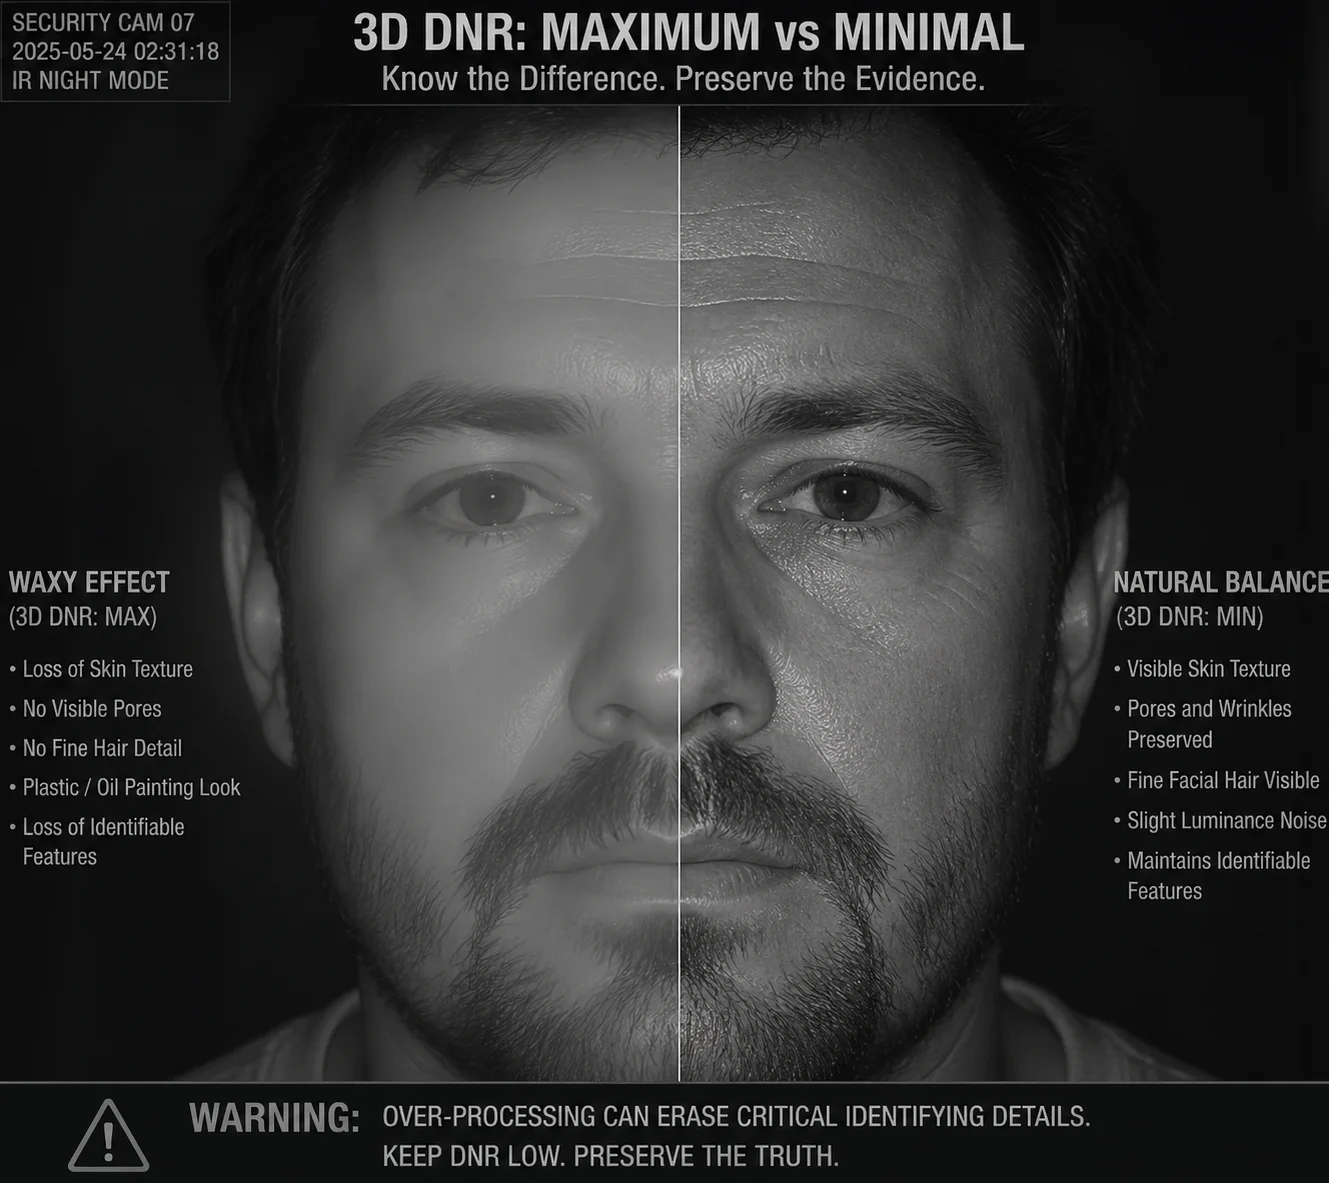
Why Does My Image Look “Waxy” When the 3D DNR Is Set to the Maximum Level?
That “waxy” or “plastic” look is the most common visual symptom of over-processing — and it is the reason I never recommend running 3D DNR at 100%.
The waxy appearance happens because maximum 3D DNR aggressively averages pixel values across many frames, erasing all fine texture and micro-contrast. Skin looks like smooth plastic. Walls lose their grain. Foliage turns into flat color blobs. The image becomes technically “clean” but visually unnatural and forensically useless for detail identification.
 Waxy image maximum 3D DNR over-processing PTZ camera
What Is Actually Happening at the Pixel Level
At maximum 3D DNR, the algorithm assigns very high confidence that any pixel variation between frames is noise. It averages aggressively — sometimes across 5 to 8 reference frames. This heavy temporal averaging produces an image where only large, high-contrast edges survive. Everything else gets blended into a smooth surface.
Here is a simple comparison:
| 3D DNR Level | Texture Retention | Noise Visibility | Motion Ghosting | Forensic Usability |
|---|---|---|---|---|
| 0 (Off) | 100% — all detail preserved | High — visible grain everywhere | None | High — but noisy |
| 40 – 50 (Medium) | 80–85% — minor softening | Low — grain mostly gone | Minimal at walking speed | Good — best balance |
| 80 – 90 (High) | 50–60% — noticeable loss | Very low — almost clean | Moderate — visible on fast objects | Reduced — fine detail missing |
| 100 (Maximum) | 30–40% — heavy loss | Near zero — perfectly clean | Severe — strong trails | Poor — faces and text smeared |
The “Oil Painting” Problem in Outdoor Scenes
This waxy effect is worst in outdoor scenes with natural textures. Trees, bushes, gravel roads, and grass all have complex, irregular detail. At maximum DNR, a forest scene looks like a digital oil painting. I have had clients call me saying their camera is broken because the image looks “fake.” It is not broken. It is just over-processed.
How to Fix It
The fix is straightforward:
- Open the camera’s Web UI.
- Go to Image Settings → Noise Reduction.
- Pull the 3D DNR slider down from 100 to around 50–60.
- Check the live preview. You should see texture return immediately.
- If you still see too much grain, increase 2D DNR slightly to handle the remaining spatial noise.
- Save the configuration.
When Maximum DNR Might Be Acceptable
There is one narrow use case where very high DNR is tolerable: completely static scenes with no people, no vehicles, and no forensic requirements. For example, monitoring the exterior wall of a building for structural changes over time. In that case, you do not need texture detail, and the storage savings from an ultra-clean image can be significant. But for any scene involving human activity, vehicles, or identification tasks, stay well below maximum.
Expert Mode: Going Beyond the Basic Slider
On Loyalty-Secu’s custom firmware for B2B clients, we open up advanced parameters beyond the simple 0–100 slider:
- Temporal Weight: Controls how many reference frames the algorithm uses and how heavily it weights them. Lower values reduce ghosting.
- Spatial Weight: Controls the single-frame smoothing component. Think of it as a pre-sharpening filter.
- Threshold Offset: Lets you target specific noise patterns from specific sensors (like the Sony IMX415 5‘s dark current noise) without affecting the entire image.
These parameters are available in the Expert Configuration Page of the Web UI. I recommend that integrators use them during the final commissioning phase, under real nighttime conditions, to dial in the exact balance their site needs.
Conclusion
3D DNR manual adjustment is essential — not optional — for any serious PTZ deployment. Lower it for moving targets, raise it for static scenes, and always save separate day and night profiles to get the best image quality around the clock.
1. Axis Communications guide to 3D noise reduction technology. ↩︎ 2. Technical comparison of 2D vs. 3D noise reduction methods. ↩︎ 3. How H.265 compression interacts with noise reduction settings. ↩︎ 4. Network Video Recorder integration for remote camera control. ↩︎ 5. Sony IMX415 sensor dark current noise characteristics. ↩︎ 6. Temporal noise reduction algorithm motion artifact analysis. ↩︎ 7. Photoresistor-based day/night switching for security cameras. ↩︎ 8. Bitrate savings from optimized noise reduction profiles. ↩︎ 9. H.265 vs H.264 compression efficiency for surveillance video. ↩︎ 10. Forensic image quality standards for legal evidence use. ↩︎“