
I wasted hours reviewing false alerts from birds and distant cars on a remote farm project. The fix was simple: target size filtering. It changed everything.
Yes, professional PTZ cameras support setting detection thresholds based on target size. You can configure the system to ignore any object smaller than a specific percentage of the frame (such as 2%), using either pixel ratio or absolute pixel values. This prevents false alerts from birds, distant vehicles, and other small-frame noise.
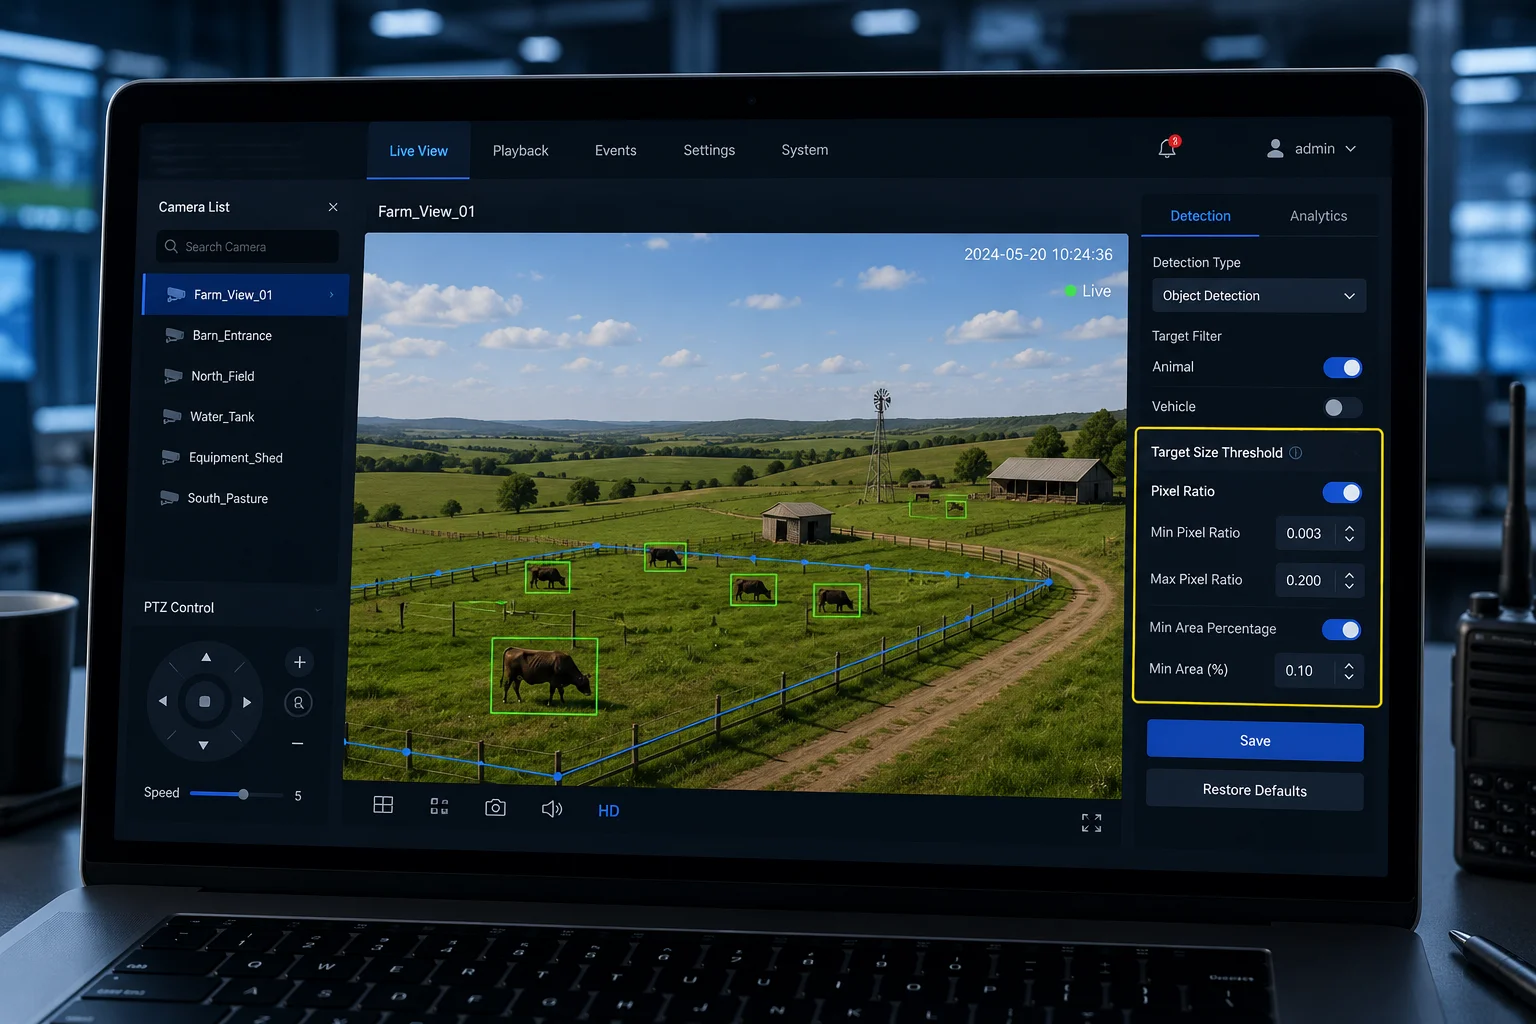 PTZ camera target size threshold settings
Below, I break down exactly how to use this feature. I cover bird alert prevention, calibration for distance, dynamic tracking as targets grow, and visual box selection tools. Each section gives you the technical detail you need to configure this correctly on your next deployment.
Table of Contents
Can I Prevent “Bird Alerts” by Ignoring Any Object That Occupies Less Than 2% of the Pixels?
I once had a client call me at 2 AM because his phone buzzed 47 times overnight. Every alert was a bird flying past the lens. That project taught me the value of minimum size filtering.
Yes, you can eliminate bird alerts by setting a minimum object size threshold below 2% of the frame. The AI engine calculates the bounding box of each detected object and compares it to total frame area. If the object is smaller than your threshold, the system discards it silently.
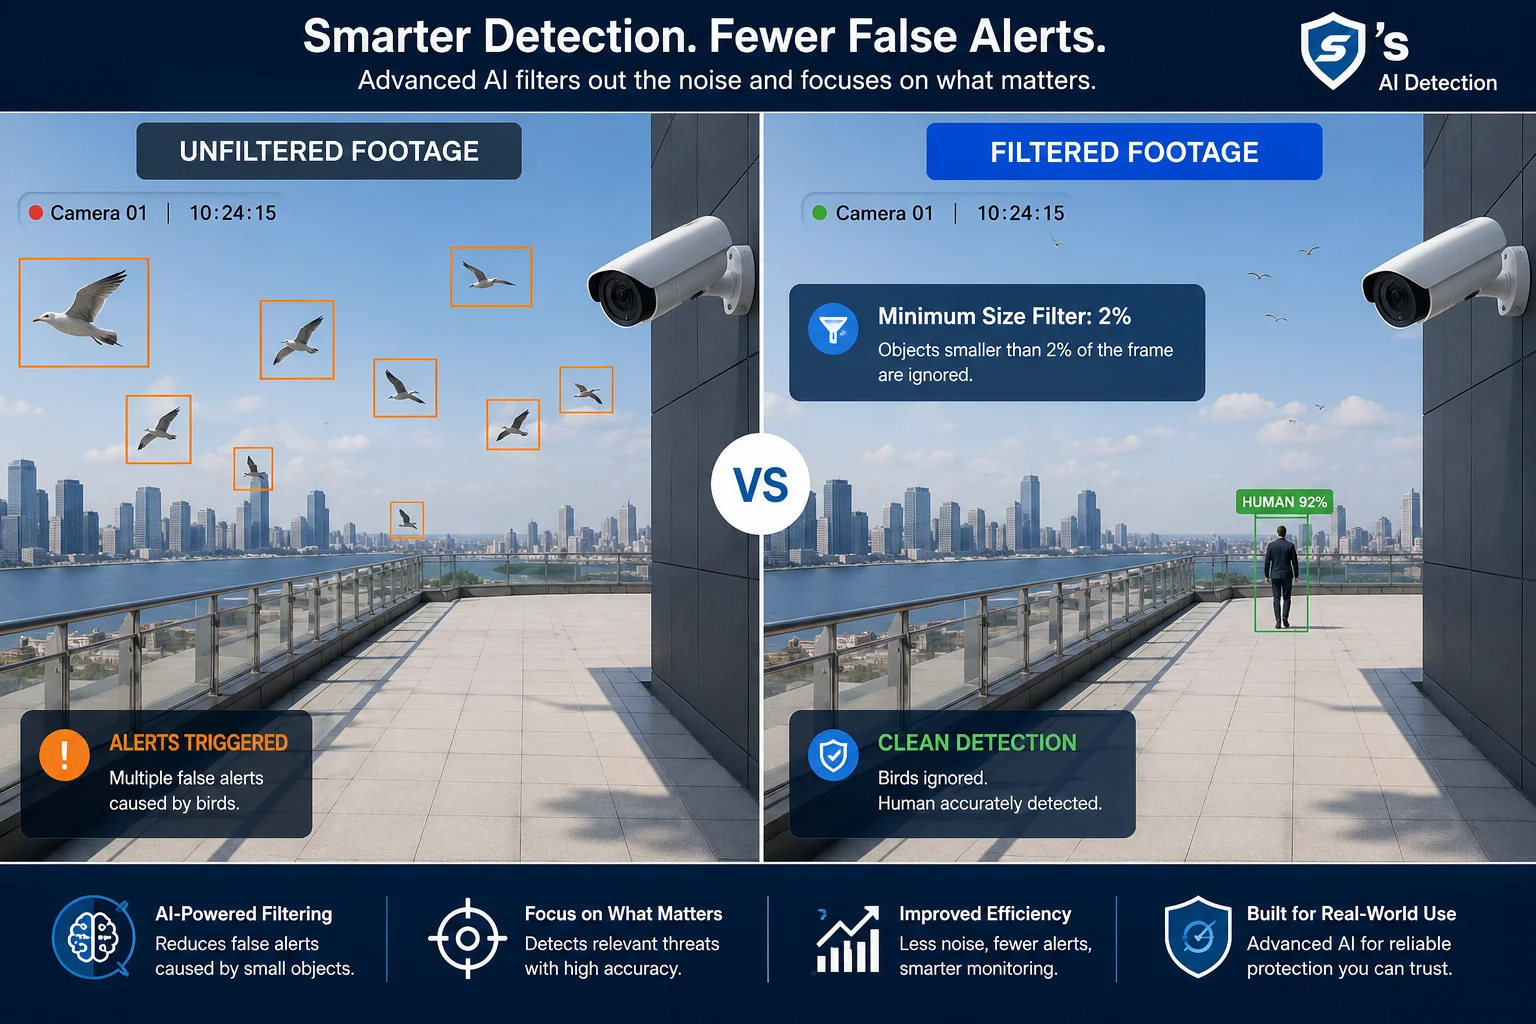 Minimum size filter bird alert prevention
How the Minimum Size Filter Works
The detection algorithm draws a rectangle around every moving object in each frame. This rectangle is called a bounding box. The system then calculates what percentage of the total image this box occupies. If the box is smaller than your set threshold, the system treats it as noise.
For example, a bird flying 10 meters from the camera might produce a bounding box that covers only 0.3% of a 4MP frame. A person walking at 30 meters might cover 3-5% of the same frame. By setting your threshold at 1.5% to 2%, you create a clear gap between “noise” and “real target.”
Why 2% Is a Good Starting Point
The 2% value works well for most perimeter security applications. Here is why. A standard 4MP image1 has roughly 8.3 million pixels. Two percent of that is about 166,000 pixels. A human body at 20-30 meters from the camera typically fills more than this area. Birds, insects, and distant traffic almost never reach this size.
But 2% is not a universal number. Your actual threshold depends on three things:
- Camera resolution
- Lens focal length
- Distance to the perimeter boundary
Configuration Options for Minimum Size Filtering
| Parameter | Range | Recommended Value | Use Case |
|---|---|---|---|
| Minimum area (%) | 0.1% – 50% | 1% – 2% | Filter birds, distant cars |
| Maximum area (%) | 10% – 100% | 70% – 80% | Filter lens obstructions |
| Detection sensitivity | Level 1 – 10 | Level 7 | Balance with size filter |
| Filter mode | Area / Diagonal | Area | General perimeter use |
What Happens to Filtered Objects
When an object falls below your threshold, the system does not simply delete it. You have options. In our firmware, you can configure the system to still record filtered objects to the SD card without sending a push notification. This means you keep video evidence of everything, but your phone only buzzes for real threats. For 4G solar deployments2, this saves both data and battery.
Diagonal-Based Filtering as an Alternative
Some objects change shape as they move. A person crouching looks very different from a person standing. Area-based filtering can fluctuate in these cases. Our advanced firmware offers diagonal-length filtering3 as an alternative. The diagonal of the bounding box stays more stable regardless of posture changes. This gives you more consistent detection of human targets even when they bend, crouch, or turn sideways.
How Do I Calibrate the “Minimum Object Size” to Match the Distance of My Perimeter?
I learned this the hard way on a Texas ranch project. The client set his threshold too high and missed a trespasser at 45 meters. Proper calibration would have caught it.
To calibrate minimum object size, have a person walk at your farthest alert boundary while you observe the live bounding box percentage on the web interface. Set your threshold 20-30% below that observed value to ensure no missed detections at maximum range.
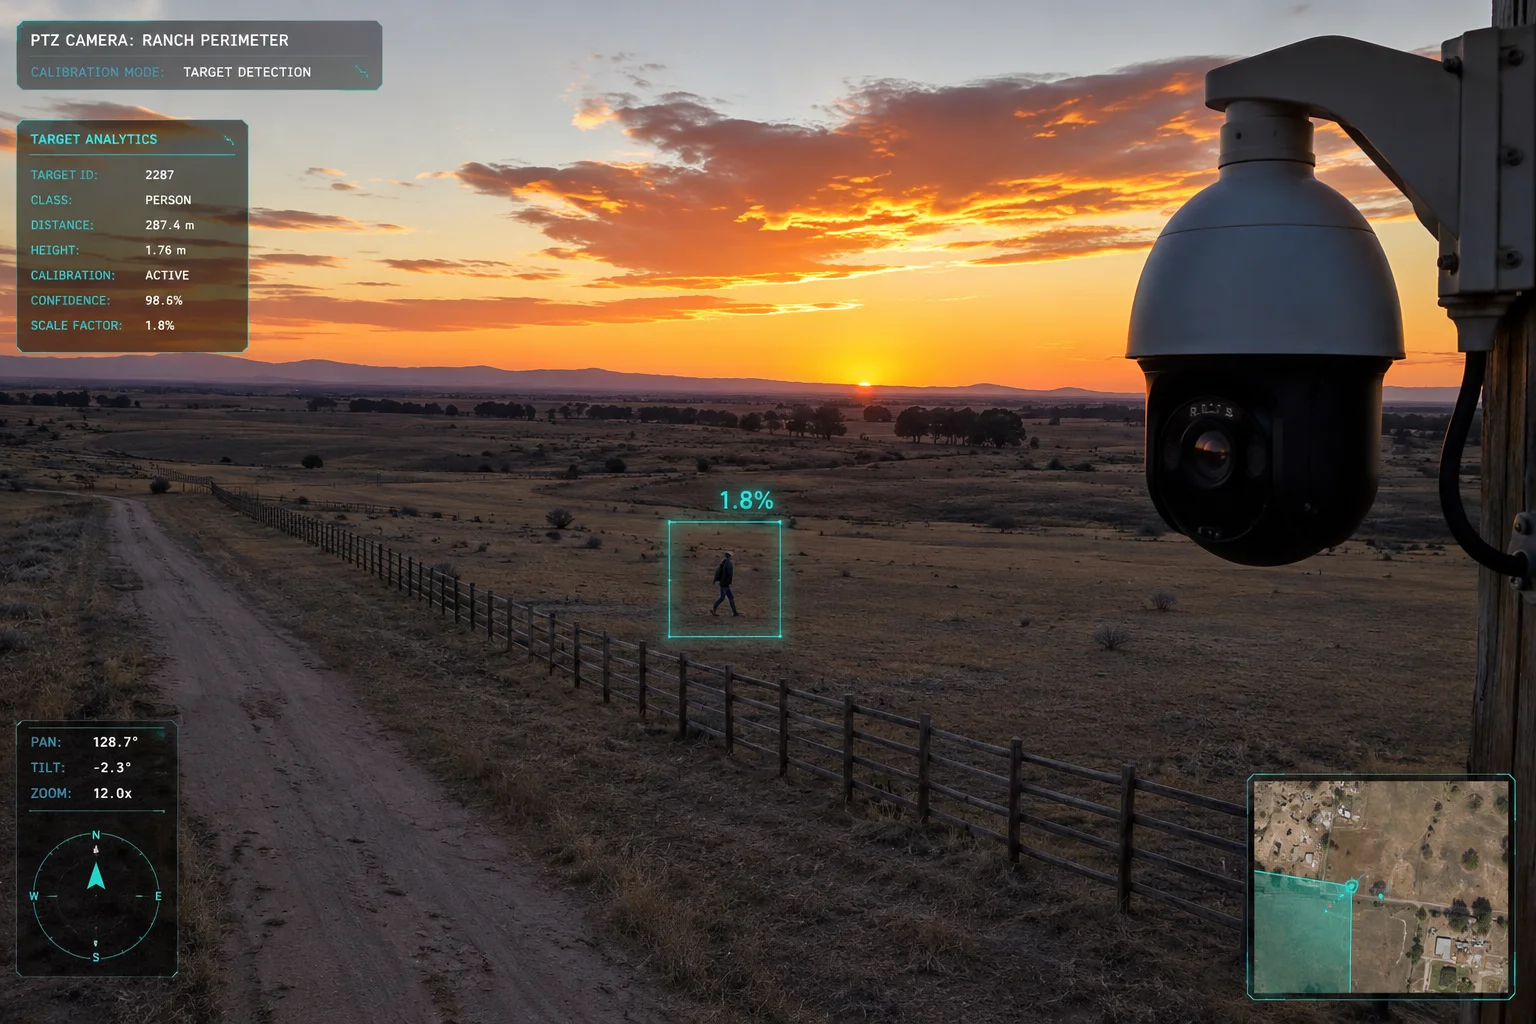 Calibrating minimum object size for perimeter distance
The Field Calibration Process
Calibration is not something you do from your desk. You need to be on-site with the camera installed at its final position. Here is the step-by-step process I recommend to every integrator:
- Mount the camera at its permanent location
- Open the web interface or SDK4 on your laptop
- Enable the real-time bounding box overlay
- Have a person walk along your farthest perimeter line
- Note the bounding box percentage displayed
- Set your threshold 20-30% below that number
For example, if a person at 50 meters shows a bounding box of 1.8%, set your threshold to 1.2% or 1.3%. This buffer accounts for smaller individuals, partial occlusion by vegetation, and varying lighting conditions.
Resolution Matters for Calibration
The percentage calculation is tied directly to your image resolution. If you calibrate at 4MP and later switch to 1080P, your threshold becomes invalid. The pixel density changes, which means the same person at the same distance produces a different percentage value.
| Resolution | Total Pixels | 2% Threshold (pixels) | Person at 30m (typical) |
|---|---|---|---|
| 4MP (2560×1440) | 3,686,400 | 73,728 | 3.2% – 4.5% |
| 1080P (1920×1080) | 2,073,600 | 41,472 | 2.8% – 3.9% |
| 5MP (2592×1944) | 5,038,848 | 100,777 | 2.5% – 3.8% |
Focal Length and Zoom Impact
A 38X optical zoom5 lens changes everything about size calculation. At wide angle, a person at 50 meters is tiny. Zoom in to 20X, and that same person fills a large portion of the frame. If your camera uses auto-zoom during tracking, the threshold must account for the starting zoom level — the level at which initial detection happens.
I always tell clients: calibrate at your default patrol zoom level. That is the zoom position where the camera sits when idle and scanning. Detection happens at this level first. Once the AI locks onto a target, the zoom increases for identification, but the initial trigger depends on the patrol position.
Environmental Factors That Affect Calibration
Wind causes vegetation to move. Rain creates streaks across the frame. heat shimmer6 distorts distant objects. All of these can affect bounding box calculations. I recommend calibrating during the worst expected conditions, not the best. If your site has tall grass that sways in wind, calibrate on a windy day. This ensures your threshold remains valid year-round.
Will the System Still Track a Far-Off Target as It Grows Larger While Approaching the Camera?
I had a client ask me this exact question last year. He worried that filtering small objects meant the system would never “pick up” a threat that starts far away. The answer surprised him.
Yes, the system continuously re-evaluates every moving object frame by frame. Once a filtered target grows beyond your minimum threshold as it approaches the camera, the AI immediately locks on and begins active tracking. No manual intervention is needed.
![]() Dynamic target tracking as object approaches camera
Dynamic target tracking as object approaches camera
Frame-by-Frame Re-Evaluation
The AI processor does not make a one-time decision about each object. It runs detection on every single frame — typically 15 to 30 times per second. Each frame is a fresh evaluation. So when a person appears at 100 meters and registers as only 0.5% of the frame, the system notes the motion but does not alert. As that person walks closer, the bounding box grows. The moment it crosses your 2% threshold, the system triggers.
This process is seamless. There is no delay between crossing the threshold and triggering the alert. The transition from “filtered noise” to “active target” happens within one frame cycle — roughly 33 to 66 milliseconds.
The Tracking Handoff Sequence
Here is what happens technically when a target crosses the threshold:
- Pre-threshold phase: Object detected, bounding box calculated, size below threshold. System logs motion but does not alert. SD card records silently if configured.
- Threshold crossing: Bounding box exceeds minimum size. AI classifier runs (human/vehicle/animal). If classification matches your alert categories, the system triggers.
- Active tracking phase: PTZ motor engages. Camera follows the target. Zoom increases for identification. 4G push notification sent to app.
Why This Design Saves Battery and Data
For solar-powered 4G systems, this approach is critical. Every push notification costs data. Every PTZ motor7 movement costs power. By filtering small objects, you avoid hundreds of unnecessary motor activations per day. The camera stays still, consuming minimal power, until a real target crosses the threshold. Then it activates fully.
I have seen this reduce daily power consumption by 40-60% on remote solar installations. That means smaller solar panels, smaller batteries, and lower total project cost for your clients.
Combining Size Filtering with Zone Detection
For maximum accuracy, combine size filtering with detection zones. Draw a zone around your perimeter fence. Set the minimum size to 1.5%. Now the system only alerts when an object larger than 1.5% appears inside your drawn zone. This double-layer filtering virtually eliminates false alerts while catching every legitimate intrusion.
Does the App Allow for a Visual “Box Selection” to Define the Target Size Threshold?
I remember the first time I showed a client the box selection tool. He had been typing pixel values manually for weeks. When he saw he could just draw two boxes on screen, he said it was the feature he never knew he needed.
Yes, the web interface and mobile app both support visual box selection. You draw a small rectangle representing your minimum target size and a large rectangle representing your maximum target size directly on the live video feed. The system automatically converts these visual selections into pixel threshold values.
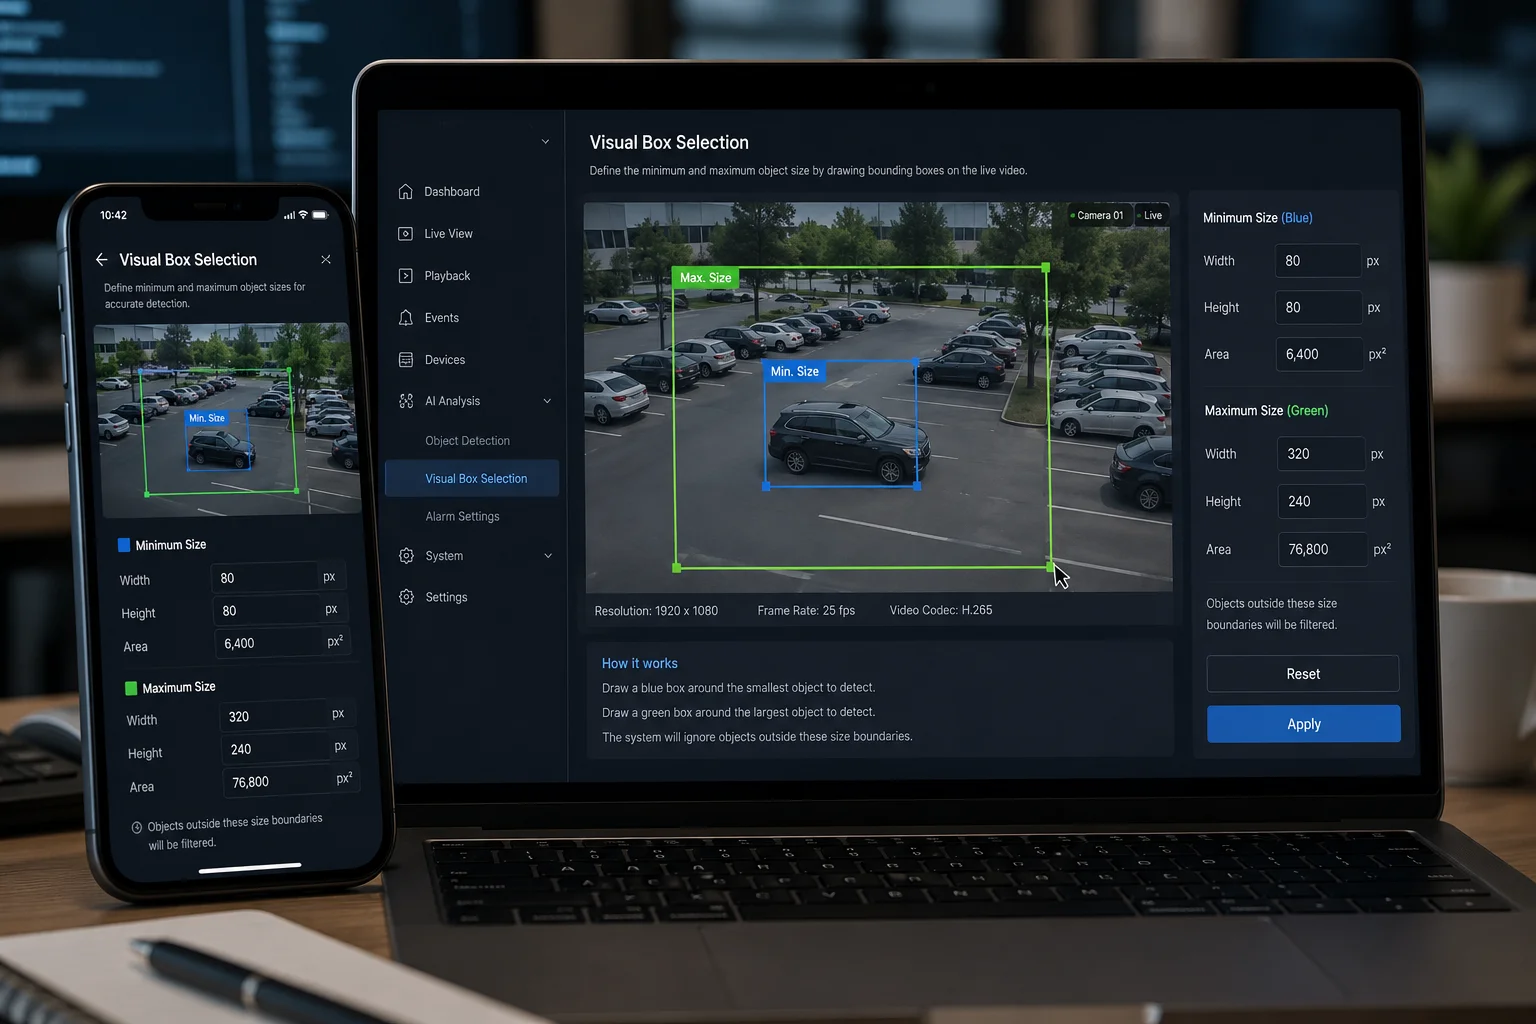 Visual box selection interface for target size
How Visual Box Selection Works
Instead of calculating percentages manually, you simply draw on the screen. The interface shows your live camera feed. You use your mouse or finger to draw a small box — this represents the smallest object you want to detect. Then you draw a larger box — this represents the largest valid target. Anything outside these two boundaries gets filtered out.
The firmware reads the pixel dimensions of your drawn boxes and converts them into threshold values automatically. This is far more intuitive than entering numbers. You can see exactly what size object will trigger an alert because you are drawing it right on top of the actual scene.
Step-by-Step Box Selection Process
Here is how I walk clients through this:
- Log into the camera web interface
- Navigate to AI Detection Settings
- Select “Size Filter” or “Object Size”
- Click “Draw Minimum Size”
- Draw a box on the video that matches the smallest target you want to catch (for example, draw a box the size of a person at your farthest perimeter point)
- Click “Draw Maximum Size”
- Draw a box representing the largest valid target
- Save and test
Advantages Over Manual Number Entry
| Method | Accuracy | Ease of Use | Calibration Time | Error Risk |
|---|---|---|---|---|
| Manual percentage entry | High | Low | 30-60 min | High (typos, miscalculation) |
| Visual box selection | High | High | 5-10 min | Low (what you see is what you get) |
| Diagonal pixel entry | Medium | Low | 20-40 min | Medium |
Remote Configuration via 4G
For 4G-connected cameras in remote locations, you can perform box selection remotely through the cloud platform8. You do not need to be on-site after initial installation. If conditions change — say a new fence is built closer to the camera — you can redraw your size boxes from your office. The camera applies the new settings immediately.
This is a major advantage for integrators managing dozens or hundreds of remote sites. You adjust thresholds without sending a technician. No truck roll. No travel cost. Just log in, redraw, and save.
Combining Box Selection with AI Classification
The size filter works alongside AI classification9. Even if an object passes the size threshold, it still must pass the AI classifier. So if a large tumbleweed blows through your zone and exceeds 2% of the frame, the AI classifier identifies it as “not human” and “not vehicle.” No alert fires. This dual-layer approach — size filtering plus AI classification — gives you the lowest possible false alarm rate while maintaining high detection sensitivity for real threats.
Conclusion
Target size filtering is one of the most effective tools for reducing false alerts in remote PTZ surveillance. Set your minimum threshold through visual box selection, calibrate on-site, and let the AI handle the rest. If you need help configuring this for your specific project, reach out to me at sales05@.com.
1. Explanation of 4MP resolution and its impact on image quality and pixel density. ↩︎ 2. Overview of solar-powered 4G surveillance systems and their power management challenges. ↩︎ 3. Technical description of diagonal-based object size filtering used in advanced security cameras. ↩︎ 4. What a software development kit is and how it enables custom integration. ↩︎ 5. Detail on optical zoom ratios and their effect on surveillance capabilities. ↩︎ 6. Explanation of how atmospheric turbulence and heat shimmer distort long-range imaging. ↩︎ 7. How PTZ motors operate and their power consumption implications. ↩︎ 8. Overview of cloud-based camera management and remote configuration capabilities. ↩︎ 9. Explanation of AI-based image classification used in modern surveillance. ↩︎