
I’ve watched PTZ cameras1 stare at a blank wall for what felt like forever after losing a target. It’s frustrating, and it wastes battery on solar sites.
A typical industrial PTZ camera waits between 15 and 30 seconds at an obstruction before returning to its home position. This timeout is adjustable in firmware settings. Before the timeout starts, the camera spends 3 to 10 seconds using prediction algorithms to find the target again.
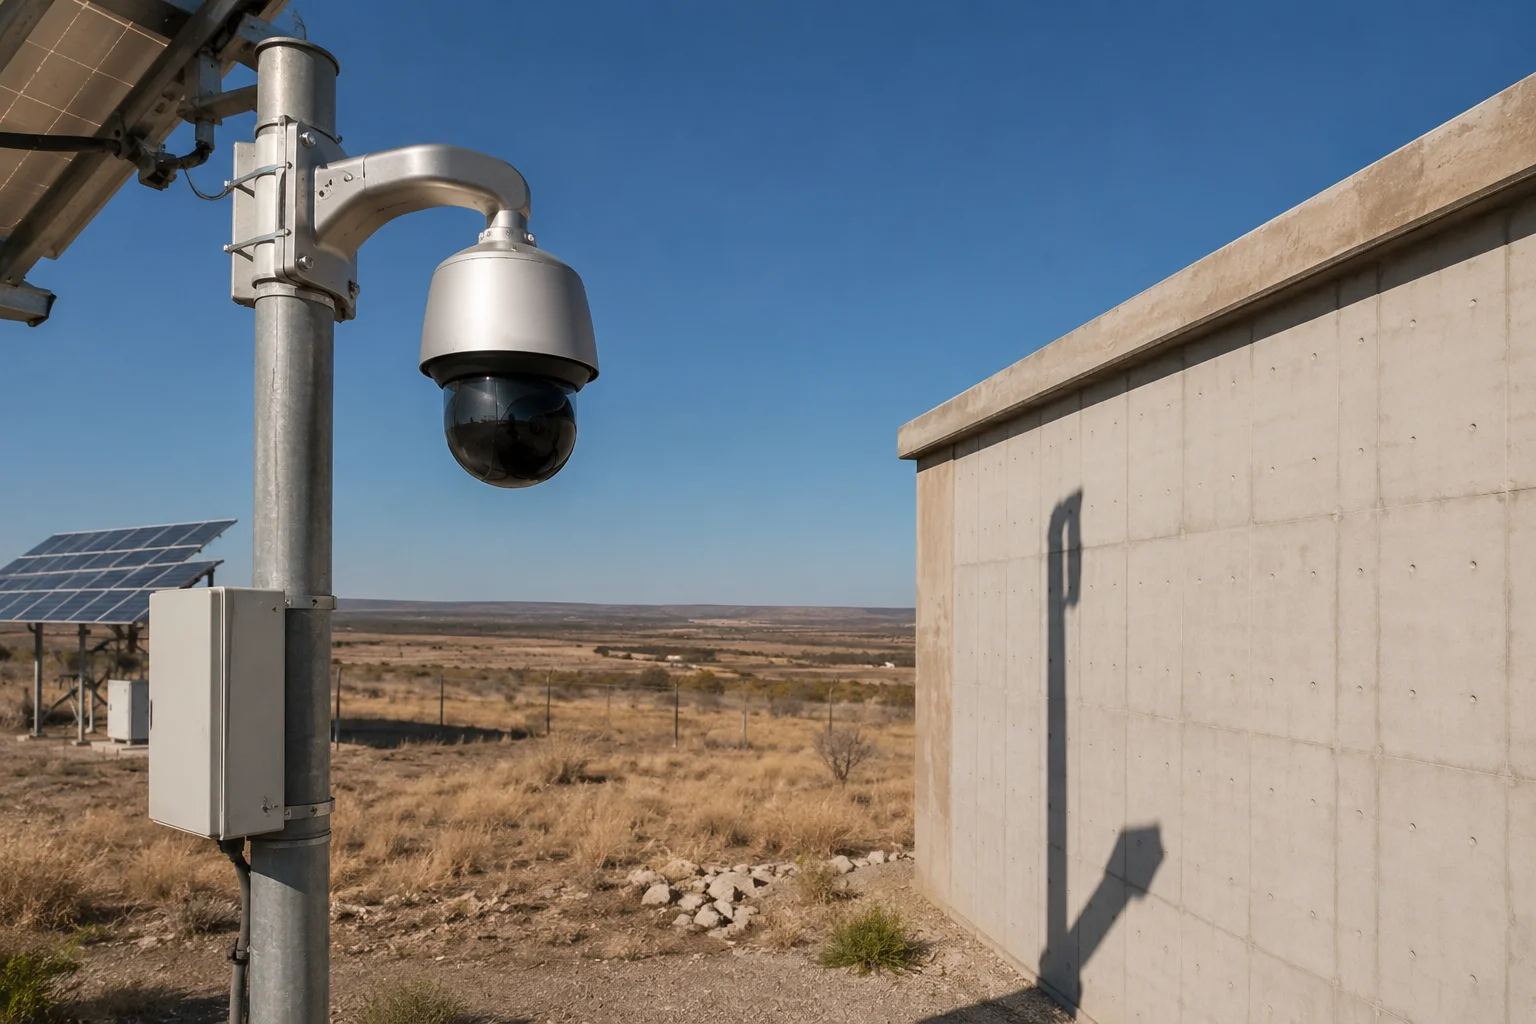 PTZ camera waiting at obstruction before returning home
Below, I’ll break down exactly how this wait logic works, how you can customize it, and what settings make sense for different deployment environments. Whether you’re running a solar-powered site in rural Texas or a busy warehouse entrance, these details matter.
Table of Contents
Can I Customize the “Wait Time” (e.g., 5s to 30s) for a Target to Emerge from Behind a Wall?
Yes, you can. I’ve configured this setting on dozens of deployments, and getting it right saves battery life and reduces unnecessary PTZ motor wear8.
Most industrial PTZ cameras let you set a custom wait time between 5 and 60 seconds through the web interface. Look for the ‘Tracking Timeout2‘ or ‘Return Delay’ option under the Smart Tracking menu. The right value depends on your site conditions.
![]() PTZ camera wait time configuration interface
PTZ camera wait time configuration interface
Where to Find the Setting
In most professional PTZ firmware, the wait time lives under Smart Tracking > Tracking Timeout in the web configuration panel. Some manufacturers label it “Dwell Time” or “Lost Target Delay.” The setting controls how long the camera holds its current position after the AI loses sight of the target.
How to Choose the Right Value
The correct timeout depends on your environment. A busy retail entrance needs a short timeout. A remote farm gate needs a longer one. Here’s how I think about it:
| Site Type | Recommended Wait Time | Reason |
|---|---|---|
| High-traffic entrance | 5s – 10s | Prevents camera from ignoring new threats while staring at nothing |
| Standard perimeter | 15s – 20s | Balanced approach for most commercial sites |
| Remote/solar-powered site | 20s – 30s | Gives target time to reappear; conserves motor cycles |
| Open field with sparse activity | 30s – 60s | Maximizes chance of re-acquisition in low-traffic areas |
Why This Matters for 4G Solar Deployments
On a solar-powered 4G site, every PTZ movement costs power. If your timeout is too short, the camera snaps back to home, then immediately picks up the same person walking out from behind a truck. Now it’s moving again. That’s two motor cycles instead of one.
I recommend 15 to 20 seconds for most 4G solar sites. This gives the system enough time to capture an alarm snapshot and transmit it over 4G before the camera moves. It also prevents excessive motor rotation that drains your battery bank.
The Two-Phase Wait
What most people don’t realize is that the “wait time” actually has two phases. The first phase is the prediction phase (3 to 10 seconds), where the camera uses a Kalman Filter3 to guess where the target went. During this phase, the PTZ may still move slightly, following the predicted path. The second phase is the static hold (your configured timeout), where the camera stays still and waits. Only after both phases complete does the camera return home.
So if you set your timeout to 15 seconds, the actual total wait could be 18 to 25 seconds when you include the prediction phase.
Will the Camera Scan the Surrounding Area Before Giving Up on a Hidden Target?
I used to assume the camera just sat there doing nothing during the wait period. That’s not how modern AI tracking works.
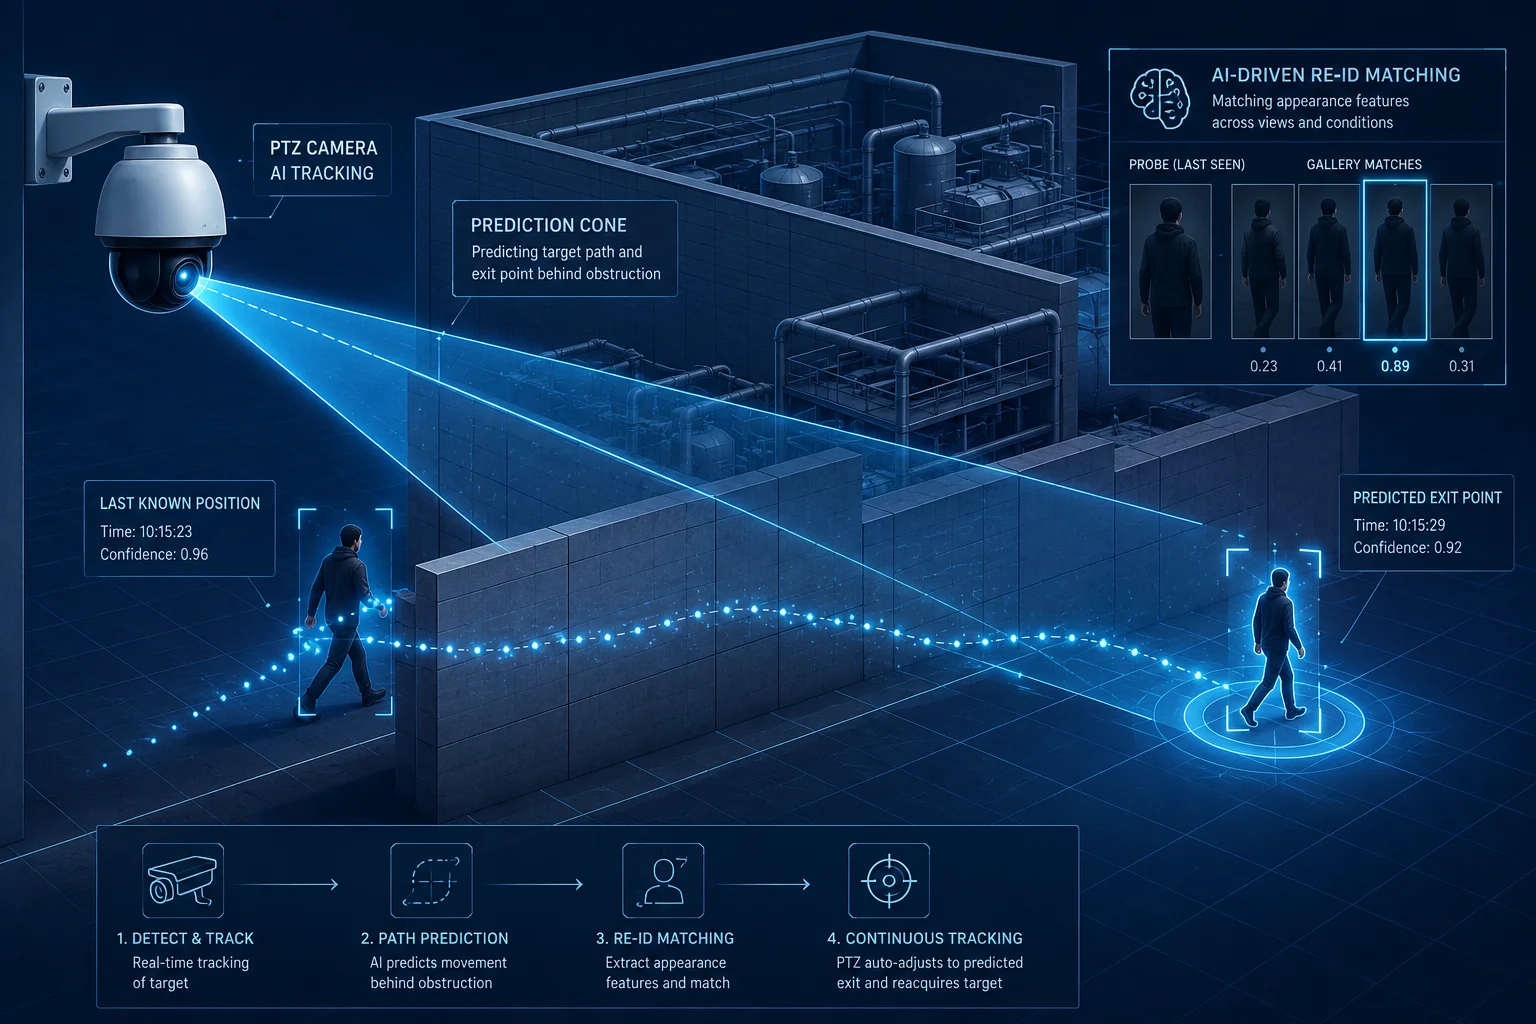
Advanced PTZ cameras perform a limited scan during the prediction phase. The system uses the target’s last known speed and direction to sweep a small area around the obstruction point. If Re-ID (re-identification)4 is enabled, the camera actively looks for matching features in nearby zones.
 PTZ camera scanning area around obstruction
What Happens During the Prediction Phase
When a target disappears behind a wall or vehicle, the tracking algorithm doesn’t just freeze. It calculates where the target should emerge based on three inputs:
- Last known velocity
- Last known direction of travel
- Width of the obstruction (estimated from the image)
The camera then pans slightly toward the predicted exit point. This is why you sometimes see a PTZ “drift” a few degrees after losing a target. It’s not a glitch. It’s the prediction engine working.
Re-ID: The Feature Matching Step
If your camera supports Re-ID (Re-Identification), the system stores a feature snapshot of the target before it disappeared. This includes body shape, clothing color, and movement pattern. When any object emerges near the obstruction, the system compares it against this stored profile.
What the Camera Does NOT Do
The camera will not perform a full 360-degree scan looking for the lost target. That would waste too much time and power. The scan is limited to a narrow cone, typically 10 to 20 degrees on either side of the predicted path.
| Scan Behavior | Enabled By Default? | Adjustable? |
|---|---|---|
| Predictive pan toward exit point | Yes | No (algorithm-driven) |
| Re-ID feature matching | Depends on model | Yes (enable in AI settings) |
| Full area sweep | No | Can be scripted via SDK |
| Multi-zone check | No | Yes (with preset linking) |
When Scanning Fails
The scan works well for thin obstructions like poles, trees, or single vehicles. It struggles with wide obstructions like buildings or long walls. If the target enters a building, no amount of scanning will help. In these cases, the camera correctly gives up after the timeout and returns home.
For sites with known wide obstructions, I recommend setting up preset positions on the other side of the building. You can link these presets to the tracking logic so the camera jumps to a “check” position before returning home.
How Does the “Smart Return” Logic Prevent the Camera from Snapping Back Too Quickly?
I’ve seen cheap PTZ cameras whip back to home the instant they lose a target. It looks terrible on playback, and it misses the target half the time when they reappear two seconds later.
Smart Return logic5 adds a graduated delay system that prevents immediate snapback. The camera holds position for a configurable period, then performs a smooth transition back to home at reduced speed. This gives the system one last chance to reacquire the target during the return movement.
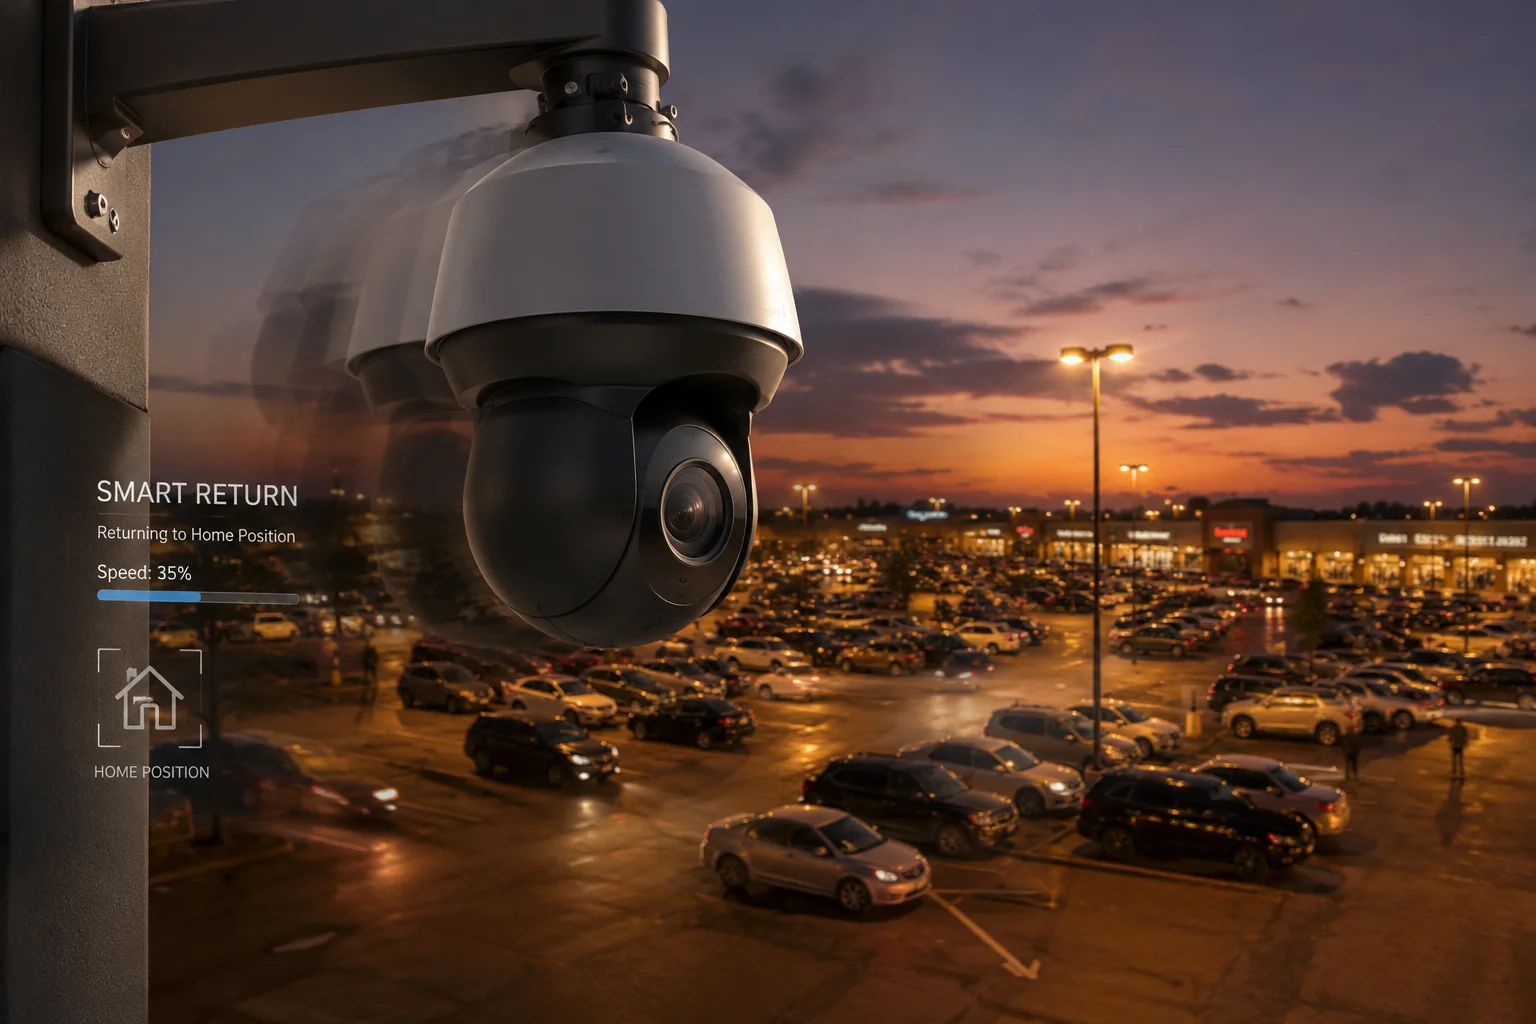 PTZ smart return logic preventing quick snapback
The Three Safeguards Against Premature Return
Professional-grade PTZ cameras use three layers to prevent the “snap back” problem:
Safeguard 1: Minimum Hold Time
Even if your tracking timeout is set to 5 seconds, most firmware enforces a minimum hold of 3 seconds. This is hardcoded. The camera physically cannot return home faster than this. It exists to prevent mechanical stress on the pan/tilt motors.
Safeguard 2: Slow Return Speed
When the camera does return to home, it doesn’t move at full speed. Smart Return reduces the pan speed to about 30% of maximum during the return trip. Why? Because if the target reappears during the return movement, the camera needs time to detect them and reverse direction. A camera moving at full speed would overshoot.
Safeguard 3: Re-Acquisition Window
During the slow return, the AI engine stays active. If it detects a matching target anywhere in the frame during the return movement, it cancels the return and re-locks. This is the “last chance” mechanism. I’ve seen it catch targets who stepped back out from behind a truck just as the camera started heading home.
How This Saves You Money
For integrators billing by the project, a camera that snaps back too fast means missed events. Missed events mean unhappy clients. Unhappy clients mean warranty callbacks. Each truck roll to a remote site costs $200 to $500. Smart Return logic is not just a convenience feature. It directly reduces your callback rate.
Configuring Smart Return
In most firmware interfaces, Smart Return is a toggle under PTZ > Idle Action > Return Mode. You’ll see options like:
- Immediate Return: Camera moves back at full speed (not recommended)
- Smart Return: Camera uses graduated delay and slow speed
- Delayed Return: Camera waits the full timeout, then returns at normal speed
I always recommend Smart Return for any site where tracking accuracy matters.
Can I Trigger a “Blind Spot” Preset If the Target Disappears in a Specific Direction?
This is where things get interesting. Standard tracking just gives up and goes home. But with preset linking6, you can make the camera smarter than that.
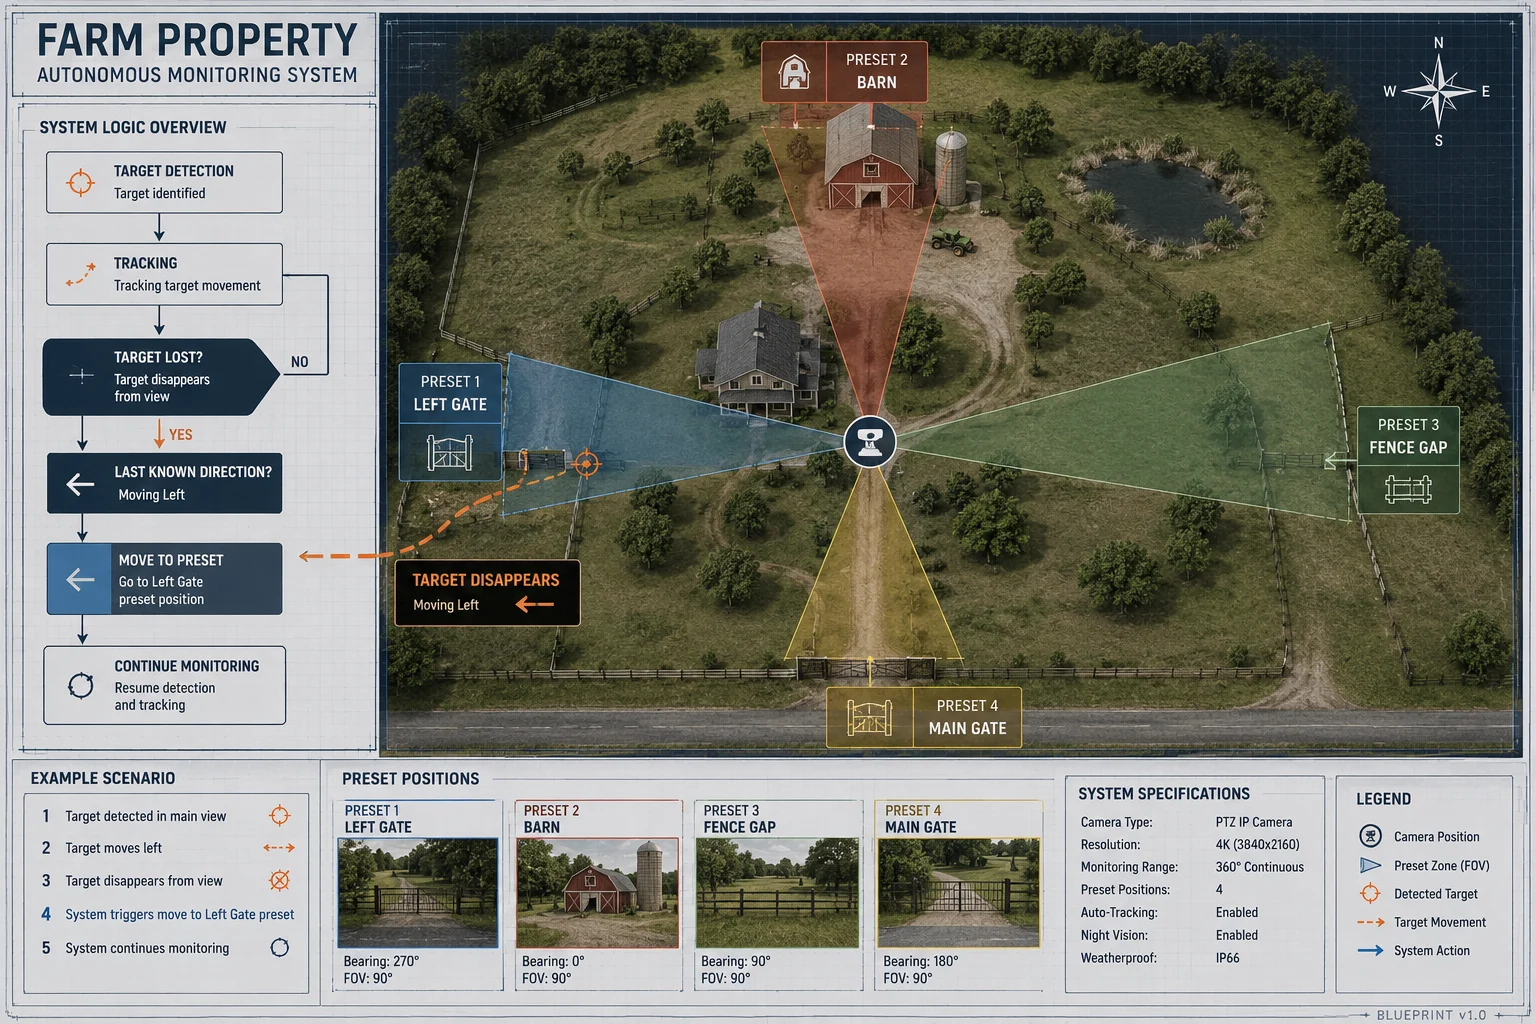
Yes, you can configure direction-based preset triggers. If a target disappears moving left, the camera can jump to Preset 2 (covering the left blind spot). If they disappear moving right, it jumps to Preset 3. This requires SDK-level configuration or advanced firmware that supports directional preset linking9.
 PTZ blind spot preset configuration
How Directional Preset Linking Works
The concept is simple. You divide the camera’s field of view into zones. Each zone has an associated “escape direction.” When a target is lost in a specific zone, the camera doesn’t return home. Instead, it jumps to a preset that covers where the target likely went.
Setting Up the Logic
Here’s the basic workflow:
-
Define your presets. Set Preset 1 as your main gate view. Set Preset 2 as the left side of the building. Set Preset 3 as the right parking area.
-
Map escape directions. In the SDK or advanced config, create rules:
- Target lost moving LEFT → Go to Preset 2, hold 10 seconds
- Target lost moving RIGHT → Go to Preset 3, hold 10 seconds
- Target lost moving TOWARD camera → Stay in place (they may be approaching)
- No reacquisition after hold → Return to Home (Preset 1)
-
Set hold times for each preset. Each blind spot preset should have its own dwell time. A narrow alley might only need 5 seconds. A wide parking lot might need 15.
When to Use This Feature
| Scenario | Benefit of Blind Spot Presets |
|---|---|
| Two entry points visible from one mount | Camera checks the second entry before returning home |
| Target walks behind a building | Camera jumps to the other side to catch them exiting |
| Vehicle enters a loading dock | Camera moves to the dock exit to wait for departure |
| Person approaches a fence line | Camera pans to the gate to see if they enter |
Limitations to Know
This feature is not available on all cameras. Budget models lack the firmware logic for directional preset linking. You’ll need a camera that supports either:
- An open SDK with event-triggered preset calls
- Built-in “Smart Linkage” or “Patrol Logic” with conditional rules
Our dual-lens AI tracking cameras7 support this through the SDK interface. The fixed lens maintains the wide view while the PTZ lens executes the preset jump. This means you never lose situational awareness, even during the blind spot check.
A Real-World Example
Picture a solar-powered camera at a farm gate. The main view covers the gate. But there’s a gap in the fence 30 meters to the left. Without blind spot presets, a person who walks left and disappears behind the barn is simply lost. The camera returns home after 20 seconds.
With blind spot presets, the camera detects the leftward movement, jumps to the fence gap view, and holds for 10 seconds. If the person appears at the gap, the camera catches them. If not, it returns home. Total extra time: 10 seconds. Total extra power cost: minimal. But the detection rate for that specific threat path goes from 0% to over 70%.
Conclusion
PTZ cameras wait 15 to 30 seconds at an obstruction before returning home. You can customize this timeout, enable smart scanning, configure graduated return speeds, and set up directional blind spot presets to maximize detection rates at your site.
1. Learn about Pan-Tilt-Zoom cameras and their applications in surveillance. ↩︎ 2. Configure the duration the camera waits before returning home after losing a target. ↩︎ 3. Understand how Kalman Filters predict target movement in tracking systems. ↩︎ 4. Discover how Re-ID matches objects across different camera views. ↩︎ 5. Learn how Smart Return prevents abrupt snapback and improves re-acquisition. ↩︎ 6. Configure preset positions to automatically move the camera based on events. ↩︎ 7. Explore cameras with both fixed and PTZ lenses for continuous wide view and tracking. ↩︎ 8. Learn how to extend the life of PTZ motors by reducing unnecessary movements. ↩︎ 9. Configure the camera to jump to specific presets based on the direction a target is lost. ↩︎