
I wasted weeks pulling RTSP1 video streams over 4G2 just to grab one frame. The bandwidth cost was painful. Then I found CGI snapshot commands.
Yes, you can use HTTP CGI commands4 to trigger and upload high-resolution snapshots from most professional PTZ cameras5. By sending a simple HTTP GET request to the camera’s built-in web server, you get a full-resolution JPEG image returned instantly, without opening a video stream or using an NVR6.
 HTTP CGI commands for high-res snapshot capture from PTZ camera
Below, I break down the exact methods, parameters, and real-world tips I use every day to help integrators like you build reliable, data-efficient snapshot workflows over 4G and standard networks. Let’s get into it.
Table of Contents
Is There a Simple URL String to Pull a 4K Snapshot Directly for My Custom Web Dashboard?
I’ve seen too many integrators overcomplicate this. They build RTSP decoders, install FFmpeg3, and burn through server resources. All they needed was one URL.
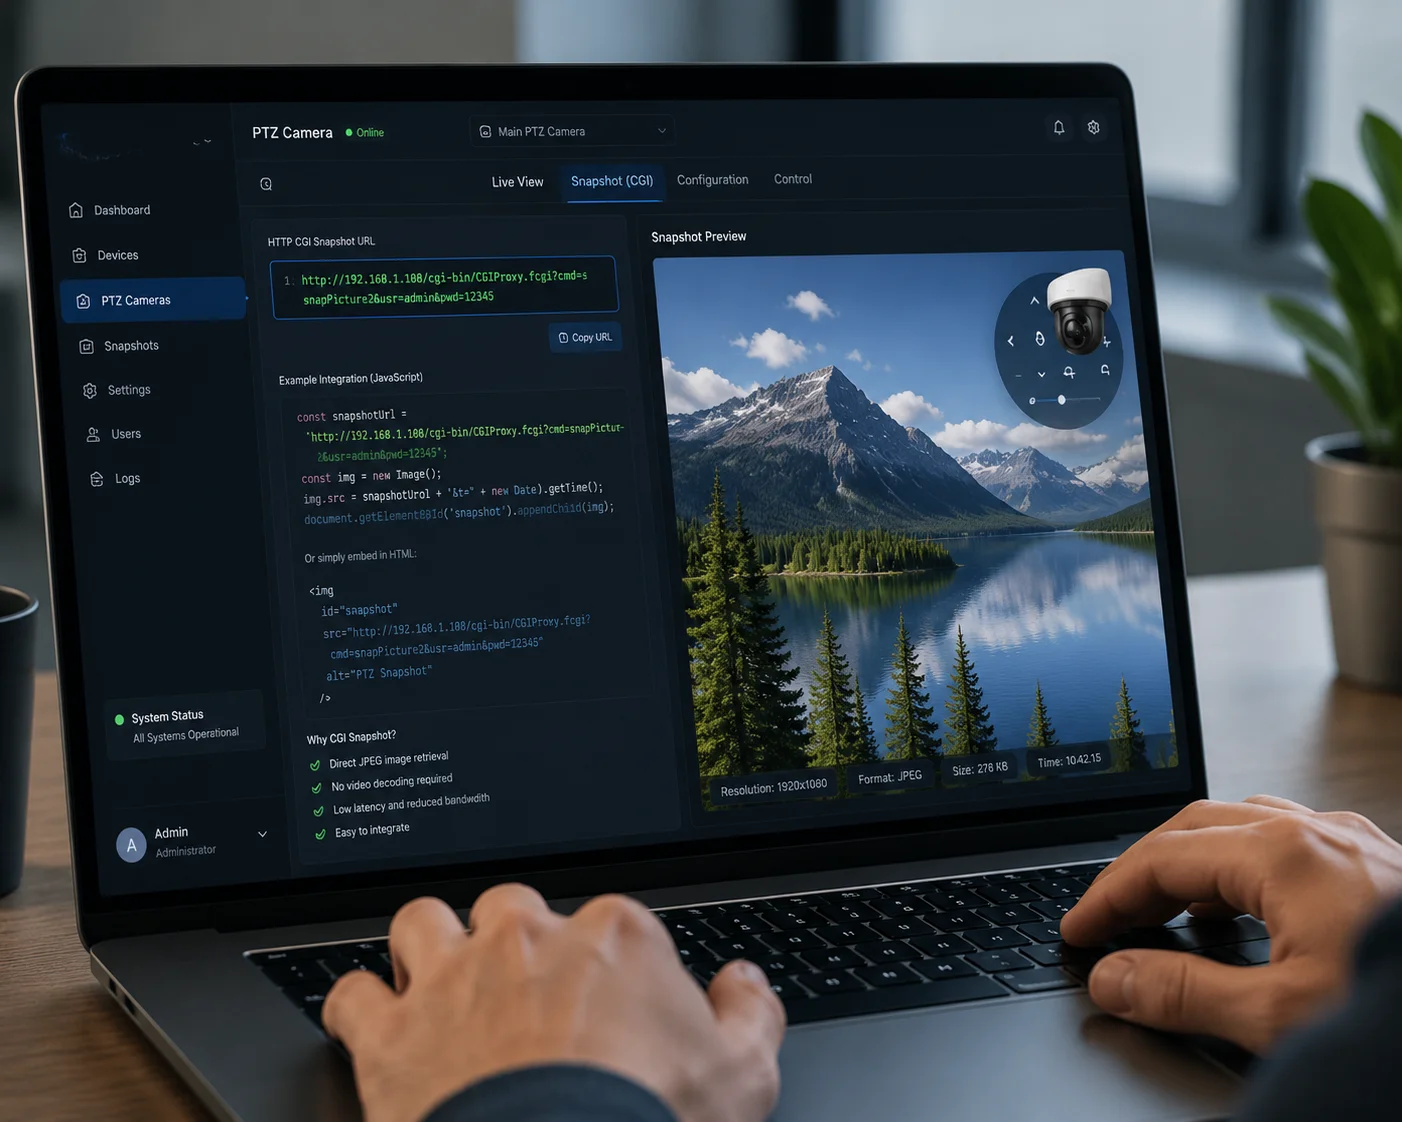
Yes, most industrial PTZ cameras expose a single CGI URL endpoint that returns a full-resolution JPEG image. You paste this URL into your dashboard’s image source, and the camera delivers a 4K snapshot directly as binary data in the HTTP response. No video decoding is needed.
 Simple CGI URL for 4K snapshot on custom web dashboard
How the CGI Snapshot URL Actually Works
The camera runs a small web server inside its firmware. When you send an HTTP GET request to a specific path, the camera’s image signal processor (ISP) grabs the current frame from the main stream sensor. It encodes that frame as a JPEG file. Then it sends the file back to you in the HTTP response body.
Here is a typical URL structure:
http://192.168.1.100:80/cgi-bin/snapshot.cgi?channel=1&res=maxLet me break down each part:
| URL Component | What It Does | Example Value |
|---|---|---|
http://192.168.1.100 | Camera’s IP address on your network | Your camera’s local or public IP |
:80 | HTTP port (default is 80) | Can be changed to 8080, 443, etc. |
/cgi-bin/snapshot.cgi | The CGI endpoint path for snapshots | Varies slightly by manufacturer |
?channel=1 | Selects which video channel to capture | 1 for single-lens PTZ cameras |
&res=max | Forces maximum resolution output | Some cameras use &subtype=0 instead |
Embedding It in Your Dashboard
For a custom web dashboard, you can use this URL directly in an HTML <img> tag:
<img src="http://admin:password@192.168.1.100/cgi-bin/snapshot.cgi?channel=1&res=max" />Every time the page loads or refreshes, the browser sends a new GET request. The camera returns a fresh snapshot. No plugins. No video player. Just an image.
Main Stream vs. Sub Stream
This is where many people make mistakes. Cameras typically have two streams:
- Main Stream (subtype=0): Full resolution. This is your 4K or 4MP image. Use this for snapshots.
- Sub Stream (subtype=1): Low resolution. This is for live preview over weak networks. Do not use this for high-res snapshots.
If your CGI command pulls from the sub stream by default, you will get a blurry 640×480 image. Always check the parameter. Force it to use the main stream.
Authentication in the URL
Most cameras require a username and password. You can pass them inline:
http://admin:YourPassword@192.168.1.100/cgi-bin/snapshot.cgi?channel=1This works for quick testing. But for production dashboards, I strongly recommend using Digest Authentication in your backend code instead. Putting passwords in plain URLs is a security risk, especially over public 4G networks.
A Quick Note on Response Size
A single 4K JPEG snapshot is typically between 1.5 MB and 4 MB, depending on scene complexity. A parking lot at night with few details might be 1.5 MB. A busy construction site in daylight could hit 3.5 MB. This is still far smaller than even a 5-second video clip, which could easily be 10-20 MB. For 4G deployments, this difference matters a lot.
Can I Schedule the CGI Command to Capture an Image Every 60 Seconds Without Using an NVR?
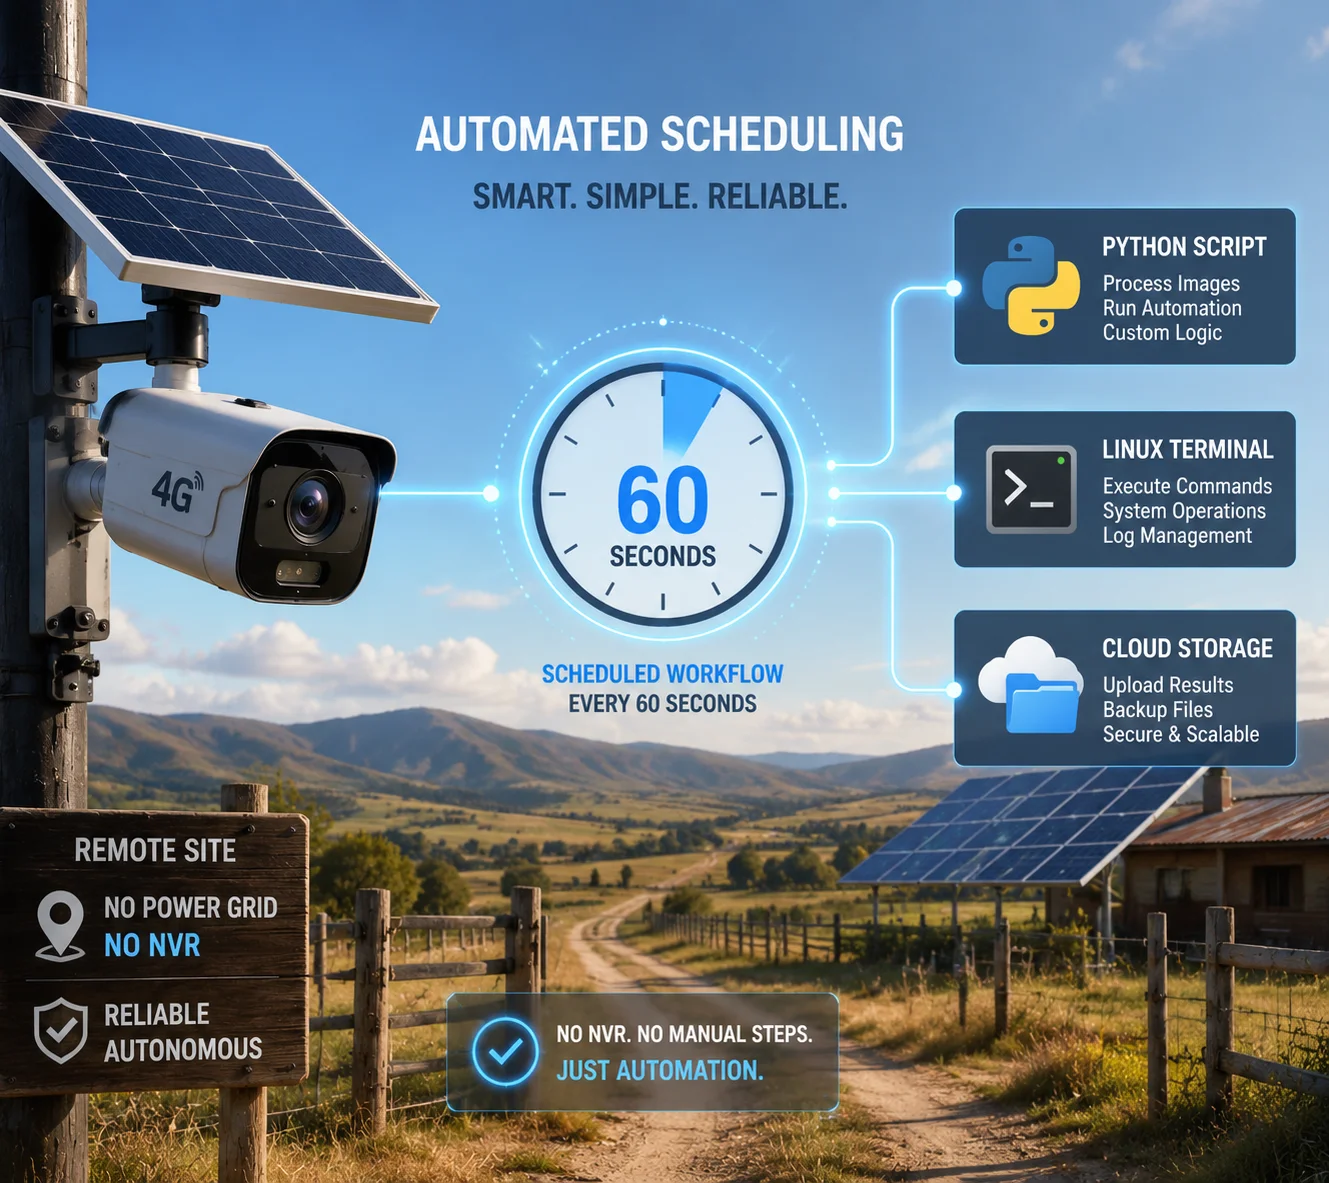
I’ve had clients ask me this exact question dozens of times. They want time-lapse monitoring on remote solar-powered sites. They don’t want to buy an NVR. They don’t want to record 24/7 video. They just want one picture every minute.
Yes, you can schedule CGI snapshot commands at any interval using external tools like n8n7, cron8 jobs, or Python scripts. The camera does not need an NVR. Your automation platform sends the HTTP request on a timer, receives the image, and stores or forwards it wherever you want.
 Scheduled CGI snapshot capture every 60 seconds without NVR
Why Skip the NVR for Scheduled Snapshots?
An NVR is designed for continuous video recording. It is overkill if all you need is periodic snapshots. On a 4G solar site, an NVR also means more power draw, more hardware to fail, and more data consumption. A simple scheduled CGI call removes all of that complexity.
Three Ways to Schedule CGI Snapshots
Method 1: n8n Workflow (No Code)
If you already use n8n for automation, this is the easiest path:
- Add a Cron node. Set it to trigger every 60 seconds.
- Add an HTTP Request node. Point it to your camera’s CGI snapshot URL.
- Set the response type to Binary Data.
- Add a Google Drive node (or S3, FTP, etc.) to upload the binary image.
The whole workflow takes about 5 minutes to build. No coding required.
Method 2: Python Script with requests
For developers who prefer code:
import requests
import time
from datetime import datetime

while True:
url = "http://192.168.1.100/cgi-bin/snapshot.cgi?channel=1&res=max"
response = requests.get(url, auth=requests.auth.HTTPDigestAuth('admin', 'password'), timeout=15)

if response.status_code == 200:
filename = f"snapshot_{datetime.now().strftime('%Y%m%d_%H%M%S')}.jpg"
with open(filename, 'wb') as f:
f.write(response.content)

time.sleep(60)
Method 3: Linux Cron + cURL
On any Linux server or Raspberry Pi:
* * * * * curl --digest -u admin:password -o /snapshots/$(date +\%Y\%m\%d_\%H\%M\%S).jpg "http://192.168.1.100/cgi-bin/snapshot.cgi?channel=1&res=max"This runs every minute. Each image gets a unique timestamp filename.
Critical Settings for 4G Deployments
| Setting | Recommended Value | Why It Matters |
|---|---|---|
| HTTP Timeout | 10–15 seconds | 4G handshake is slow. Short timeouts cause failed requests. |
| Request Interval | ≥ 30 seconds | Rapid requests overload the camera CPU on 4G modules. |
| Image Resolution | Main stream (max) | Sub stream gives blurry images not suitable for verification. |
| Retry Logic | 2 retries with 5s delay | 4G signal drops are common. Retries prevent data gaps. |
| Power Budget | Check solar panel capacity | Each CGI request wakes the processor. Too many requests drain the battery. |
What About Camera-Side Scheduling?
Some cameras have a built-in snapshot schedule feature in their firmware. You can set the camera to take a picture every N seconds and push it to an FTP server automatically. This works, but it gives you less control. You cannot easily change the destination, add metadata, or trigger conditional logic. For most integrators I work with, the external scheduling method is more flexible and more reliable.
Does the CGI Command Allow for Custom File Naming Based on the Camera’s ID and Timestamp?
I learned this the hard way on a project with 30 cameras. Every snapshot was named snapshot.jpg. I had 30 files overwriting each other. That was a bad day.
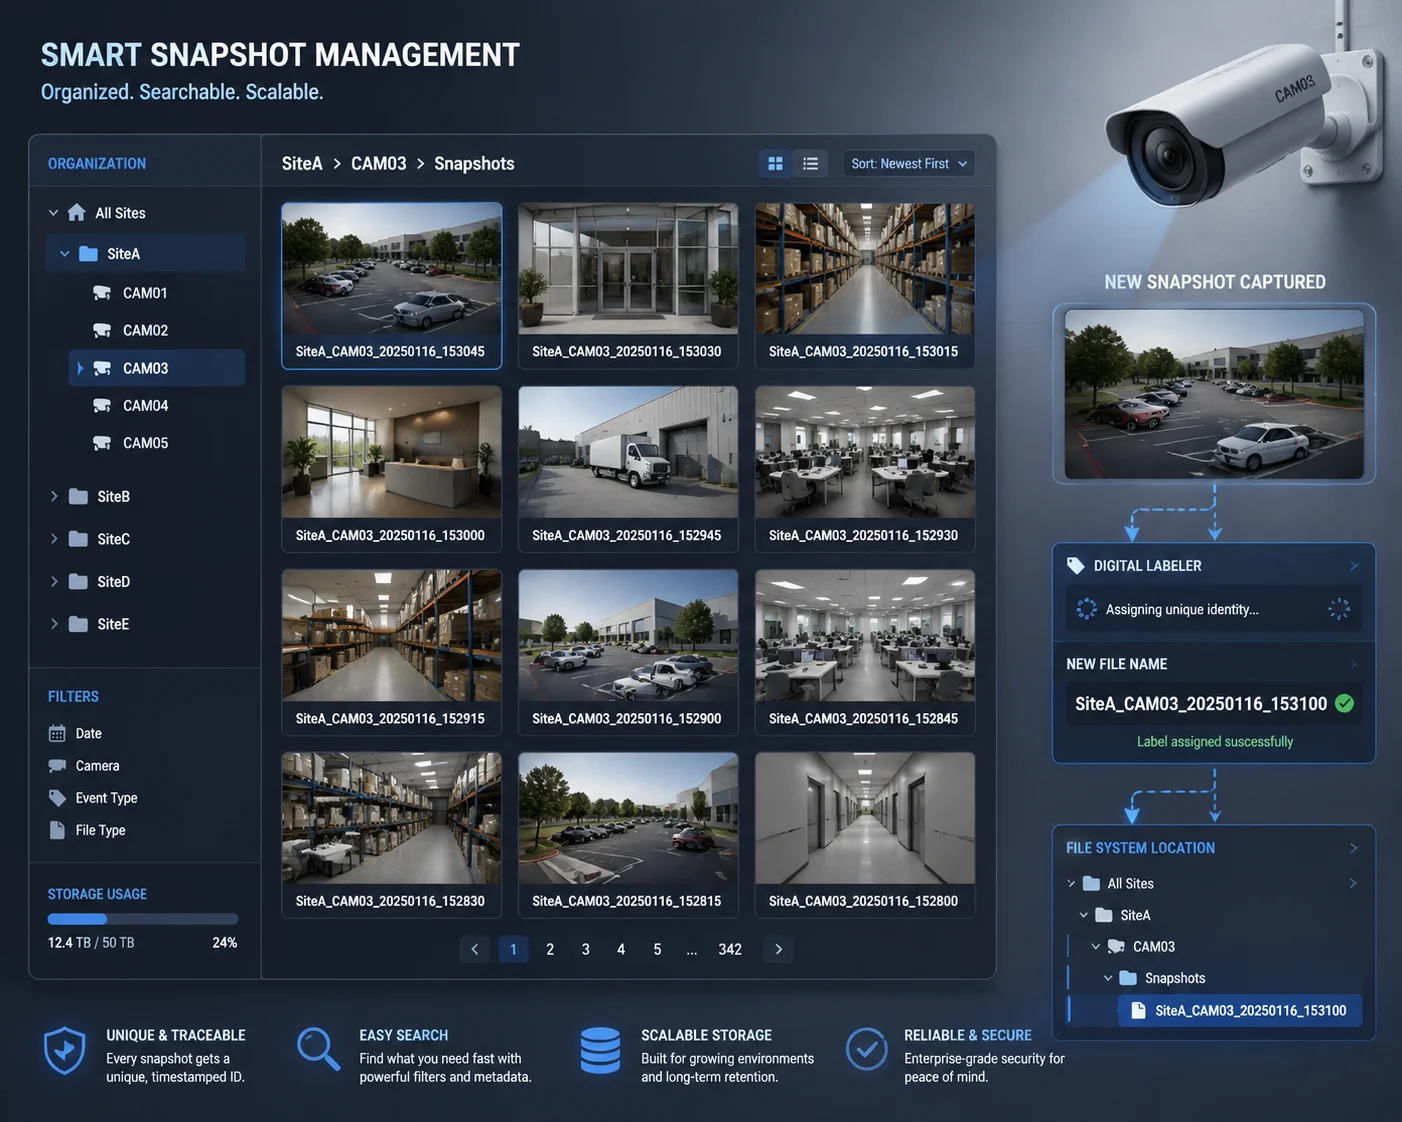
The CGI command itself does not control the file name. The camera returns raw image data in the HTTP response. Your receiving script or automation platform is responsible for naming the file. This gives you full control to include camera ID, timestamp, location, or any custom tag in the file name.
 Custom file naming for CGI snapshots with camera ID and timestamp
Understanding the Response
When you send a CGI snapshot request, the camera does not send you a file with a name. It sends raw binary data with a content type of image/jpeg. Think of it like the camera handing you a photo print with no label on the back. You decide what to write on it.
This is actually a good thing. It means you have complete freedom over your naming convention.
Building a Naming Convention
For multi-camera deployments, I recommend a naming structure like this:
{SiteID}_{CameraID}_{YYYYMMDD}_{HHMMSS}.jpgExample: SiteA_CAM03_20250116_143022.jpg
This tells you exactly which site, which camera, and what time. When you have thousands of images in a folder, this structure makes searching and sorting easy.
Implementation in Python
Here is how I handle this in a real project:
import requests
from datetime import datetime

cameras = {
"CAM01": "http://192.168.1.101/cgi-bin/snapshot.cgi?channel=1&res=max",
"CAM02": "http://192.168.1.102/cgi-bin/snapshot.cgi?channel=1&res=max",
"CAM03": "http://192.168.1.103/cgi-bin/snapshot.cgi?channel=1&res=max",
}

site_id = "SiteA"

for cam_id, url in cameras.items():
response = requests.get(url, auth=requests.auth.HTTPDigestAuth('admin', 'password'), timeout=15)
if response.status_code == 200:
timestamp = datetime.now().strftime('%Y%m%d_%H%M%S')
filename = f"{site_id}_{cam_id}_{timestamp}.jpg"
with open(f"/snapshots/{filename}", 'wb') as f:
f.write(response.content)
Adding Metadata Beyond the File Name
For advanced use cases, you can also embed metadata directly into the JPEG file using EXIF tags. Python’s piexif library lets you write GPS coordinates, camera serial numbers, or custom comments into the image file itself. This is useful when images are shared across teams or uploaded to asset management systems.
Folder Structure for Large Deployments
When you run 20+ cameras taking snapshots every minute, you generate a lot of files. I organize them like this:
/snapshots/
/SiteA/
/CAM01/
/2025-01-16/
CAM01_143022.jpg
CAM01_143122.jpg
/CAM02/
/2025-01-16/
...
This keeps things clean. Each camera gets its own folder. Each day gets a subfolder. Old folders can be archived or deleted automatically with a simple script.
Why This Matters for Your Business
If you are an integrator delivering a monitoring dashboard to your end client, professional file naming is not optional. Your client expects organized, searchable records. When they ask “Show me what Camera 3 saw at 2:30 PM last Tuesday,” you need to find that image in seconds. A good naming convention makes that possible.
Is the CGI Interface Protected by Digest Authentication to Prevent Unauthorized Image Access?
I once tested a camera from a low-cost brand. The CGI snapshot URL worked without any password. Anyone on the network could pull live images. That is a serious security hole.
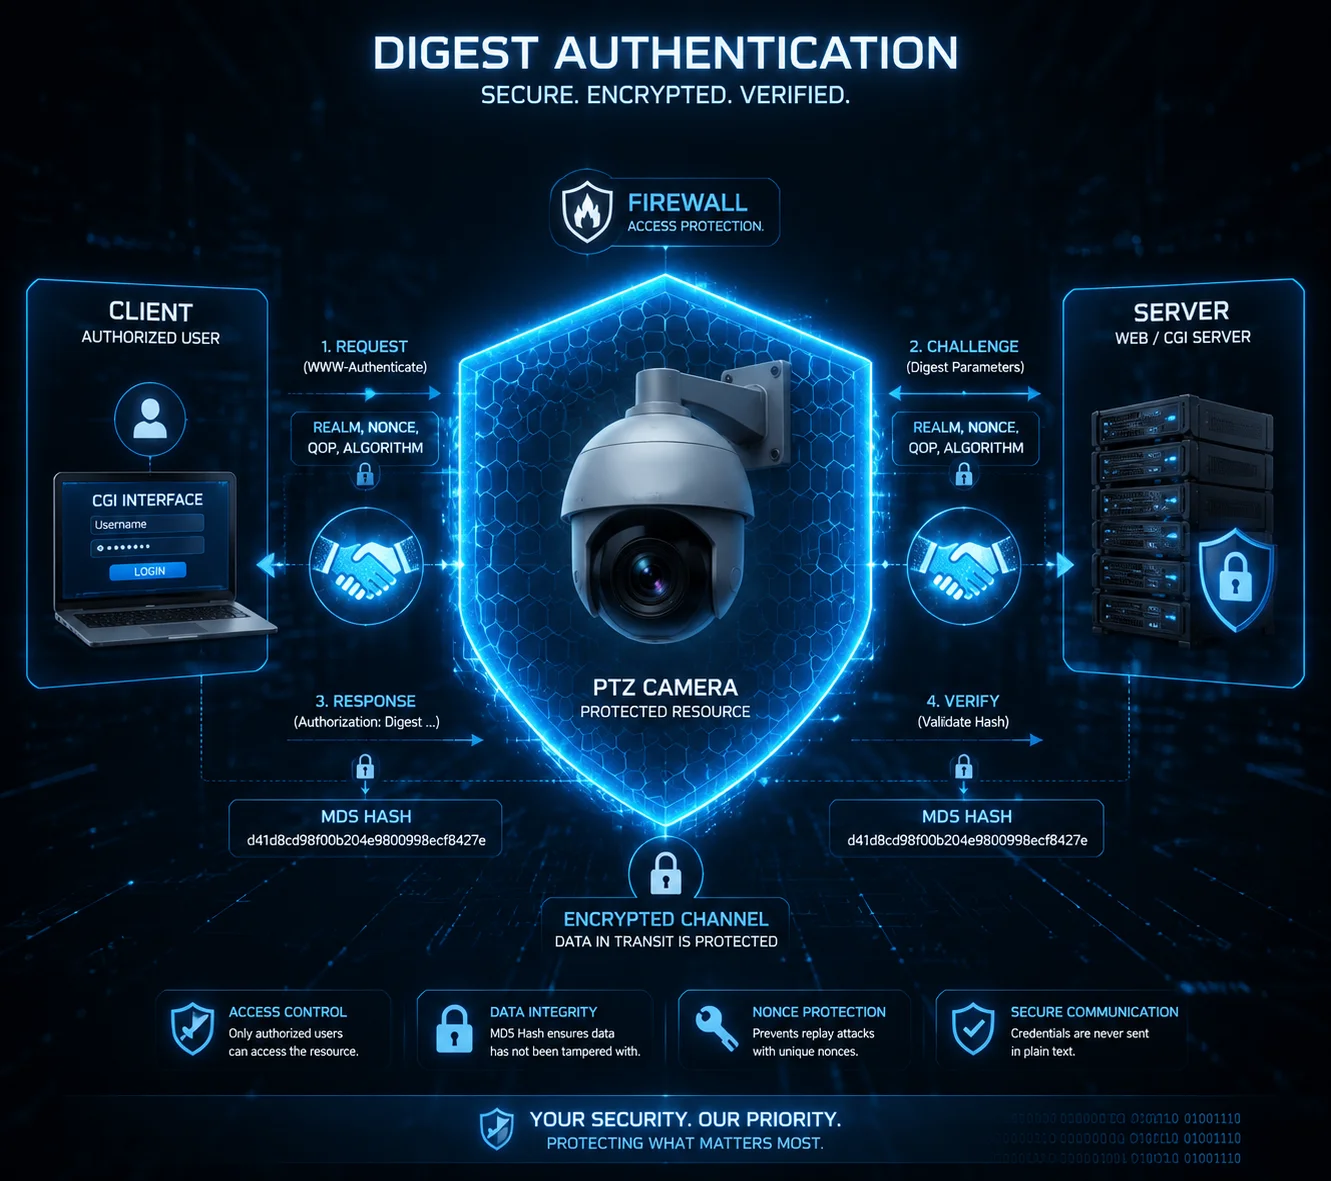
Yes, professional-grade PTZ cameras protect their CGI interface with Digest Authentication9 by default. This means every HTTP request must include valid credentials hashed with a server-provided nonce. Without the correct username and password, the camera returns a 401 Unauthorized error and no image data is sent.
 Digest Authentication protecting CGI snapshot interface
Basic Auth vs. Digest Auth
There are two common HTTP authentication methods used by cameras. Understanding the difference is critical for security, especially on 4G public networks.
| Feature | Basic Authentication | Digest Authentication |
|---|---|---|
| Password Transmission | Base64 encoded (easily decoded) | Hashed with MD5 and a one-time nonce |
| Replay Attack Risk | High — same string every time | Low — nonce changes per request |
| HTTPS Required? | Yes, absolutely | Recommended but safer without HTTPS than Basic |
| Camera Support | Older/cheaper models | Most professional-grade cameras |
| Ease of Implementation | Very simple | Slightly more complex but well-supported |
How Digest Authentication Works
Here is the simplified flow:
- Your script sends a GET request to the CGI URL without credentials.
- The camera responds with
401 Unauthorizedand includes aWWW-Authenticateheader. This header contains a nonce (a random one-time string) and the realm. - Your script takes the username, password, nonce, request URI, and HTTP method. It hashes them together using MD5.
- Your script sends the request again, this time with the hash in the
Authorizationheader. - The camera verifies the hash. If it matches, the camera returns the snapshot image.
The key point is that your actual password never travels across the network. Only a hash travels. And because the nonce changes every time, even if someone captures the hash, they cannot reuse it.
Implementing Digest Auth in Your Code
In Python, the requests library handles all of this automatically:
from requests.auth import HTTPDigestAuth

response = requests.get(
"http://192.168.1.100/cgi-bin/snapshot.cgi?channel=1&res=max",
auth=HTTPDigestAuth('admin', 'YourSecurePassword'),
timeout=15
)
In n8n, you set the authentication type to “Digest Auth” in the HTTP Request node settings. Enter your username and password. n8n handles the nonce exchange behind the scenes.
In cURL:
curl --digest -u admin:YourSecurePassword "http://192.168.1.100/cgi-bin/snapshot.cgi?channel=1&res=max" -o snapshot.jpgHTTPS: The Extra Layer You Should Not Skip
Digest Auth protects your password from being read in transit. But it does not encrypt the image data itself. If someone is sniffing your 4G traffic, they cannot steal your password, but they can see the JPEG image being transmitted.
For full protection, enable HTTPS on the camera. This encrypts everything — the authentication exchange, the image data, and all headers. Most professional cameras support self-signed SSL certificates. You can also upload a proper certificate if your deployment requires it.
Practical Security Checklist for Remote CGI Access
Here is what I recommend for every 4G deployment:
- Change the default admin password immediately.
- Enable Digest Authentication. Disable Basic Auth if the camera allows it.
- Enable HTTPS. Accept the self-signed certificate warning in your scripts by setting
verify=Falsein Python (or use a proper cert). - Use a VPN or port forwarding with IP whitelisting. Do not expose the camera’s CGI port directly to the public internet.
- Create a dedicated “snapshot-only” user account with limited permissions. Do not use the admin account for automated scripts.
- Rotate passwords every 90 days, especially on public-facing deployments.
Security is not glamorous. But one unauthorized access incident can destroy your reputation with a client. It is worth the extra 30 minutes of setup.
Conclusion
HTTP CGI commands give you a fast, lightweight, and automation-ready way to capture and upload high-res snapshots from PTZ cameras — no NVR, no video stream, no wasted bandwidth.
1. Understand the Real Time Streaming Protocol used for controlling streaming media servers. ↩︎ 2. Understand the fourth-generation broadband cellular network technology and its characteristics for data transmission. ↩︎ 3. FFmpeg is a powerful multimedia framework for decoding, encoding, and processing audio and video. ↩︎ 4. Understand the Common Gateway Interface standard that allows web servers to execute external programs and return dynamic content. ↩︎ 5. Learn about pan-tilt-zoom cameras and their capabilities for remote surveillance. ↩︎ 6. Learn how a network video recorder stores and manages video footage from IP cameras. ↩︎ 7. n8n is a workflow automation tool that allows connecting various services and automating processes with no-code or low-code. ↩︎ 8. Cron is a time-based job scheduler in Unix-like operating systems, useful for automating periodic tasks. ↩︎ 9. Learn about the HTTP digest authentication scheme that uses MD5 hashing and nonces to secure credentials. ↩︎