
I have deployed PTZ cameras along coastlines for years. Sea fog kills image contrast and makes AI analytics useless. So I had to find out if “Electronic Defog” really works.
Electronic defog improves image contrast in light mist, but it cannot see through thick coastal fog. It is a software algorithm that enhances what the sensor already captured. It does not add new visual data. For heavy sea fog at long range, you need optical defog or thermal imaging instead.
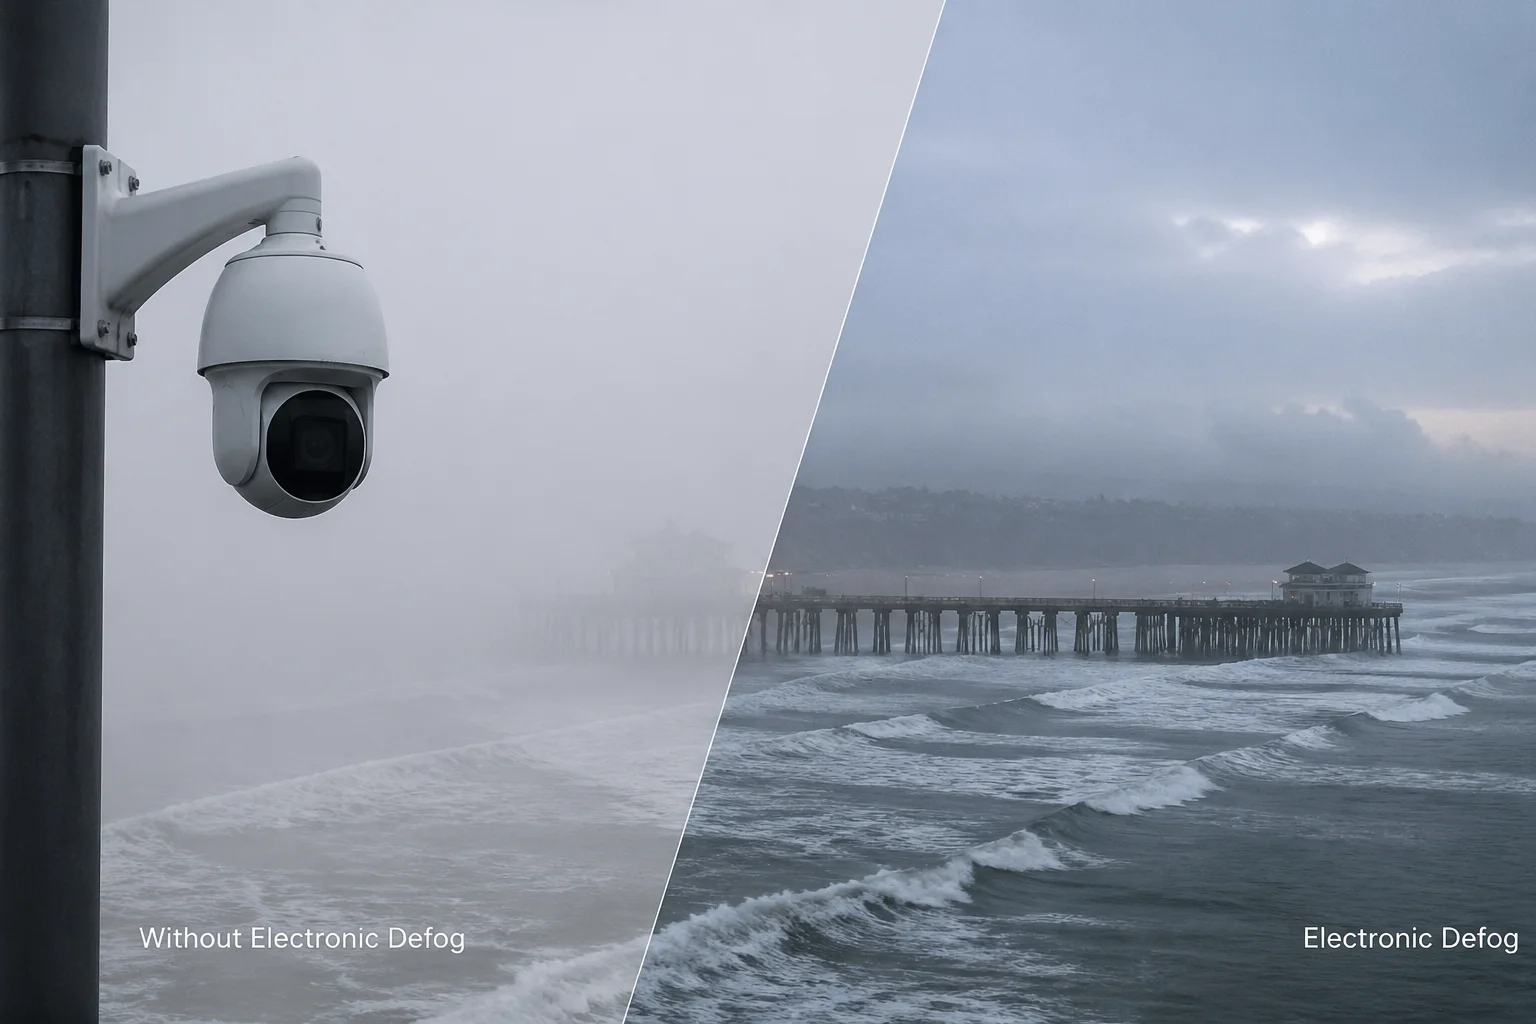 Electronic defog feature on PTZ camera in coastal fog
Most Chinese PTZ cameras list “Defog” or “Electronic Defog” in their spec sheets. But what does that actually mean for a real coastal project? Below, I break down how the algorithm works, show you what to expect in real conditions, warn you about artifacts, and explain when you need to step up to optical defog. Let’s get into it.
How Does the Defog Algorithm Improve the Contrast of My Long-Range Coastal Views?
I used to think “defog” meant the camera could see through fog. It does not. It only makes the existing image look less washed out. That difference matters a lot.
The defog algorithm works inside the camera’s image signal processor (ISP). It analyzes the histogram of each frame, detects low-contrast areas caused by fog, and then stretches the contrast and adjusts color levels. This makes the image appear clearer, but it only enhances data the sensor already received.
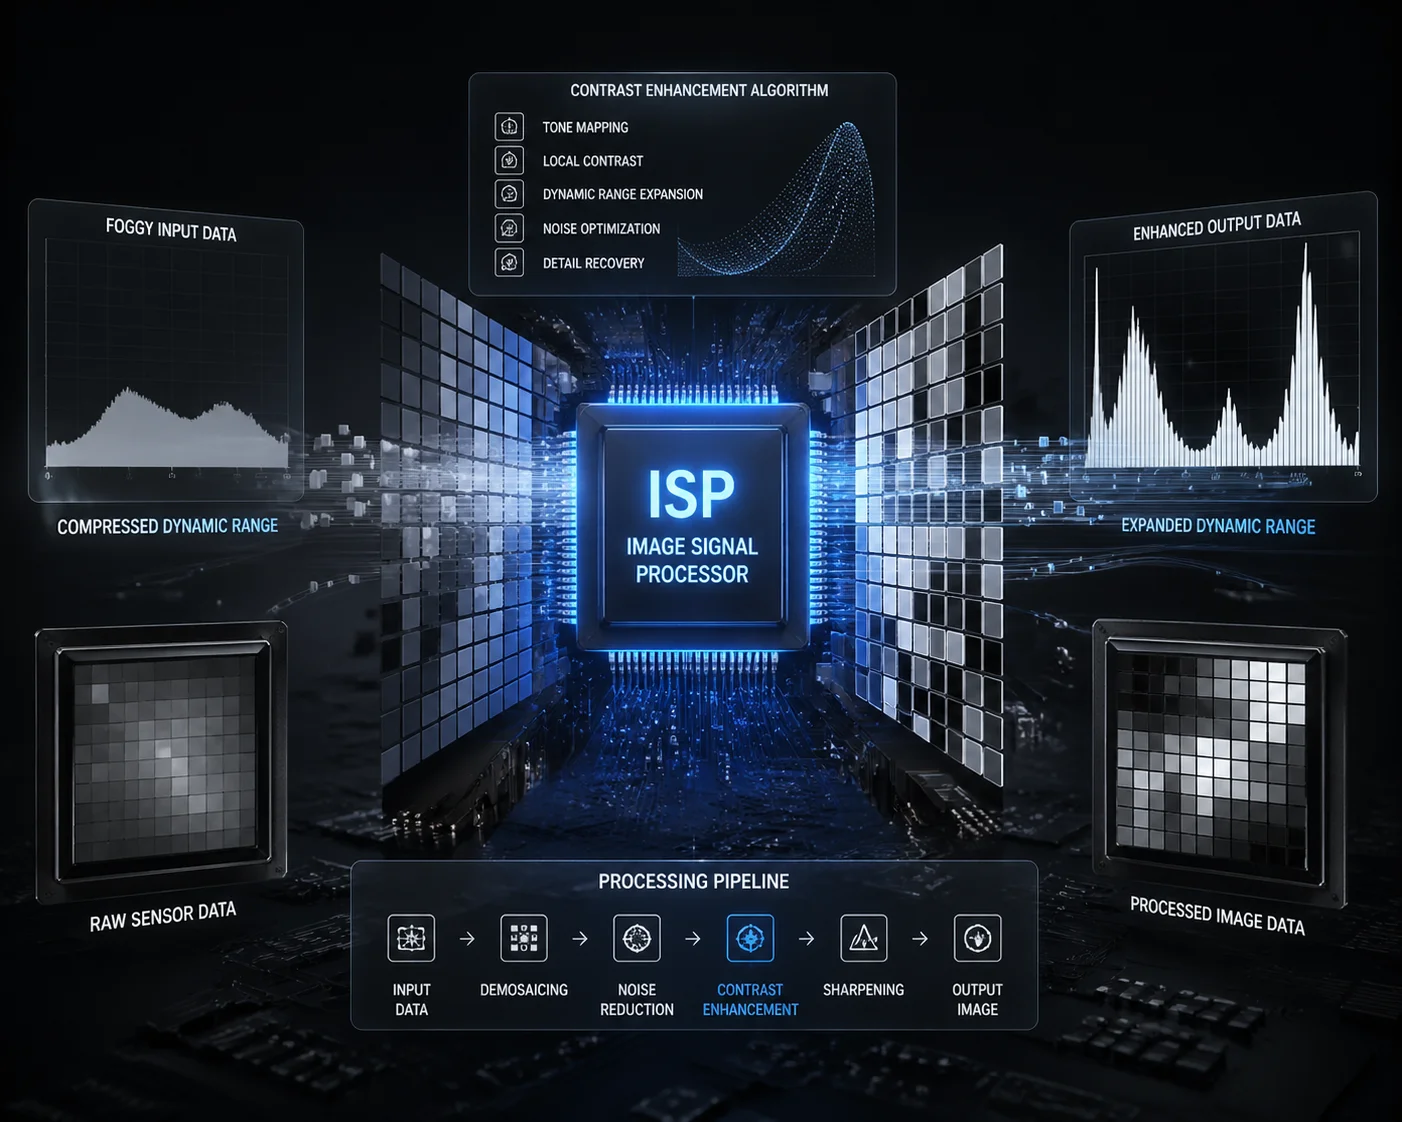 Defog algorithm contrast enhancement on coastal PTZ camera
What Happens Inside the ISP
When fog sits between your camera and the target, it scatters light. The image sensor receives a flat, gray signal with very little difference between bright and dark areas. The defog algorithm takes this flat signal and pulls it apart. It pushes dark pixels darker and bright pixels brighter. It also adjusts the color saturation so objects do not look so washed out.
Think of it like adjusting the “Levels” slider in Photoshop. You are not adding new information. You are just making better use of the information that is already there.
Where It Works and Where It Fails
This is the critical point. The algorithm can only work with what the sensor captures. If the fog is thin enough that some light from a distant object still reaches the lens, the algorithm can pull that faint detail out and make it visible. But if the fog is so thick that no light from the target reaches the sensor at all, there is nothing to enhance. The algorithm will just amplify noise.
For long-range coastal views, this creates a hard limit. Here is what I have seen in practice:
| Fog Density | Visibility Range | Defog Effectiveness | Result |
|---|---|---|---|
| Light mist (500m+ visibility) | Medium to long range | Good | Noticeably clearer outlines, improved contrast |
| Moderate fog (200-500m visibility) | Short to medium range | Partial | Near targets improve, far targets still unclear |
| Heavy sea fog (<200m visibility) | Very short range only | Poor | Amplifies noise, creates artifacts, no real improvement at distance |
The Histogram Stretch Problem
Here is something most spec sheets will not tell you. When the algorithm stretches a narrow histogram to fill the full dynamic range, it also stretches the gaps between pixel values. This can create banding artifacts and posterization. In a coastal scene, this means the sky and water surface can look unnatural, with visible steps between color tones instead of smooth gradients.
For a system integrator like David who needs clean footage for AI analytics, this matters. If the defog algorithm introduces banding or noise, it can actually make automated license plate reading or vessel identification harder, not easier. The AI model may misread distorted characters.
Auto Mode vs. Manual Mode
Most modern PTZ cameras offer both auto and manual defog settings. In auto mode, the ISP monitors the transmission map of each frame and adjusts the defog intensity in real time. In manual mode, you set a fixed level from 1 to 100.
For coastal sites, I recommend auto mode. Sea fog changes fast. A gust of wind can clear the fog in minutes, and if your defog is stuck on a high manual setting during clear weather, the image will look over-saturated and over-sharpened. Auto mode avoids this problem by backing off when the fog lifts.
Can I See a Real-World Comparison of My Camera’s View With and Without Defog Active?
I always ask suppliers for real-world footage before I buy. Lab demos with smoke machines tell you nothing about actual sea fog performance. You need to see the camera working in a real coastal environment.
With defog off, a typical coastal PTZ image in light fog looks flat, gray, and low-contrast. With defog on, the same scene shows improved contrast, sharper edges, and better color separation. But in heavy fog, the difference between on and off becomes very small, and the “on” image often shows visible noise and color shifts.
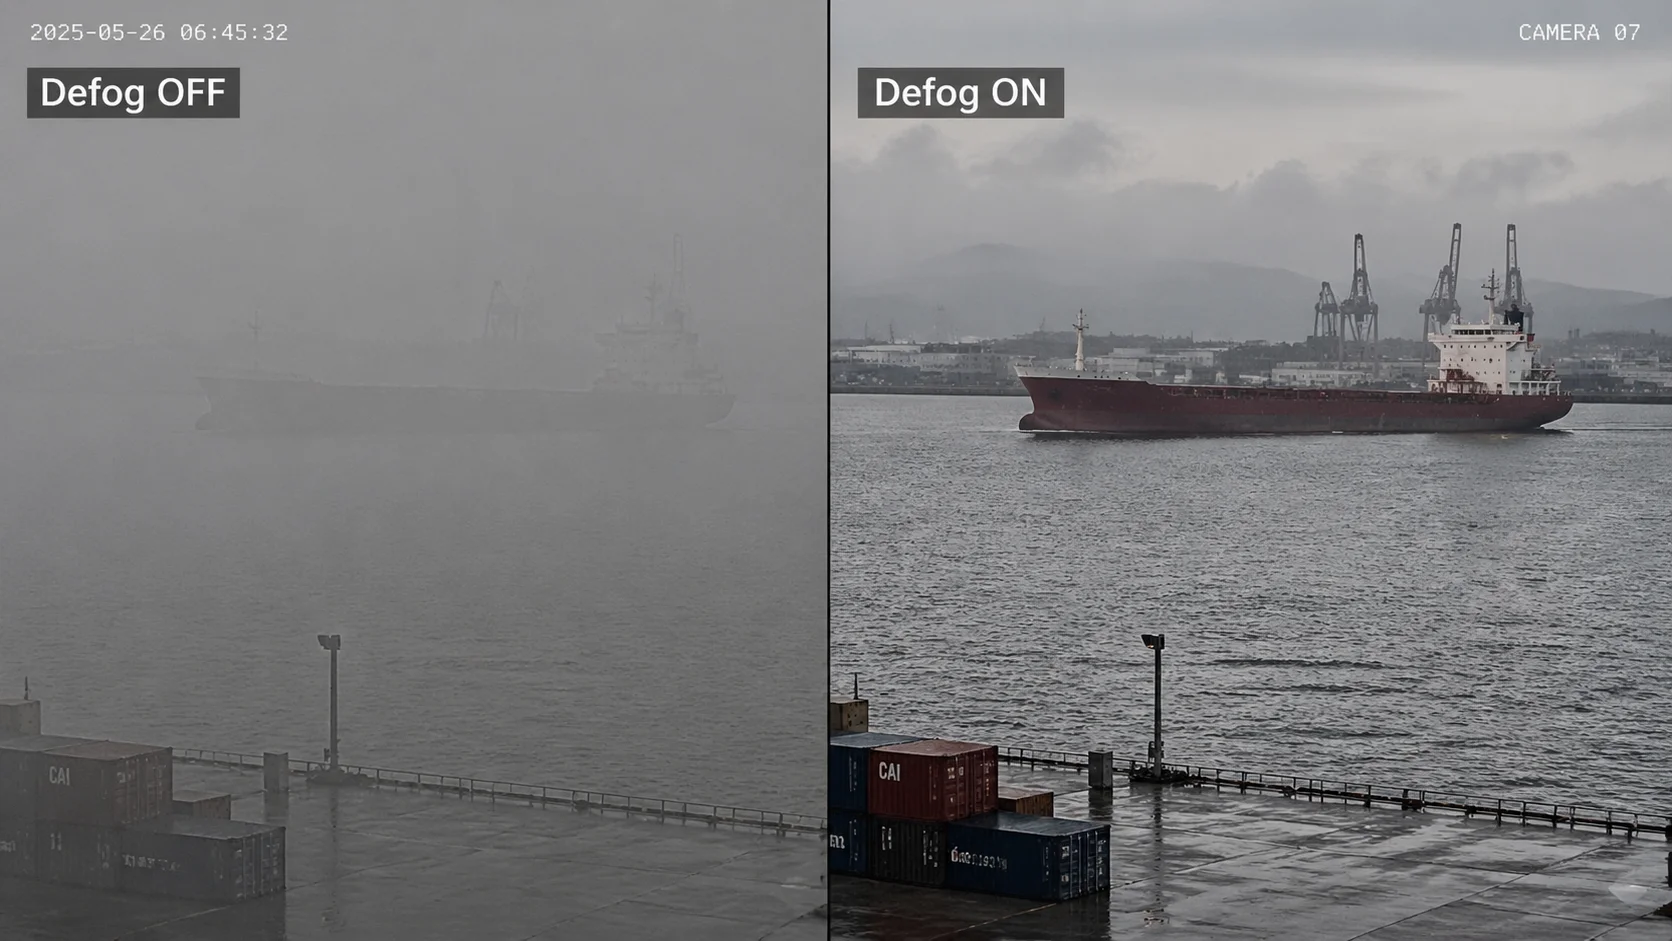 Before and after defog comparison on coastal security camera
What to Look for in a Comparison Video
When you ask a supplier for a defog comparison, do not accept a single screenshot. Ask for video. Fog is dynamic. It moves, thickens, and thins. A single frame can be cherry-picked to look impressive. Video shows you the real behavior over time.
Here are the three things I check in every comparison video:
- Mid-range target clarity. Pick an object 200-400 meters away. Can you read text on it? Can you see its outline clearly? Compare defog on vs. off.
- Background noise level. Zoom into a flat area like the sky or water surface. With defog on, does it look grainy? Do you see colored speckles? That is the algorithm amplifying sensor noise.
- Color accuracy. Does the water still look like water? Does the sky still look natural? Some cheap defog algorithms push colors into unnatural territory. Greens become neon. Blues become purple.
The Sensor Size Factor
One thing that makes a huge difference in defog performance is the image sensor size. A larger sensor captures more light per pixel. This means the raw image has a better signal-to-noise ratio before the defog algorithm even starts working. When the algorithm then stretches the contrast, it has cleaner data to work with, so the result looks better.
| Sensor Size | Pixel Size (typical) | Low-Light Performance | Defog Quality |
|---|---|---|---|
| 1/2.8″ | ~2.9μm | Standard | Acceptable in light fog, noisy in moderate fog |
| 1/1.8″ | ~3.75μm | Good | Better detail retention, less noise after defog |
| 1/1.2″ | ~5.3μm | Excellent | Best results, cleaner image even at higher defog levels |
This is why I always recommend pairing electronic defog with the largest sensor you can afford. A 1/1.8″ sensor with electronic defog will outperform a 1/2.8″ sensor with the same algorithm every time. The algorithm is only as good as the data it receives.
Real Coastal Test: What I Observed
In one project along a harbor, we tested a 38X PTZ with a 1/1.8″ sensor. On a morning with light sea mist, the defog function made a clear difference. We could read vessel registration numbers at about 300 meters with defog on. With defog off, those same numbers were just blurry smudges.
But two hours later, when the fog thickened, the same camera with defog on maximum could barely show the outline of a vessel at 150 meters. The image was full of grain. The AI system stopped detecting objects entirely. That is the physical limit of electronic defog. It is not magic. It is math applied to pixels.
Does the Defog Feature Create Unnatural Colors or Artifacts in My Security Footage?
I have seen defog ruin perfectly good footage. When the algorithm is too aggressive, it creates problems that are worse than the fog itself. This is a real concern for anyone who needs reliable evidence-grade video.
Yes, electronic defog can create unnatural colors, halo artifacts around high-contrast edges, and visible noise amplification. These problems get worse as you increase the defog intensity. The key is to find the right balance between clarity improvement and artifact introduction, which is why manual tuning or a well-calibrated auto mode is essential.
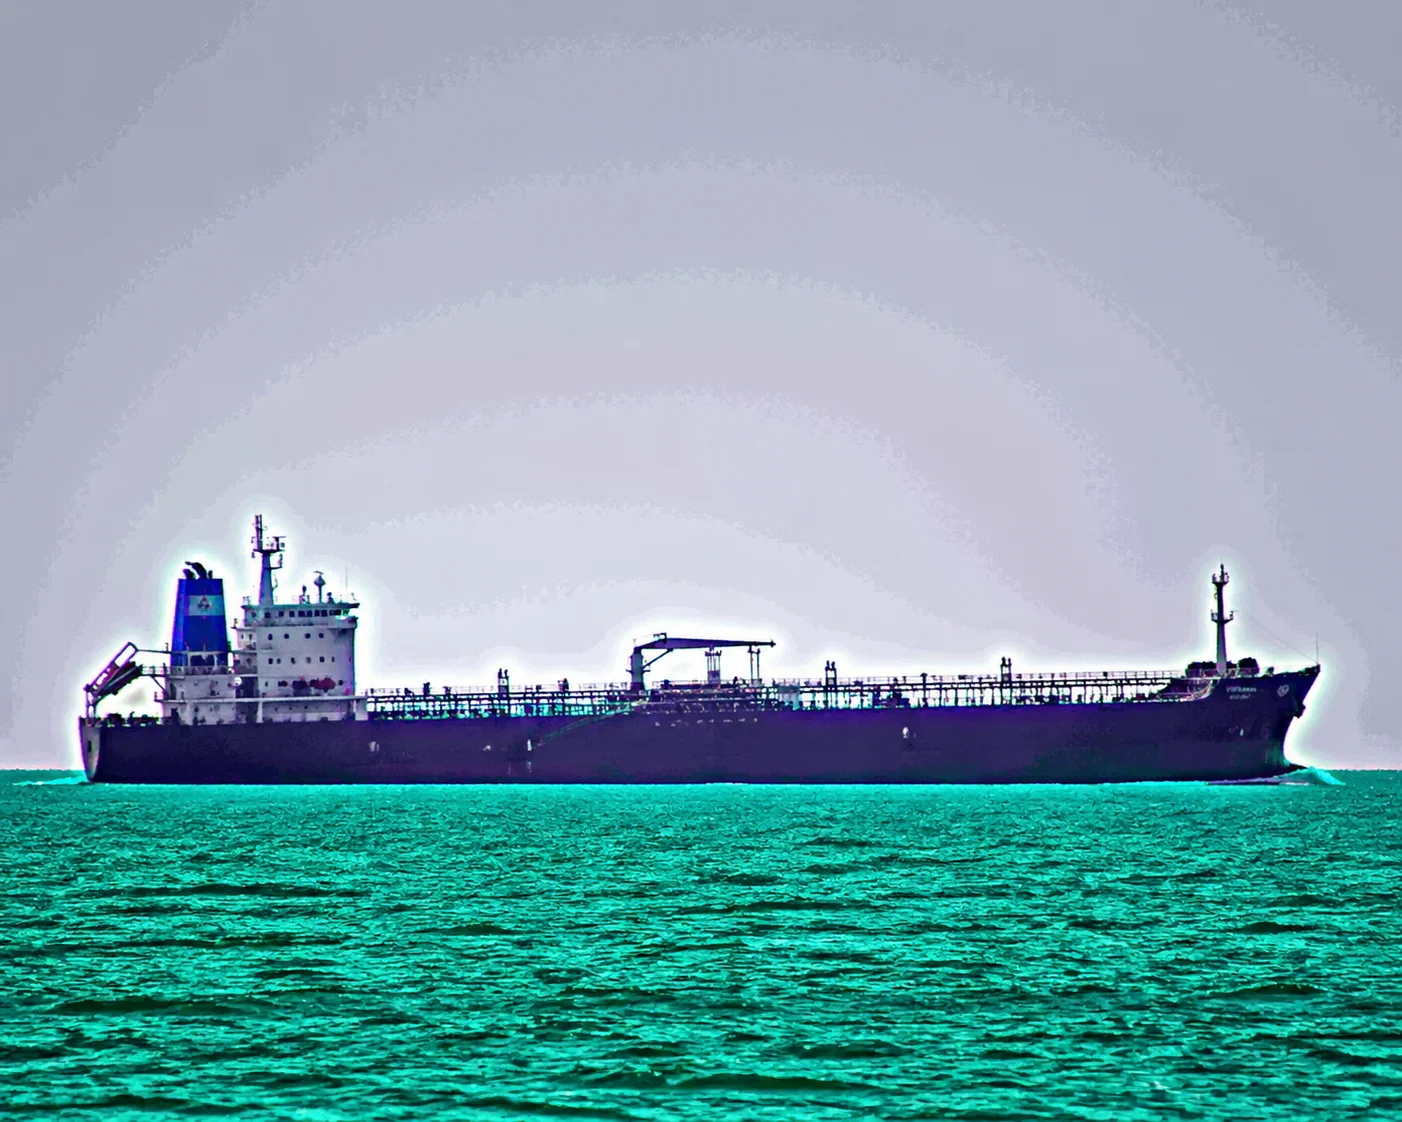 Defog artifacts and color distortion in security camera footage
Common Artifacts You Will See
There are three main types of artifacts that electronic defog can introduce into your footage. Understanding them helps you set the right defog level and avoid degrading your video quality.
1. Halo Effect This appears as a bright glow around dark objects or a dark shadow around bright objects. It happens because the algorithm increases local contrast too aggressively. In a coastal scene, you will often see halos around boats against the sky, or around buildings against the water. This can confuse AI analytics because the halo changes the apparent shape of the object.
2. Color Shift The algorithm adjusts color channels independently to remove the blue-gray cast that fog creates. But if the calibration is off, it can push colors in the wrong direction. I have seen footage where the ocean turned green, the sky turned purple, and skin tones looked orange. For evidence-grade footage, this is unacceptable.
3. Noise Amplification This is the biggest problem. When the algorithm stretches contrast, it also stretches noise. In fog, the sensor is already working with a weak signal. The noise floor is high relative to the actual image data. When you amplify everything, the noise becomes very visible. The image looks grainy, and fine details get lost in the grain.
How 3D-DNR Helps
This is where 3D Digital Noise Reduction (3D-DNR) becomes your best friend. A good 3D-DNR algorithm analyzes multiple frames over time and removes noise that does not repeat consistently. When you combine electronic defog with strong 3D-DNR, the result is much cleaner.
Here is my recommended approach:
- Enable electronic defog in auto mode
- Set 3D-DNR to a medium or high level
- Monitor the live feed and check for artifacts
- If you see halos or color shifts, reduce the defog intensity manually
The order matters. The ISP typically applies defog first, then DNR. So the DNR cleans up the noise that defog introduces. Without DNR, the defog output can look terrible in anything beyond light mist.
The “Oil Painting” Problem
In the Chinese security camera industry, there is a well-known issue called the “oil painting effect.” This happens when the camera’s noise reduction is too aggressive and smears fine details together. The image looks smooth but fake, like an oil painting instead of a photograph.
When you combine heavy defog with heavy DNR, you can get this effect. The defog amplifies noise, then the DNR smears it away, and you lose all the fine texture in the image. Faces become smooth blobs. License plates become unreadable smudges. For a system integrator who needs to pass project acceptance testing, this is a deal-breaker.
The solution is balance. Do not max out either setting. Test at your actual site, in actual fog conditions, and find the sweet spot where you get improved contrast without losing critical detail.
Should I Choose a Camera With “Optical Defog” for More Extreme Weather Conditions?
I learned this lesson the hard way. Electronic defog has a ceiling. For serious coastal and maritime projects, you need to go beyond software algorithms. Optical defog changes the game.
Yes, for extreme coastal fog, optical defog is the better choice. It uses near-infrared (NIR) light that can physically penetrate fog particles, unlike visible light. This means the sensor captures image data that visible-light cameras simply cannot see. Combined with electronic defog, it delivers far superior results in heavy sea fog conditions.
 Optical defog PTZ camera for maritime and harbor surveillance
How Optical Defog Works Differently
Electronic defog is software. Optical defog is hardware. That is the fundamental difference.
Fog particles scatter visible light (wavelengths around 400-700nm). But near-infrared light (wavelengths around 750-1100nm) has longer wavelengths that can pass through many types of fog particles without being scattered as much. An optical defog camera uses a special lens coating and filter arrangement that allows NIR light to reach the sensor while blocking the scattered visible light.
The result is a black-and-white image (because NIR is outside the visible spectrum), but it shows details that a normal color camera cannot see at all. In harbor and coastline applications, this means you can see vessel outlines, dock structures, and even people at distances where a standard camera shows nothing but white fog.
When to Use Each Technology
Not every project needs optical defog. It is more expensive, and the black-and-white output is a trade-off. Here is my decision framework:
| Project Type | Fog Frequency | Recommended Solution | Why |
|---|---|---|---|
| Urban parking lot near coast | Occasional light mist | Electronic defog only | Cost-effective, color image preserved |
| Marina or small dock | Regular morning fog | 1/1.8″ sensor + electronic defog + 3D-DNR | Good balance of cost and performance |
| Commercial harbor or port | Frequent heavy sea fog | Optical defog lens + electronic defog | Penetrates fog that software alone cannot handle |
| Critical maritime infrastructure | Constant fog, high security | Dual-spectrum: visible PTZ + thermal imaging | Maximum detection capability in all conditions |
The Cost-Benefit Calculation
Optical defog lenses are expensive. A PTZ with a true optical defog lens can cost 3-5 times more than a standard PTZ with only electronic defog. But here is the question David needs to ask: what is the cost of not seeing?
If you deploy a standard PTZ at a harbor and it goes blind for 4 hours every morning due to fog, you have a 4-hour security gap every day. If something happens during that window, the camera is useless. The footage shows nothing. Your client is exposed, and your reputation as an integrator takes a hit.
Compare that to the one-time cost of an optical defog camera that maintains useful visibility even in heavy fog. For critical infrastructure, the math is simple. The optical defog camera pays for itself the first time it captures an incident that a standard camera would have missed.
Laser IR + Optical Defog: The Combination for Extreme Range
For the most demanding coastal projects, I recommend combining optical defog with high-power laser infrared illumination 8. Our 800-meter laser night vision PTZ cameras, for example, can push near-infrared light deep into fog. The optical defog lens then captures the reflected NIR signal. This combination can maintain useful image quality at distances that would be completely impossible for a standard camera with electronic defog alone.
This is the setup I recommend for:
- Major commercial ports
- Naval base perimeters
- Offshore platform monitoring
- Long-range coastal border surveillance
The key point is this: electronic defog is a baseline feature. Every modern PTZ should have it. But for coastal environments where fog is a daily reality, it is just the starting point. The real question is what you put on top of it.
Conclusion
Electronic defog helps in light fog but cannot replace physics. For serious coastal surveillance, combine it with optical defog, large sensors, and 3D-DNR for reliable results.
1. Image histogram contrast stretch for fog removal algorithms. ↩︎ 2. Light scattering in fog and its effect on camera sensors. ↩︎ 3. Auto vs manual defog mode in security camera ISPs. ↩︎ 4. Signal-to-noise ratio and sensor size relationship. ↩︎ 5. Halo artifacts in contrast enhancement algorithms. ↩︎ 6. 3D digital noise reduction (3D-DNR) for low-light video. ↩︎ 7. Near-infrared (NIR) imaging for fog penetration. ↩︎ 8. Loyalty-Secu laser IR PTZ for coastal surveillance. ↩︎ 9. Dual-spectrum visible and thermal security cameras. ↩︎ 10. AI object detection accuracy degradation in foggy scenes. ↩︎