
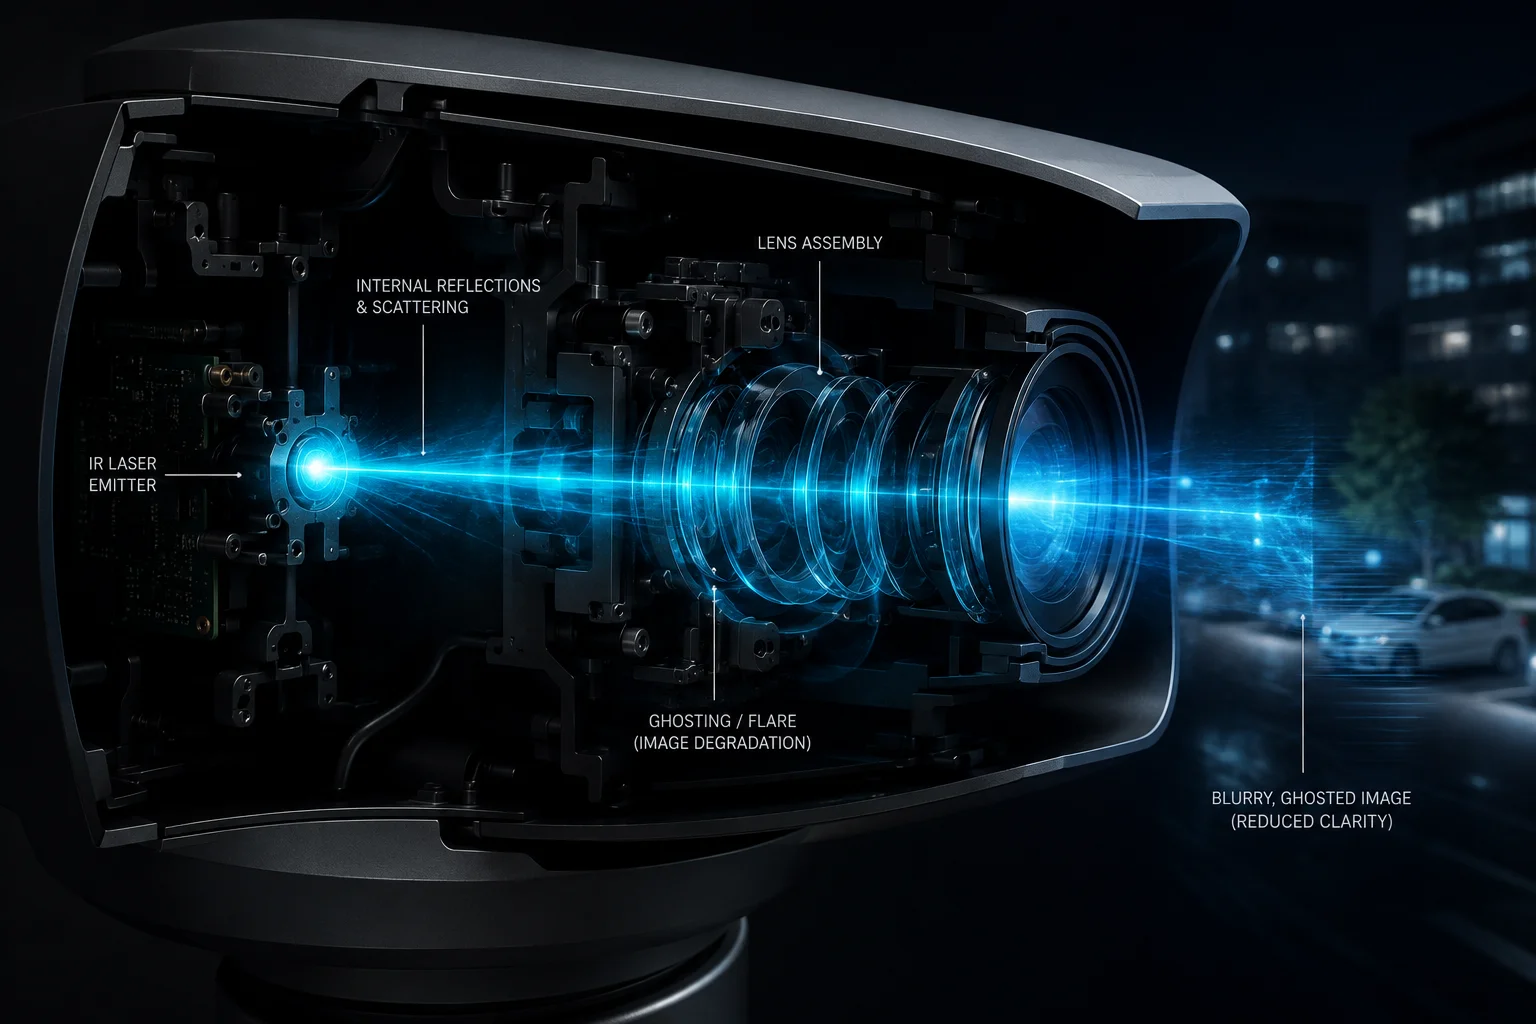
I have seen ghosting1 ruin a clear night image. It turns a strong laser system into a blurry, low-trust result, and that costs me time, confidence, and money.
Ghosting in Laser Night mode usually comes from stray light bouncing inside the camera window, the lens path, or the sensor area. I reduce it by isolating the light path, using the right AR coating, controlling glass angle, and tuning laser output and focus.
 Laser night ghosting PTZ camera
I know this problem gets worse when I push long-range zoom to the edge. So I treat it as a system problem, not just a lens problem. I look at the glass, the seal, the laser path, the angle, and the software together.
Table of Contents
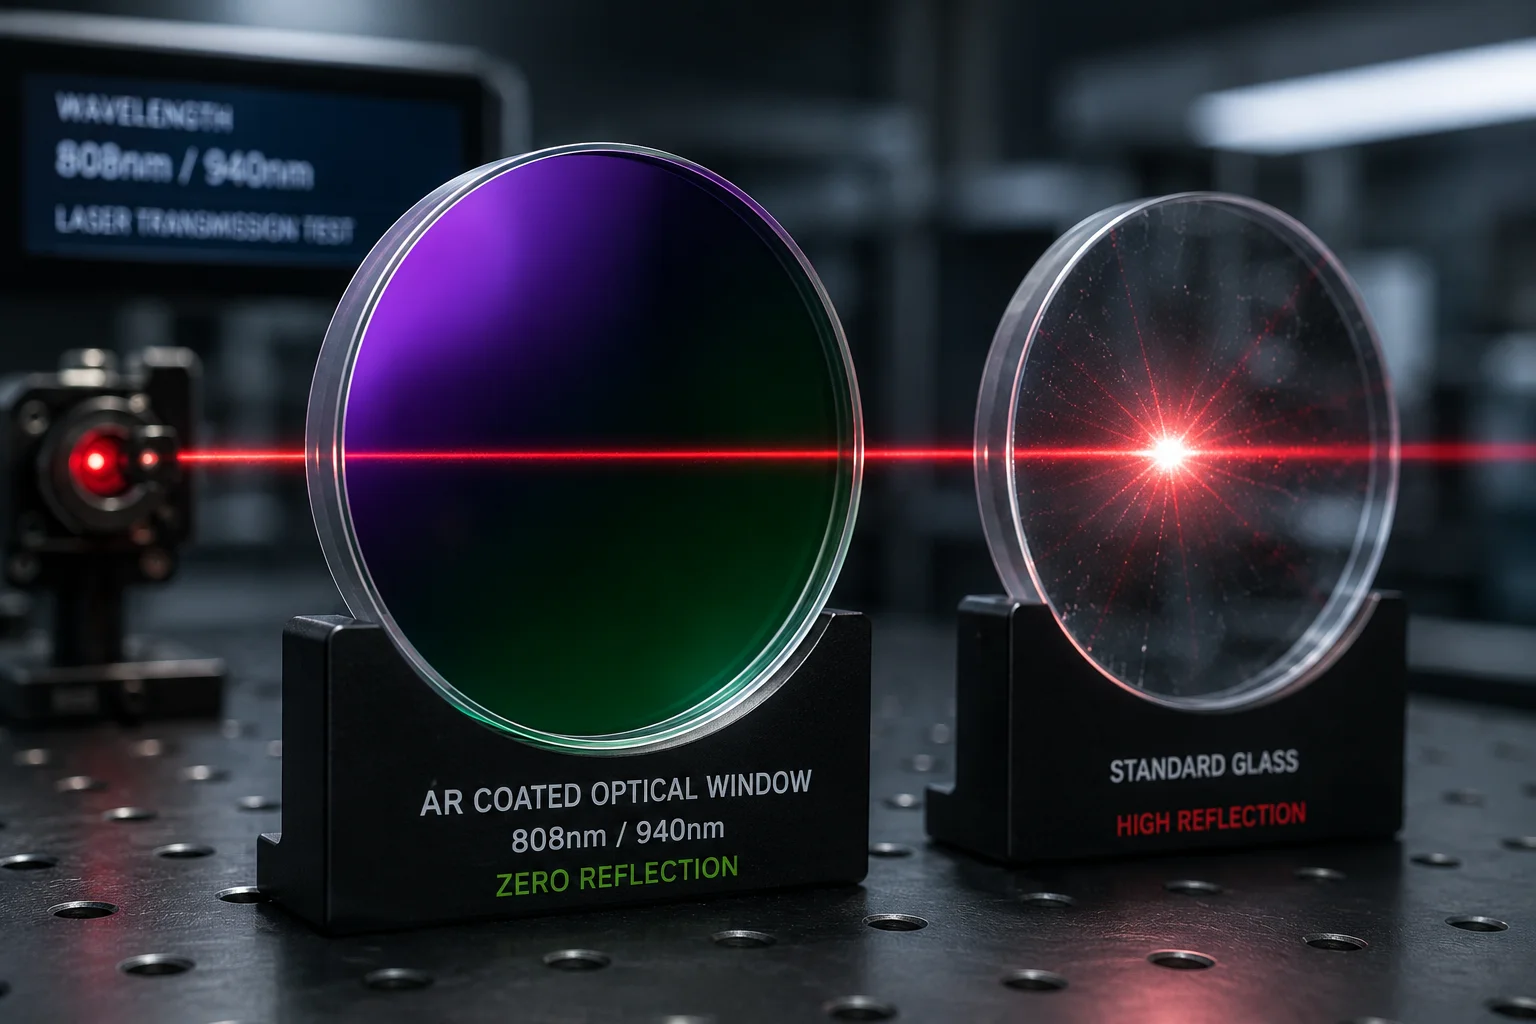
Does the window glass feature an internal Anti-Reflective (AR) coating2 to block laser flare?
I have seen cameras fail at night because the glass looked clean but still reflected too much laser light. That kind of hidden flare can make a strong system look weak.
A proper internal AR coating can cut laser flare by lowering surface reflection at the exact laser wavelength. For laser night use, I prefer a coating tuned to the IR band9, because a normal coating often does not stop strong narrow-band reflections well enough.
 AR coating laser flare window glass
I always start with the glass. If the window coating is wrong, the rest of the system keeps fighting the same problem. A standard anti-reflective layer for visible light may look good on paper, but it can still miss the real laser wavelength used in night mode. That means the beam hits the window, bounces back, and returns into the optical path. Then I get a bright spot, a halo, or a ghost image near the center or edge of the frame.
Why the coating matters more than people think
I treat AR coating as a wavelength match problem. If the laser uses 808 nm or 940 nm, the coating must be built for that band. If it is not, the reflected energy stays too high. In a long-range PTZ camera3, even a small percentage of reflection can become a visible artifact after multiple internal bounces. The problem grows at higher zoom because the field of view gets tighter, so stray light takes up more of the frame.
What I check in real projects
| Check item | What I look for | Why it matters |
|---|---|---|
| Coating band | Matches laser wavelength | Cuts direct reflection |
| Coating quality | Even layer, no spots | Prevents local flare |
| Glass thickness | Stable and controlled | Reduces extra bounce paths |
| Surface cleanliness | No oil, dust, or film | Limits scatter |
I also remind myself that coating alone is not magic. If the window sits too close to the lens, or if the housing lets the beam hit the glass at a bad angle, I can still see ghosting. So I use coating as one layer, not the whole answer. When I design or test a camera, I ask a simple question: does the window help the laser pass cleanly, or does it become a mirror inside the system? That question usually tells me where to look next.
How does the physical “Light Barrier” between the laser and lens prevent internal light leakage?
I have learned that a strong light barrier can solve problems that software cannot fully hide. When the laser and lens share too much open space, stray light finds a path. Then I see internal leakage that looks like ghosting.
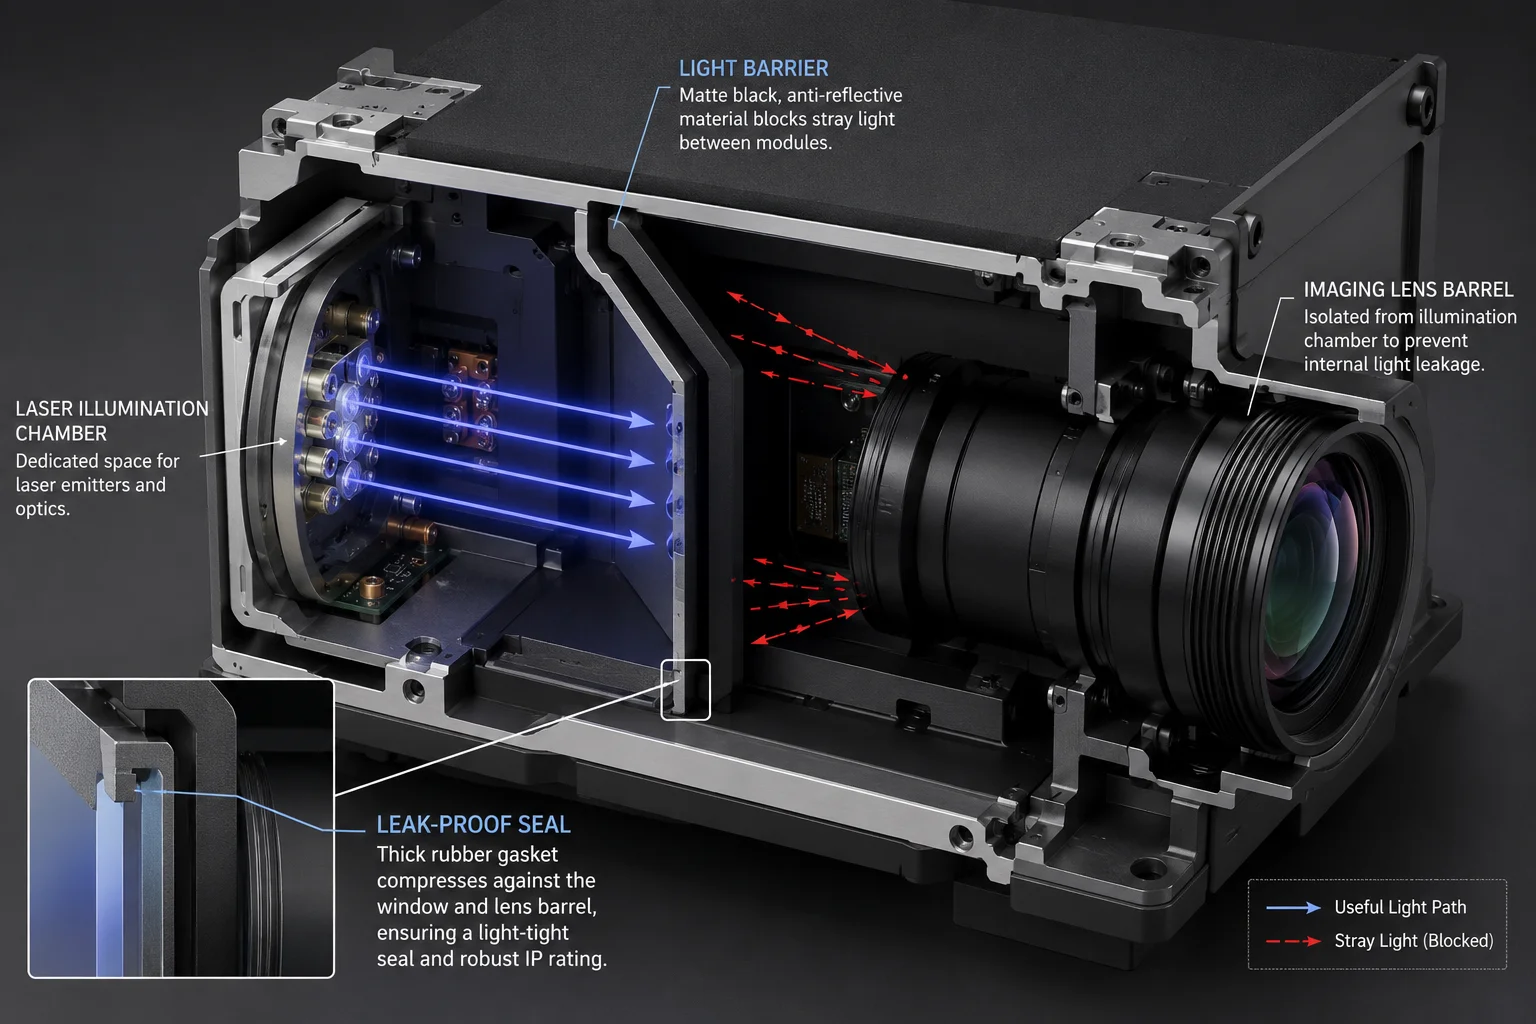
A physical light barrier4 blocks direct and reflected laser paths between the emitter and the lens. It works best when the camera uses a sealed optical route, a black gasket, and a split-window layout that keeps the laser side and lens side separate.
 Light barrier between laser and lens PTZ camera
I think of the light barrier as a wall inside the housing. Its job is simple. It stops light from moving where it should not move. In a laser night camera, even a small gap can create a problem. Light can bounce off the inner wall, hit the window again, and come back into the lens. That is why I prefer a hard physical block instead of hoping the image processor can clean everything later.
What a good barrier design does
A good barrier does three things. First, it stops direct line-of-sight between the laser emitter and the camera lens. Second, it reduces side scatter from the inner housing. Third, it forces the light to follow only the intended path. If the camera uses a black rubber seal around the lens barrel, that seal should press tightly against the optical window5. That helps remove small air gaps that can act like tiny reflective chambers.
A simple comparison
| Design choice | Result | Ghosting risk |
|---|---|---|
| Open shared chamber | Light can spread freely | High |
| Partial divider | Some leakage remains | Medium |
| Full sealed barrier | Light path stays controlled | Low |
I also like split-glass designs6 when the product needs serious long-range laser work. In that setup, the laser window and the lens window are not the same piece of glass. They sit in different zones with a metal or coated divider in between. That design gives me much better control over flare and internal scatter. It also helps when I need stable performance in heat, rain, or dust, because the barrier does more than block light. It also supports the whole optical structure.
For me, the main point is this: if light can travel freely inside the housing, ghosting will keep coming back. A software patch may hide it for a moment, but a physical barrier removes the path itself. That is the cleaner fix, and it is the one I trust first.
Is the glass tilted at a specific angle to divert stray laser reflections away from the sensor?
I have seen flat glass cause a neat but nasty mirror effect. The laser hits the surface, bounces back, and lands right where I do not want it. That is a small angle problem that creates a big image problem.
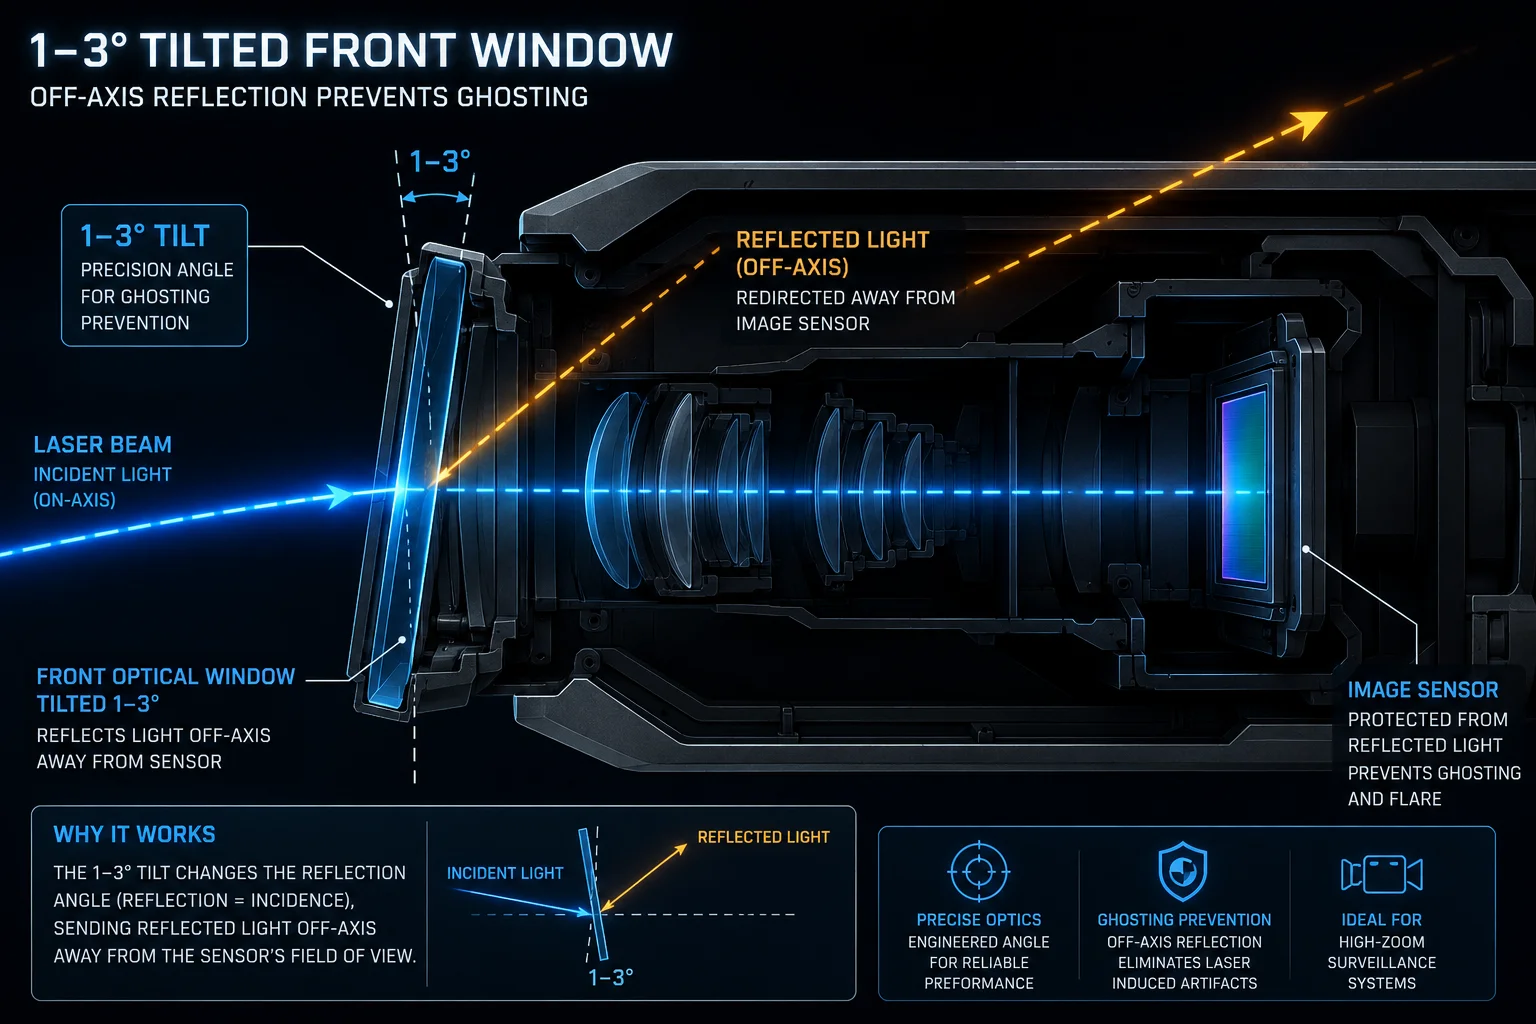
Yes, a small tilt angle can help push stray reflections away from the sensor. Even a gentle 1–3° glass tilt can move the reflected beam off the optical axis, so the sensor sees less flare and fewer ghost artifacts.
 Tilted glass to divert stray laser reflections
I like this method because it is simple and physical. It does not depend on software guessing. It changes the path of the reflection itself. When the glass is flat and parallel to the sensor path, reflected light can return straight back into the lens. When I tilt the glass a little, the reflection leaves at a different angle. That means the strongest bounce misses the sensor instead of landing on it.
Why a small tilt works
The idea is basic. Light reflects at the same angle it arrives. So if the front glass sits flat, the bounce often follows a straight path back into the imaging system. If I tilt the glass, the return path shifts. The sensor no longer sits on the strongest reflection line. This is very useful in narrow high-zoom night mode, because the camera is more sensitive to any bright internal line or spot.
Things I keep in mind
| Tilt factor | Effect on reflection | Risk if done badly |
|---|---|---|
| 0° flat glass | Reflection returns straight | High ghosting |
| Small tilt | Reflection moves off-axis | Low to medium |
| Too much tilt | Image distortion may rise | New optical issues |
I do not want to overdo the angle. If the tilt becomes too large, I can create focus shift, edge blur, or uneven window thickness effects across the frame. So I use a small and controlled angle. I also test the camera at the real zoom level, not only at a near zoom setting. A glass angle that looks fine at 10X may behave differently at 40X, because the optical path is tighter and more sensitive.
In practice, I check the live image while I point the camera at a high-reflection target at night. Then I watch the flare move. If the reflection slides out of the core area, the tilt is helping. If the image starts to look uneven, I know I have pushed it too far. For me, the best angle is the one that reduces ghosting without making the picture worse in other ways.
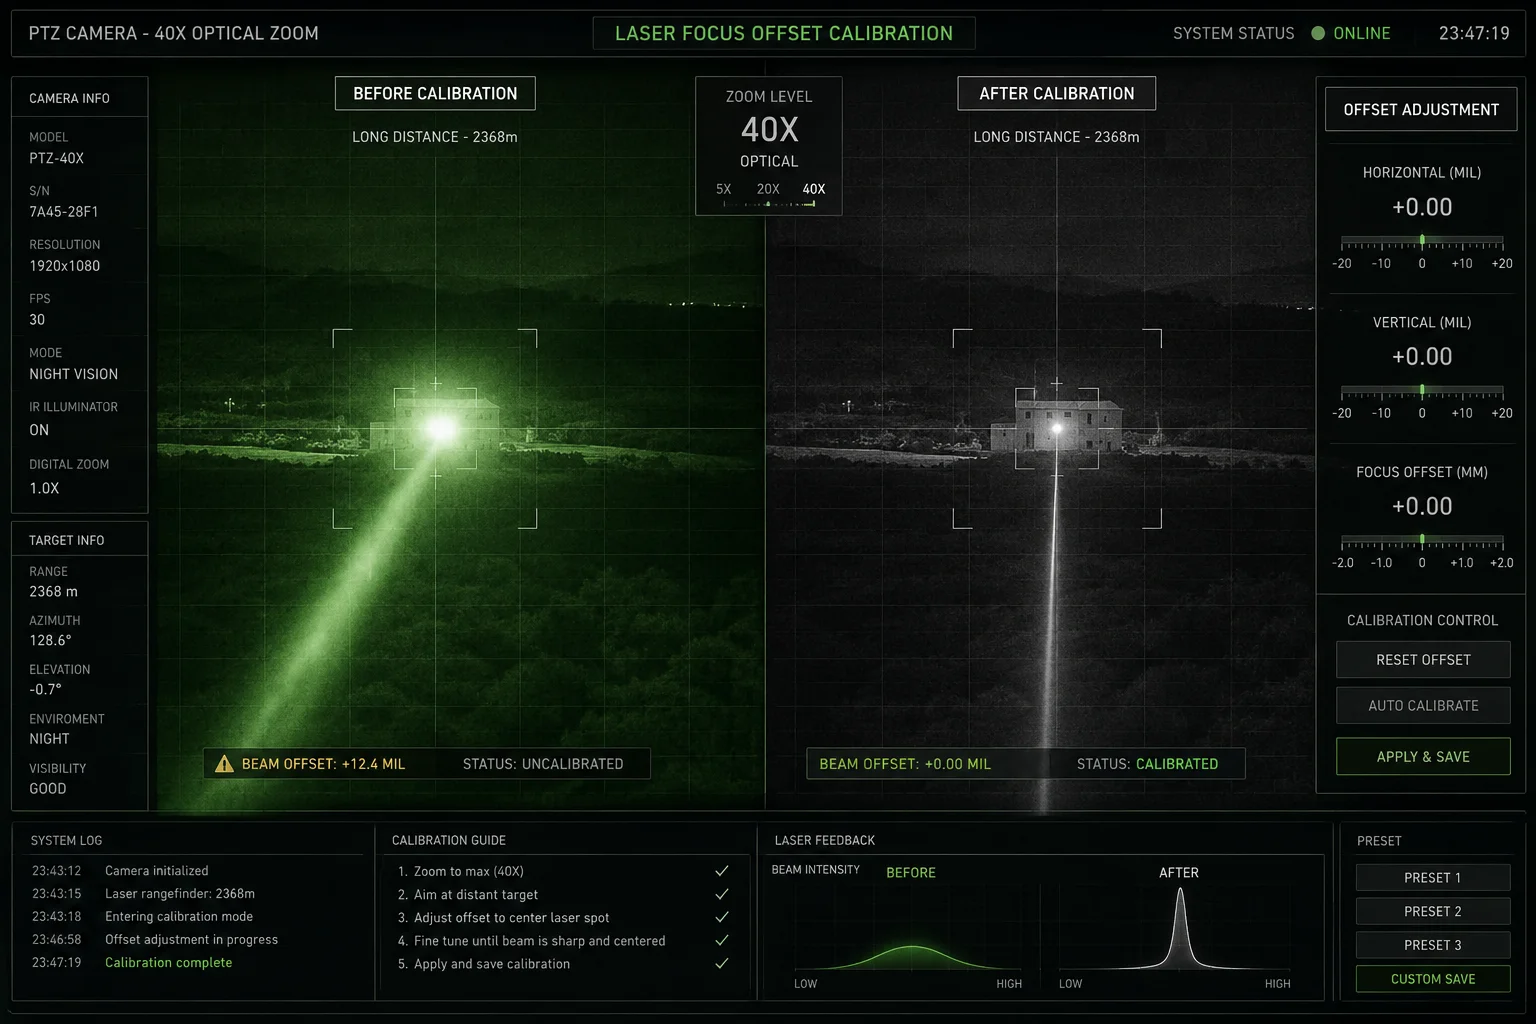
Can I adjust the laser focus offset to minimize ghosting artifacts at maximum 40X zoom?
I have used focus offset tuning when the optics were already good but the ghosting still showed up at long zoom. It is not the first fix I use, but it can help a lot when the laser and lens need better alignment.
Yes, I can adjust laser focus offset7 to reduce ghosting at 40X zoom, but only within a safe range. The goal is to align the laser spot with the lens field of view so the beam stays useful without creating bright internal artifacts.
 Laser focus offset at 40X zoom ghosting control
I treat focus offset as fine calibration, not as a repair for bad hardware. If the laser beam is too narrow, too strong, or centered badly, the optics can create a hot spot inside the camera path. At 40X zoom8, the sensor sees a smaller area, so any mistake becomes easier to notice. A small offset change can move the bright spot out of the critical zone. That can make the picture cleaner and easier to use in real work.
How I approach offset tuning
First, I test the camera in a dark scene with known reflective targets. Then I change the offset in small steps. I watch for three things: the shape of the hotspot, the amount of halo, and the stability of the target detail. If the ghosting drops but the target stays clear, I keep moving in that direction. If the target gets dim or uneven, I stop and step back.
Offset tuning checklist
| Step | Action | What I expect |
|---|---|---|
| 1 | Start at default offset | Baseline image |
| 2 | Change in small steps | Ghosting shifts |
| 3 | Test at 40X zoom | Real worst-case result |
| 4 | Compare day and night | Check for side effects |
I also want to be careful with software-only thinking. If the lens barrel, window, or barrier is already wrong, offset tuning only masks the problem. But when the optics are close to right, offset tuning gives me a useful last mile fix. This matters a lot for customers like David, because he does not want a camera that only works after ten hidden tricks. He wants a system that stays stable in the field. So I use offset tuning to polish the result, not to cover a weak design.
Conclusion
I remove laser ghosting by fixing the optics first, then fine-tuning the laser, the window, and the software together for a clean night image.
1. Understand what ghosting means in imaging – stray reflections causing duplicate or hazy artifacts. ↩︎ 2. Learn how AR coatings reduce surface reflections and improve light transmission. ↩︎ 3. Explore PTZ cameras: pan-tilt-zoom features used in surveillance and long-range imaging. ↩︎ 4. Understand how physical barriers (baffles) block stray light in optical systems. ↩︎ 5. Learn about optical windows and their role in protecting sensors while transmitting light. ↩︎ 6. See how split-glass designs separate emitter and receiver paths to reduce internal reflections. ↩︎ 7. Understand laser focus offset adjustments and their impact on beam quality and ghosting. ↩︎ 8. Learn about high‑zoom lenses and the optical challenges at maximum magnification. ↩︎ 9. Review the infrared spectrum and why AR coatings are often designed for specific IR bands. ↩︎