
I’ve seen too many outdoor PTZ deployments fail at audio. The camera records great video, but the microphone picks up nothing but wind roar.
To test a microphone’s sensitivity and wind-noise reduction outdoors, you need two things: a controlled sound source at a known distance and a repeatable wind source at measured speeds. You measure the audio output level in calm conditions first, then compare it against recordings made under wind. The gap between voice level and wind noise level — your SNR — tells you if the mic is usable or not.
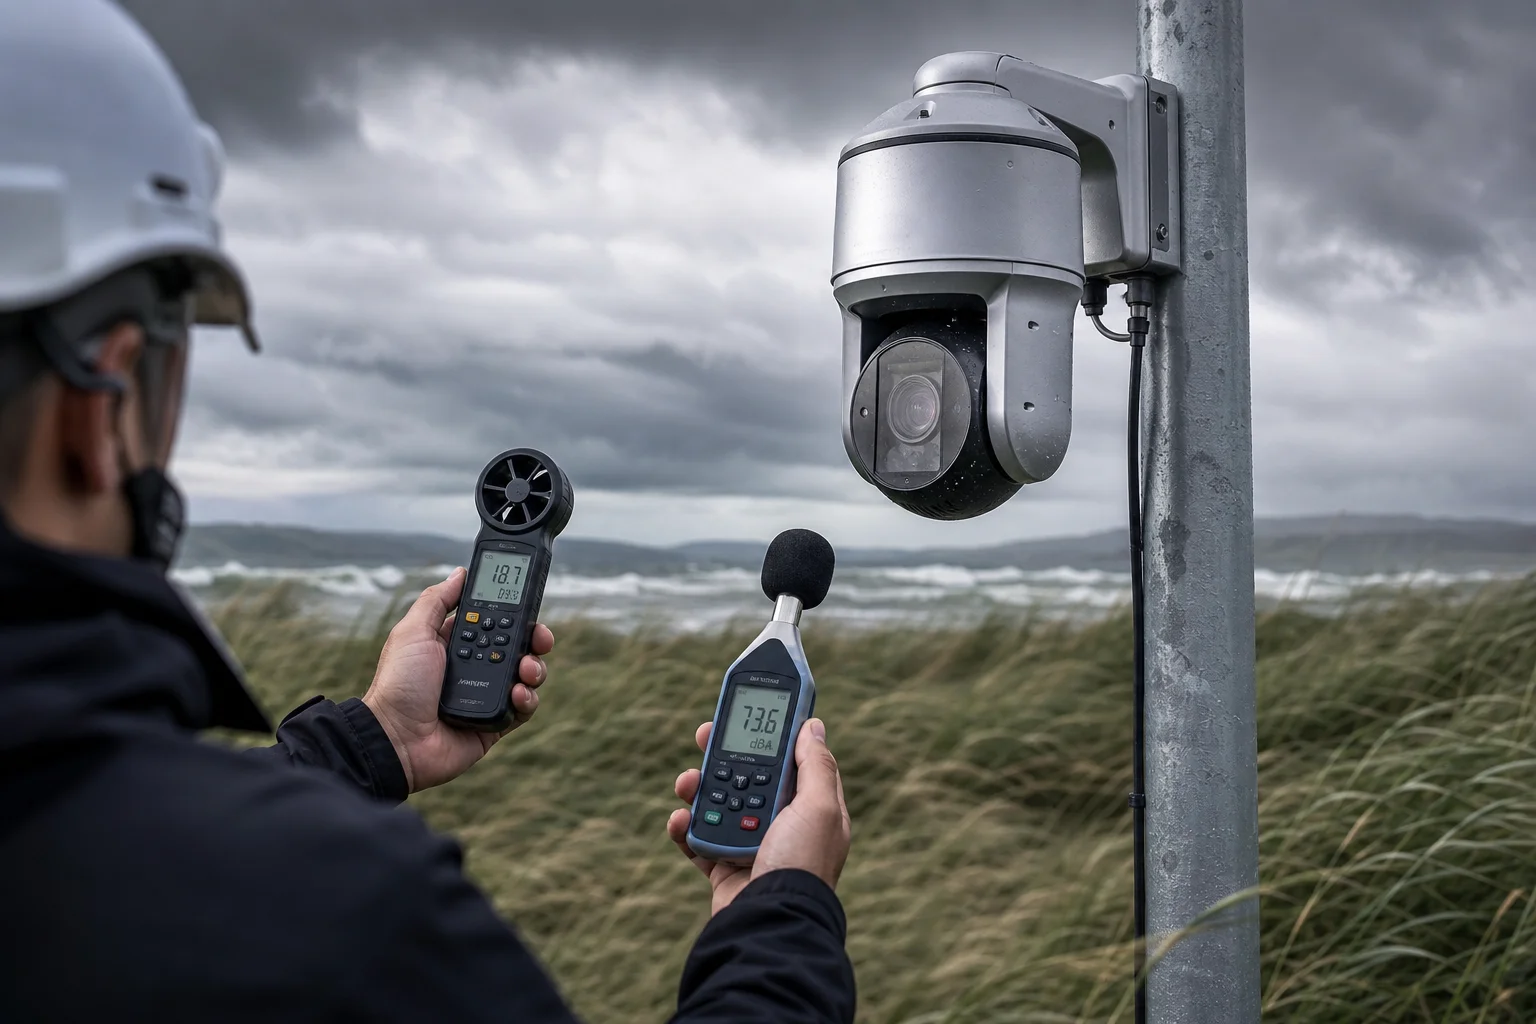 PTZ camera microphone sensitivity and wind noise testing outdoor
Below, I break down the four most common questions I get from integrators like David Miller who deploy PTZ cameras in wide-open, windy areas. Each section gives you a clear, testable method you can use to evaluate any camera before you commit to a bulk order.
Table of Contents
Can I Hear Clear Human Voices Even When the Wind Speed Exceeds 20 mph?
This is the first question every field engineer asks me. A camera that goes deaf in wind is a liability, not an asset.
Yes, you can hear clear human voices in 20+ mph wind — but only if the microphone has a high enough signal-to-noise ratio. In my testing, a well-designed PTZ mic should maintain at least 12–15 dB SNR between voice and wind noise at 5 meters distance. If it drops below 10 dB, the voice becomes mud.
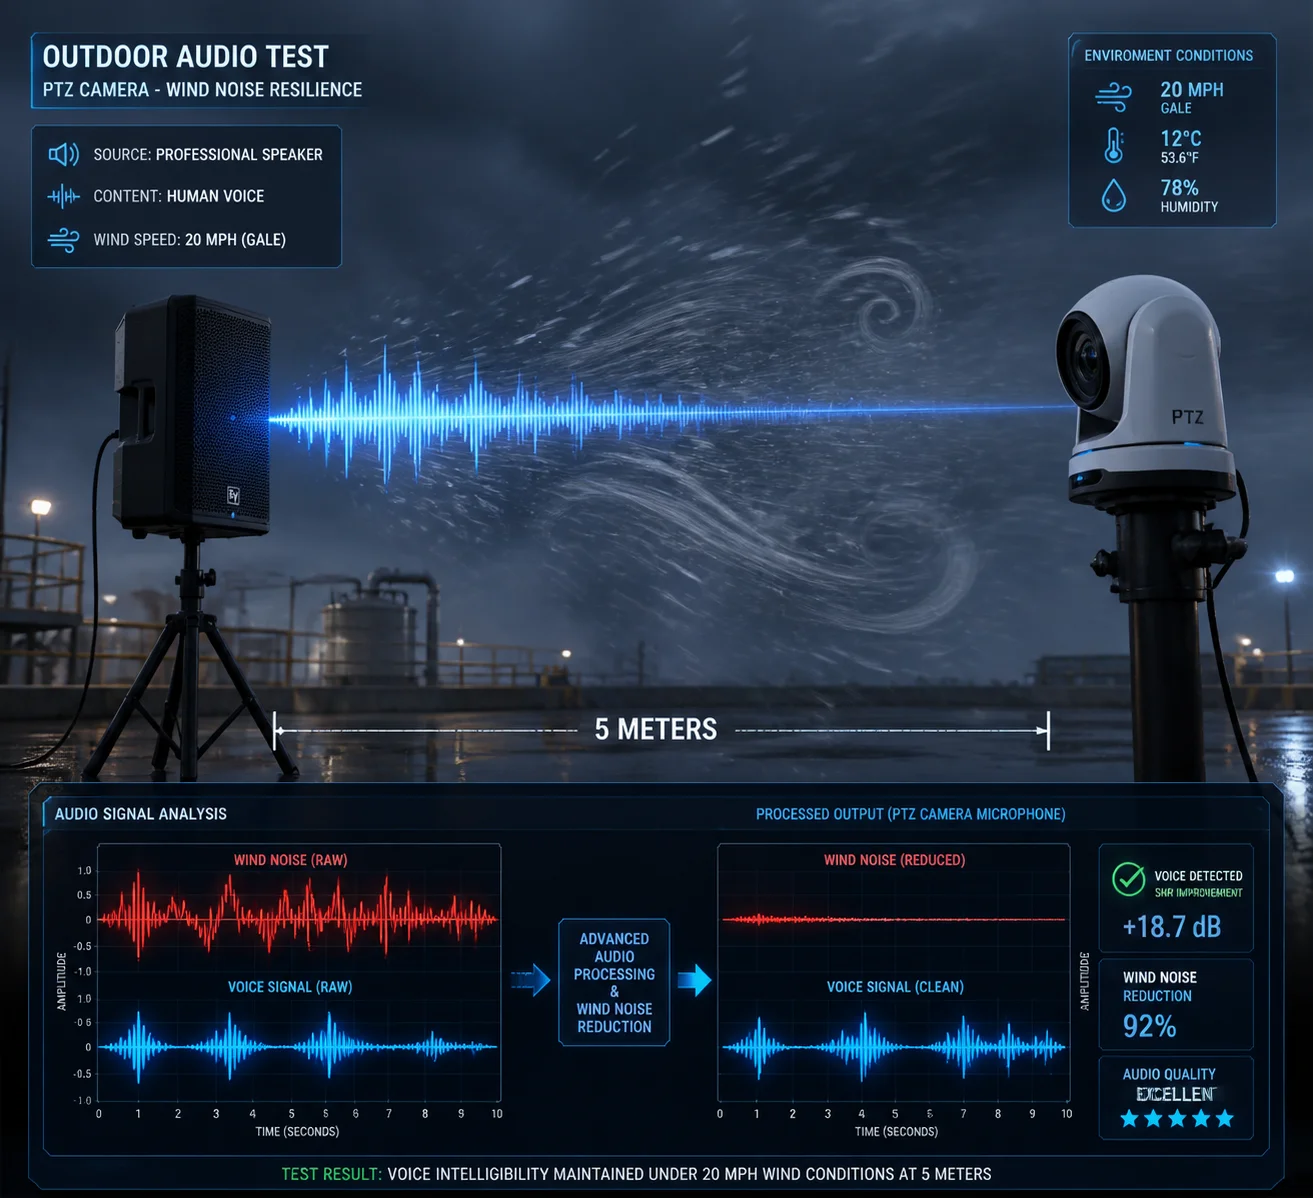 PTZ camera voice clarity test in windy outdoor conditions
What Does 20 mph Wind Actually Do to a Microphone?
20 mph is roughly 9 m/s. At this speed, the air hitting the microphone port creates turbulence. This turbulence is not “sound” in the normal sense. It is a pressure fluctuation caused by air swirling around the edges of the mic opening. The result is a deep, rumbling noise that sits mostly below 300 Hz. This low-frequency energy is powerful. It can easily overpower a human voice, which carries most of its intelligibility between 300 Hz and 4 kHz.
The problem is not that the mic cannot pick up voice. The problem is that the wind noise is so loud that it buries the voice underneath.
How to Test This in the Field
Here is a simple method I recommend to buyers who want to verify before signing a purchase order:
- Set up the PTZ camera at its intended mounting height.
- Place a portable speaker 5 meters away, playing a recorded voice sample at 65 dB SPL (normal conversation level).
- Use a handheld anemometer for measuring wind speed 1 to confirm wind speed.
- Record 60 seconds of audio from the camera in three conditions: no wind, moderate wind (5 m/s), and strong wind (9–10 m/s).
- Open the recordings in free software like Audacity audio analysis software 2. Measure the RMS level of the voice segments and the RMS level of the wind-only segments.
What the Numbers Should Look Like
| Condition | Voice RMS (dBFS) | Wind Noise RMS (dBFS) | SNR (dB) | Subjective Score (1–5) |
|---|---|---|---|---|
| No wind, 5 m | -18 | -50 | 32 | 5 — Crystal clear |
| Moderate wind (5 m/s) | -20 | -35 | 15 | 4 — Clear, slight background |
| Strong wind (9 m/s) | -22 | -34 | 12 | 3 — Understandable with effort |
| Strong wind, bad mic | -22 | -25 | 3 | 1 — Voice completely lost |
If your test results land in the bottom row, the camera’s mic design is not suitable for open-field deployment. I tell David and other integrators: do not trust spec sheets alone. Run this test on every new model before you order 50 units.
The “Distance Decay” Quick Check
If you do not have a speaker or anemometer handy, try this: stand 10 meters from the camera and speak at normal volume (about 60 dB). Play back the recording. If the voice waveform reaches at least 30% of the maximum amplitude and you can understand every word, the sensitivity is adequate for most outdoor jobs. If the waveform is a thin line buried in noise, walk away from that supplier.
Does the Camera Use Dual-Microphone Technology for Active Background Noise Cancellation?
I get this question a lot from CTOs who have read about noise cancellation in headphones and want the same thing in their security cameras.
Some PTZ cameras do use dual-microphone designs for wind noise cancellation. The principle is simple: wind noise hits each mic differently, but a real sound source like a voice hits both mics in a similar pattern. The processor compares the two signals, identifies the uncorrelated wind noise, and removes it. This can reduce wind noise by 6–15 dB without hurting voice clarity.
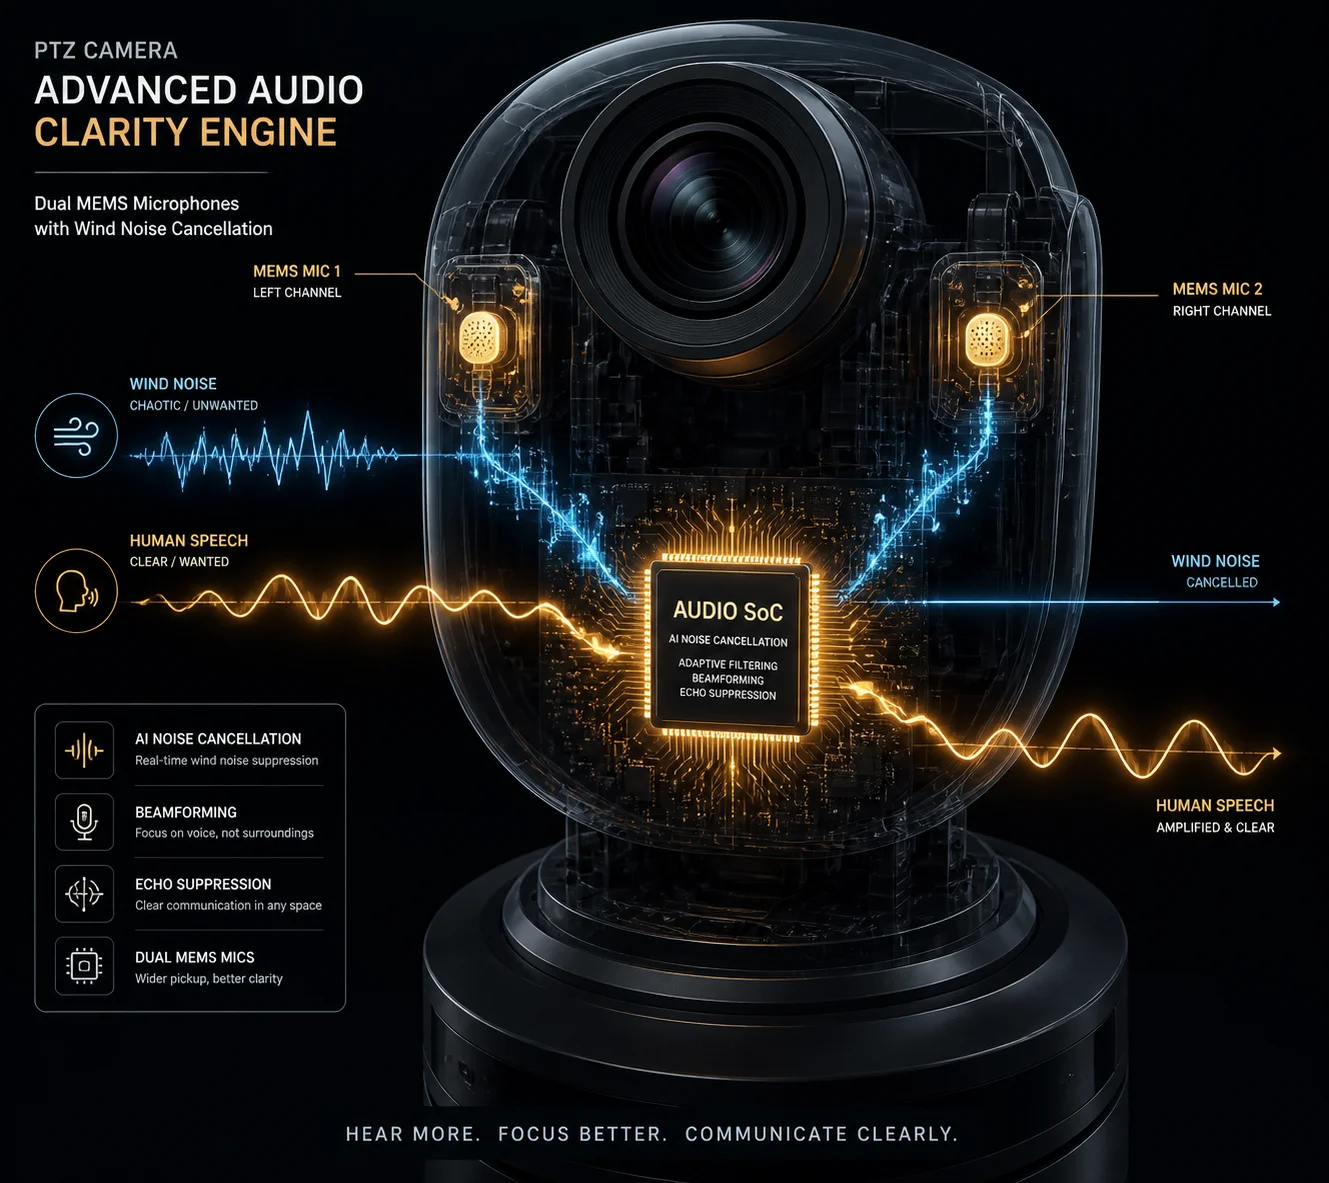 Dual microphone noise cancellation technology in PTZ security camera
How Dual-Mic Cancellation Actually Works
Think of it this way. Wind is chaotic. When a gust hits two microphones that are 20 mm apart, the pressure pattern on mic A is completely different from mic B. But when a person speaks 5 meters away, the sound wave arrives at both mics almost identically — same waveform, same timing, just a tiny delay.
The camera’s audio processor (usually built into the SoC) runs a correlation algorithm. It asks: “What part of these two signals looks the same?” That part is kept. “What part looks random and different?” That part is thrown away. Since wind noise is uncorrelated between the two mics, it gets filtered out. Since voice is correlated, it stays.
This technique is based on beamforming and differential microphone array theory 3.
Single Mic vs. Dual Mic: What You Actually Get
Not every camera that claims “noise reduction” uses dual mics. Many use a single mic with a simple high-pass filter that cuts everything below 200–300 Hz. This removes some wind rumble, but it also removes the low end of male voices and makes the audio sound thin and unnatural.
A true dual-mic system preserves more of the voice spectrum because it does not rely on frequency alone. It uses the spatial difference between the two mics to separate wind from voice.
What to Ask Your Supplier
When you are evaluating a PTZ camera from a Chinese manufacturer, ask these specific questions:
- How many microphones are built into the housing?
- Are they MEMS microphones vs ECM microphones 4?
- Does the SoC run a WNA (Wind Noise Attenuation) algorithm?
- Can you provide a recording sample with wind noise cancellation on vs. off?
If the supplier cannot answer these questions or cannot provide comparison audio, that is a red flag. At Loyalty-Secu, we provide side-by-side recordings to our B2B clients so they can hear the difference before ordering.
Testing the Dual-Mic System Yourself
Use the same wind + voice test setup from the previous section. Record with the noise cancellation feature turned on, then turned off. Open both files in Audacity and compare the frequency spectrum between 20 Hz and 500 Hz. A good dual-mic system should show a clear drop in low-frequency energy (the wind noise band) while keeping the 300 Hz–4 kHz voice band mostly untouched.
| Feature | Single Mic + HPF | Dual Mic + WNA Algorithm |
|---|---|---|
| Wind noise reduction | 3–6 dB | 6–15 dB |
| Voice naturalness | Thin, hollow | Fuller, more natural |
| Cost to manufacturer | Low | Moderate |
| Effective in gusts > 10 m/s | Poor | Moderate to good |
| Requires software tuning | Minimal | Yes, SoC firmware matters |
Is the Microphone’s High-Sensitivity Diaphragm Protected by a Waterproof, Breathable Membrane?
I have opened up cameras from at least a dozen factories. Some have proper acoustic membranes. Some have nothing but a bare hole drilled into the housing.
A good outdoor PTZ camera should have a waterproof, breathable membrane — often Gore-Tex grade or equivalent — covering the microphone port. This membrane blocks water and dust while allowing sound waves to pass through. Without it, rain or condensation will reach the diaphragm, cause corrosion, and kill the microphone within months.
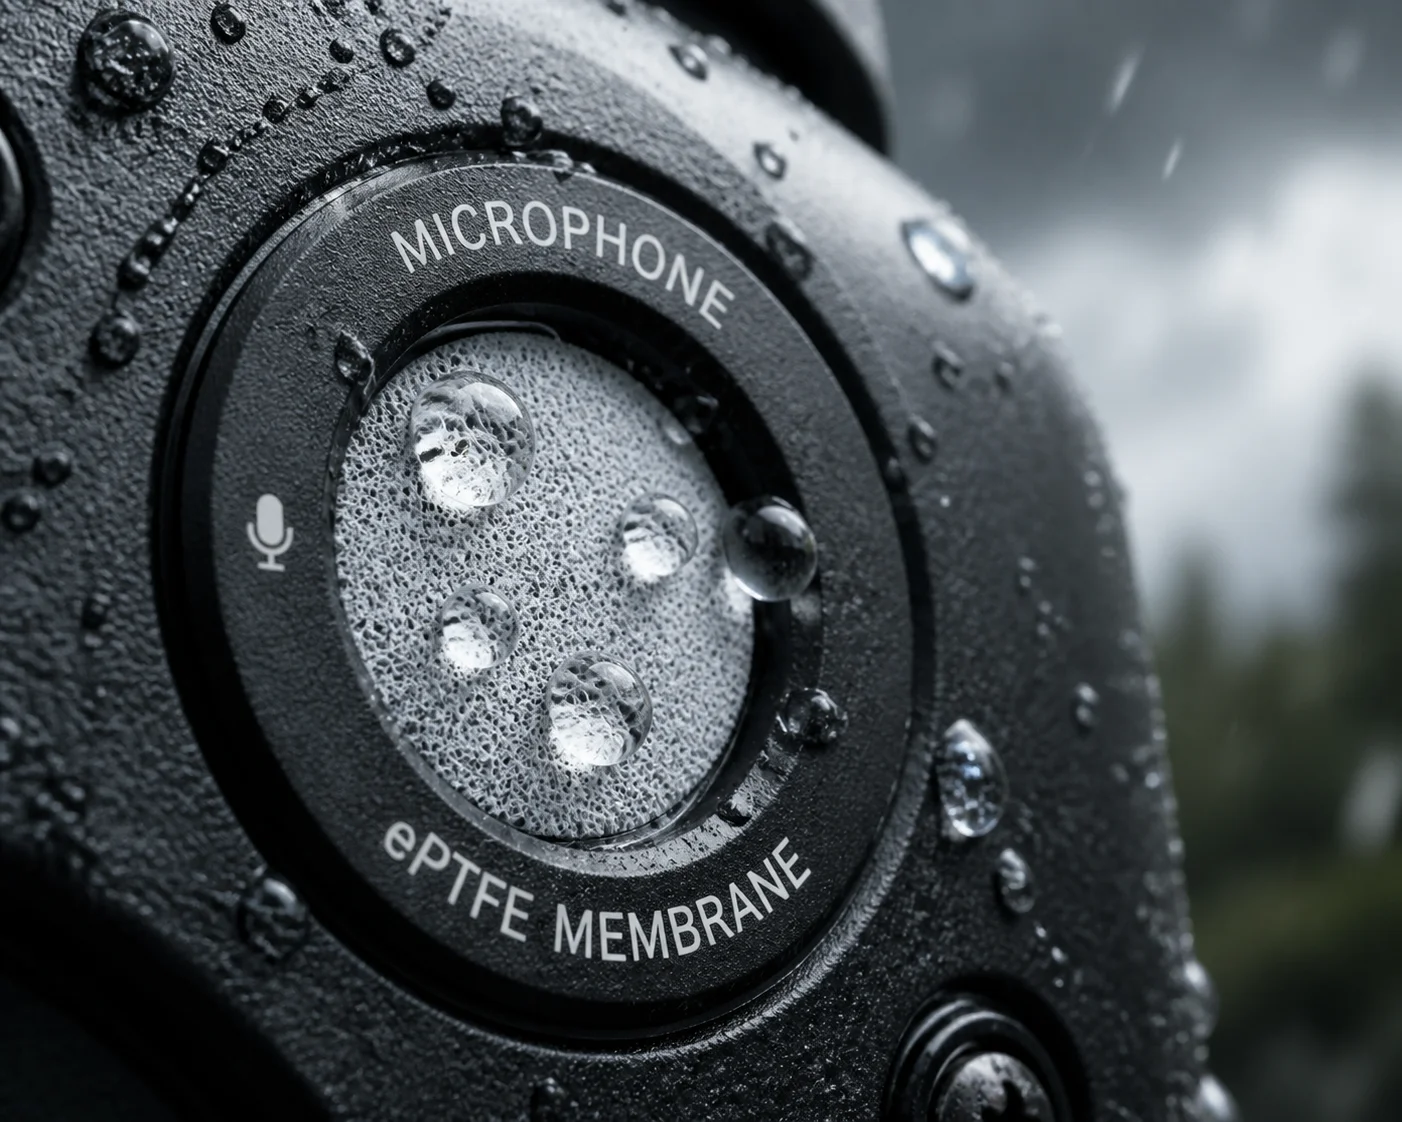 Waterproof breathable membrane protecting PTZ camera microphone port
Why Physical Protection Matters More Than You Think
The microphone diaphragm is the thinnest, most fragile part of the entire camera. In a MEMS microphone, the diaphragm is a silicon membrane only a few microns thick. In an ECM microphone, it is a thin polymer film. Either way, direct contact with water, salt spray, or fine dust will degrade performance fast.
In outdoor deployments — especially in coastal areas, deserts, or agricultural sites — the mic port is constantly exposed to the elements. Without a proper barrier, you will see these failure modes:
- Water ingress: Rain or condensation reaches the diaphragm. Sensitivity drops. Audio becomes muffled or disappears entirely.
- Dust clogging: Fine particles block the sound path. High-frequency response degrades first, making voices sound dull.
- Corrosion: Salt air or chemical exposure corrodes the electrical contacts. The mic produces crackling noise or dies completely.
What a Good Membrane Looks Like
A proper acoustic membrane has two jobs: keep water out and let sound in. These are opposing requirements, so the material must be carefully chosen.
The industry standard is an ePTFE membrane technology for acoustic vents 5 — the same material used in Gore-Tex jackets. It has microscopic pores that are large enough for air molecules (and therefore sound waves) to pass through, but small enough to block water droplets.
What to Inspect on a Sample Unit
When you receive a PTZ camera sample, look at the microphone port area closely. Here is what to check:
- Port shape: The opening should have rounded edges with a radius greater than 2 mm. Sharp edges create more turbulence, which means more wind noise.
- Membrane presence: You should see a thin membrane behind the port opening. If you can see straight through to the mic element, there is no protection.
- Foam backing: Behind the membrane, there should be a layer of open-cell acoustic foam. This foam breaks up the wind’s wavefront before it reaches the diaphragm. It acts as a secondary wind filter.
- Seal integrity: The membrane should be bonded to the housing, not just pressed in. Pull gently. If it moves, it will fail in the field.
The Trade-Off: Protection vs. Sensitivity
Every layer of protection between the outside air and the microphone diaphragm reduces sensitivity slightly. A thick foam pad will cut wind noise by 10 dB, but it might also cut high-frequency voice content by 3–5 dB. This is an acceptable trade-off for outdoor use. But if the manufacturer uses too much damping material, voices will sound muffled.
Ask your supplier for frequency response curves measured with and without the protective membrane. The difference at 4 kHz should be less than 5 dB. If it is more than that, the protection is too aggressive and will hurt audio clarity.
How Do I Adjust the Audio Gain Settings to Minimize “Clipping” in Loud Outdoor Areas?
I have heard this from David more than once: “The audio sounds fine at night, but during the day when trucks pass by, it turns into a distorted mess.”
Clipping happens when the audio signal exceeds the microphone’s maximum input level. To fix it, reduce the audio gain by 10–20% in the camera’s settings. You can also enable automatic gain control (AGC) if available, or apply a low-pass filter at 300 Hz in your VMS to cut the loudest wind energy before it causes distortion.
 Audio gain adjustment settings to prevent clipping on PTZ camera
What Clipping Actually Is
Every microphone and every analog-to-digital converter (ADC) has a maximum level it can handle. This is called the “maximum SPL” or “acoustic overload point.” For most MEMS microphones used in security cameras, this is around 120–130 dB SPL.
When the incoming sound exceeds this limit, the waveform gets chopped off at the top and bottom. Instead of a smooth wave, you get a flat-topped square shape. This sounds like harsh, crackling distortion. Once clipping happens in the recording, you cannot fix it in post-processing. The information is gone.
Common Causes of Clipping in Outdoor PTZ Deployments
- Wind gusts: A sudden gust can produce pressure spikes that exceed the mic’s range, especially if the gain is set high.
- Nearby machinery: Construction equipment, generators, or HVAC units can produce sustained loud noise above 100 dB.
- Vehicle pass-by: A truck horn or engine brake at close range can easily hit 110–120 dB.
- Thunder: Lightning strikes within a few hundred meters produce extreme pressure waves.
How to Set Gain Correctly
Most PTZ cameras with audio support let you adjust the microphone gain through the web interface or ONVIF audio settings 6. Here is my recommended approach:
Step 1: Start Low
Set the gain to its lowest level. Play a voice sample at 5 meters. If you can hear it clearly in the recording, leave the gain there. There is no reason to turn it up higher than necessary.
Step 2: Check for Clipping
Play a loud sound (clap your hands hard at 1 meter, or use a 90 dB test tone). Look at the waveform in your VMS or recording software. If the peaks touch the top and bottom of the waveform display, you have clipping. Reduce gain by another 10%.
Step 3: Use the 80% Rule
I tell all my clients: set the gain so that the loudest expected sound in your environment reaches about 80% of the maximum waveform height. This leaves 20% headroom for unexpected spikes.
Gain Settings Quick Reference
| Environment Type | Recommended Gain Level | Low-Pass Filter | AGC |
|---|---|---|---|
| Quiet rural area | 70–80% | Off | On |
| Suburban with traffic | 50–60% | Optional at 200 Hz | On |
| Windy open field | 40–50% | On at 300 Hz | On |
| Industrial / construction site | 30–40% | On at 300 Hz | Off (manual control) |
| Near highway or heavy machinery | 20–30% | On at 300 Hz | Off (manual control) |
A Note on AGC (Automatic Gain Control)
AGC automatically adjusts the gain based on the incoming sound level. When it is quiet, AGC turns the gain up. When it is loud, AGC turns it down. This sounds ideal, but it has a weakness: in gusty wind, AGC constantly pumps up and down, creating a “breathing” effect that sounds unnatural and can make voice segments harder to understand.
For windy sites, I recommend turning AGC off and setting a fixed, conservative gain level. You lose some sensitivity during quiet moments, but you avoid the pumping artifact and clipping during gusts.
The VMS-Side Fix
If you cannot adjust the camera’s gain (some budget models lock it), you can apply a 300 Hz high-pass filter in your VMS software. This will not fix clipping that already happened at the mic level, but it will remove the low-frequency wind energy from the playback and make the remaining voice content easier to hear. David uses this trick in Blue Iris VMS software 7, and it eliminates about 80% of the “thunder rumble” from wind.
Conclusion
Testing outdoor microphone performance comes down to two numbers: voice level and wind noise level. Measure both, calculate the SNR, and you will know exactly which PTZ camera delivers usable audio in the field — and which one is just spec-sheet marketing. If you need help choosing the right model or want sample recordings from our factory tests, reach out to me at han.nie@loyalty-secu.com.
1. NOAA guide to accurate wind speed measurement. ↩︎ 2. Audacity open-source audio editing and analysis software. ↩︎ 3. Analog Devices technical article on microphone array beamforming. ↩︎ 4. Comparison of MEMS vs electret condenser microphones. ↩︎ 5. Gore acoustic vent technology for electronic devices. ↩︎ 6. ONVIF audio profile specifications for IP cameras. ↩︎ 7. Blue Iris VMS software for video surveillance. ↩︎