
I have seen too many buyers get burned by fake “40X zoom” claims that fall apart on the job site. The problem is real. The cost is painful.
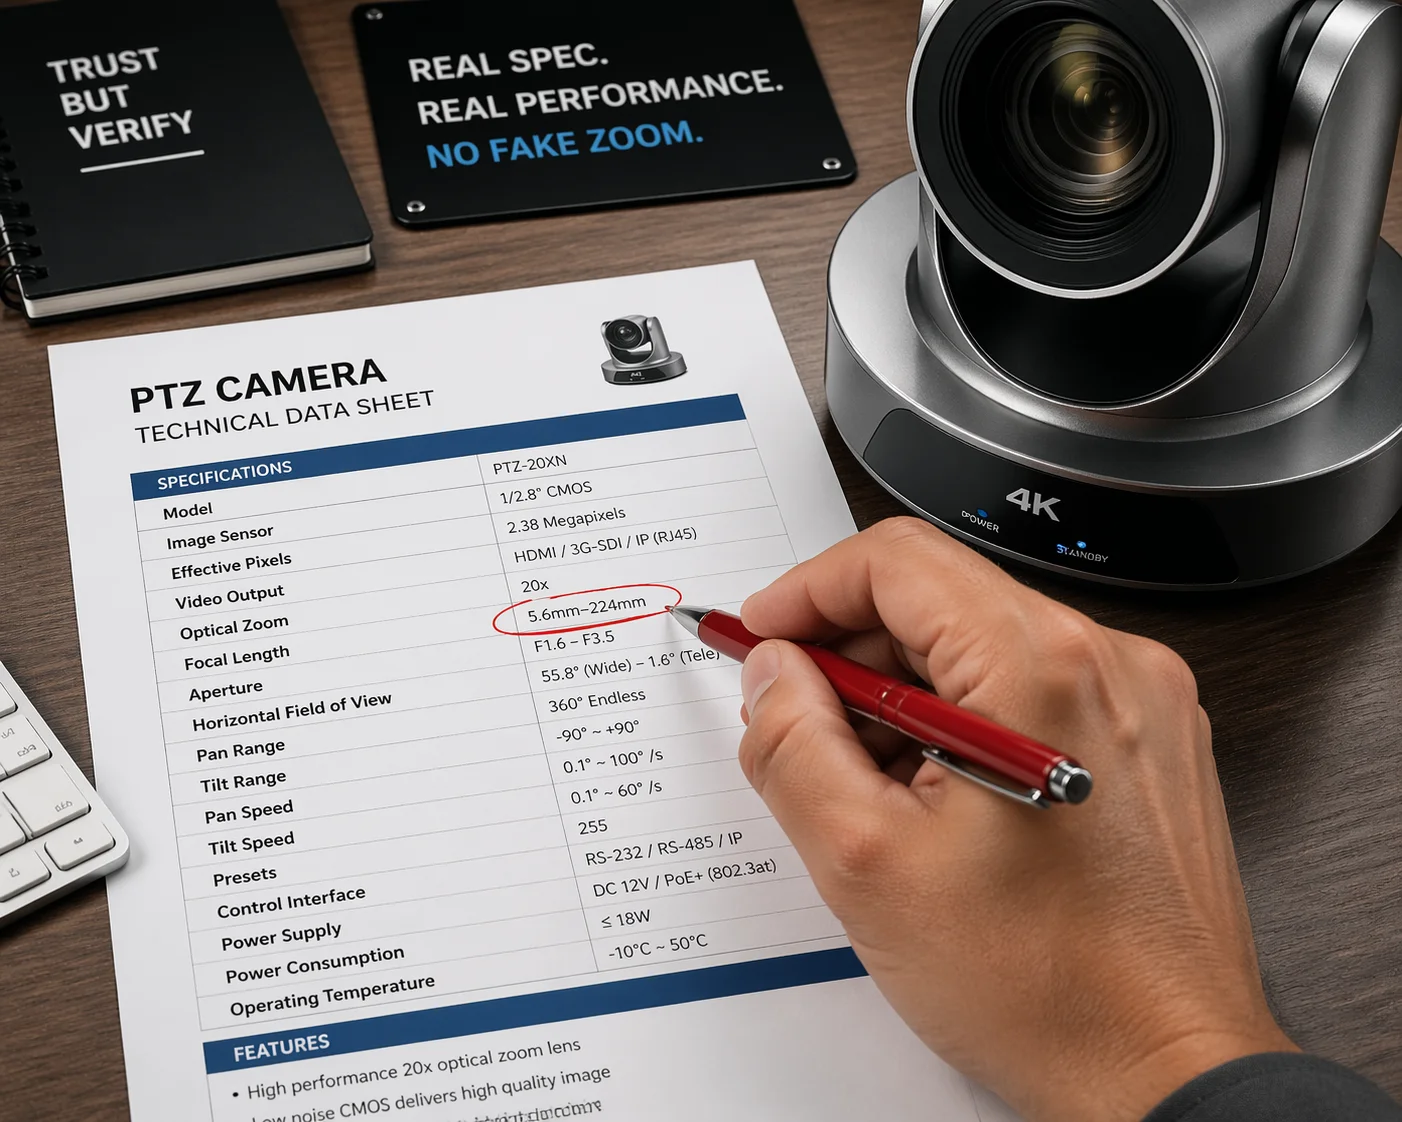
To verify real 40X optical zoom1, I check three things: the focal length range2 on the data sheet3 (such as 5.6mm to 224mm), the physical lens module size inside the housing, and the image sharpness4 at full zoom. If any of these fail, the camera uses digital interpolation5 to fake the number.
 verify 40X PTZ camera optical zoom vs digital interpolation
Below, I break down the exact methods I use to catch fake zoom specs before they cost you a failed project. Each section covers a different angle. By the end, you will have a complete checklist to protect your next purchase.
How Do I Identify Fake Zoom Claims in a Chinese Supplier’s Data Sheet?
I learned this the hard way. A clean-looking data sheet can hide the biggest lies. The numbers look right until you know exactly where to look.
I identify fake zoom claims by checking if the data sheet separates optical zoom from digital zoom and lists a specific focal length range in millimeters. If it only says “40X zoom” with no breakdown, that is always a red flag I never ignore.
 how to identify fake zoom claims PTZ camera data sheet
The Three Numbers That Matter
The most important line on any PTZ camera data sheet is the focal length range. A true 40X optical zoom camera will show something like “5.6mm–224mm” or “4.25mm–170mm.” This tells you the lens physically moves from a wide angle to a narrow telephoto. If you divide the max focal length by the min, you get the real optical zoom ratio. For example, 224 ÷ 5.6 = 40X. If the data sheet skips this line, ask why.
Next, look for separate entries for optical zoom and digital zoom. Honest manufacturers list both. A spec sheet might say “40X optical zoom + 16X digital zoom.” That is clear. But some suppliers write “40X zoom” and hide the fact that it is 10X optical combined with digital padding. They multiply the two numbers together or just round up to make the headline look impressive.
I also check the horizontal field of view6 at both ends. A real 40X optical lens has a wide angle around 55°–65° and a telephoto angle around 1.5°–2°. If the data sheet only lists one angle or skips this spec entirely, the supplier is hiding something.
Red Flag Checklist for Data Sheets
| What to Check | Good Sign | Bad Sign |
|---|---|---|
| Focal length range | Listed clearly (e.g., 5.6mm–224mm) | Missing or vague |
| Optical vs. digital zoom | Separated into two lines | Only “total zoom” shown |
| Sensor or block camera model7 | Named (e.g., Sony IMX series) | Not mentioned at all |
| Horizontal field of view | Wide and tele angles both listed | Only one angle or none |
| Price vs. similar branded models | Comparable range | Far cheaper than known 40X cameras |
Why the Block Camera Model Matters
One trick I always use is asking the supplier for the block camera model. This is the internal module that contains the sensor and lens assembly. Real manufacturers like Loyalty-Secu will tell you the exact model right away. They will tell you it uses a Sony Starvis sensor or a similar high-grade chip. If the supplier dodges this question or only talks about the outer shell and the color of the housing, something is wrong.
A true 40X optical module is expensive to build. It uses precision glass elements8 and metal gears. If the supplier cannot name the module, they are likely using a lower-spec block and padding the zoom number with digital interpolation. I recommend cross-checking the block camera model online. Many modules from known sensor makers have published specs. You can confirm the real optical zoom range in minutes.
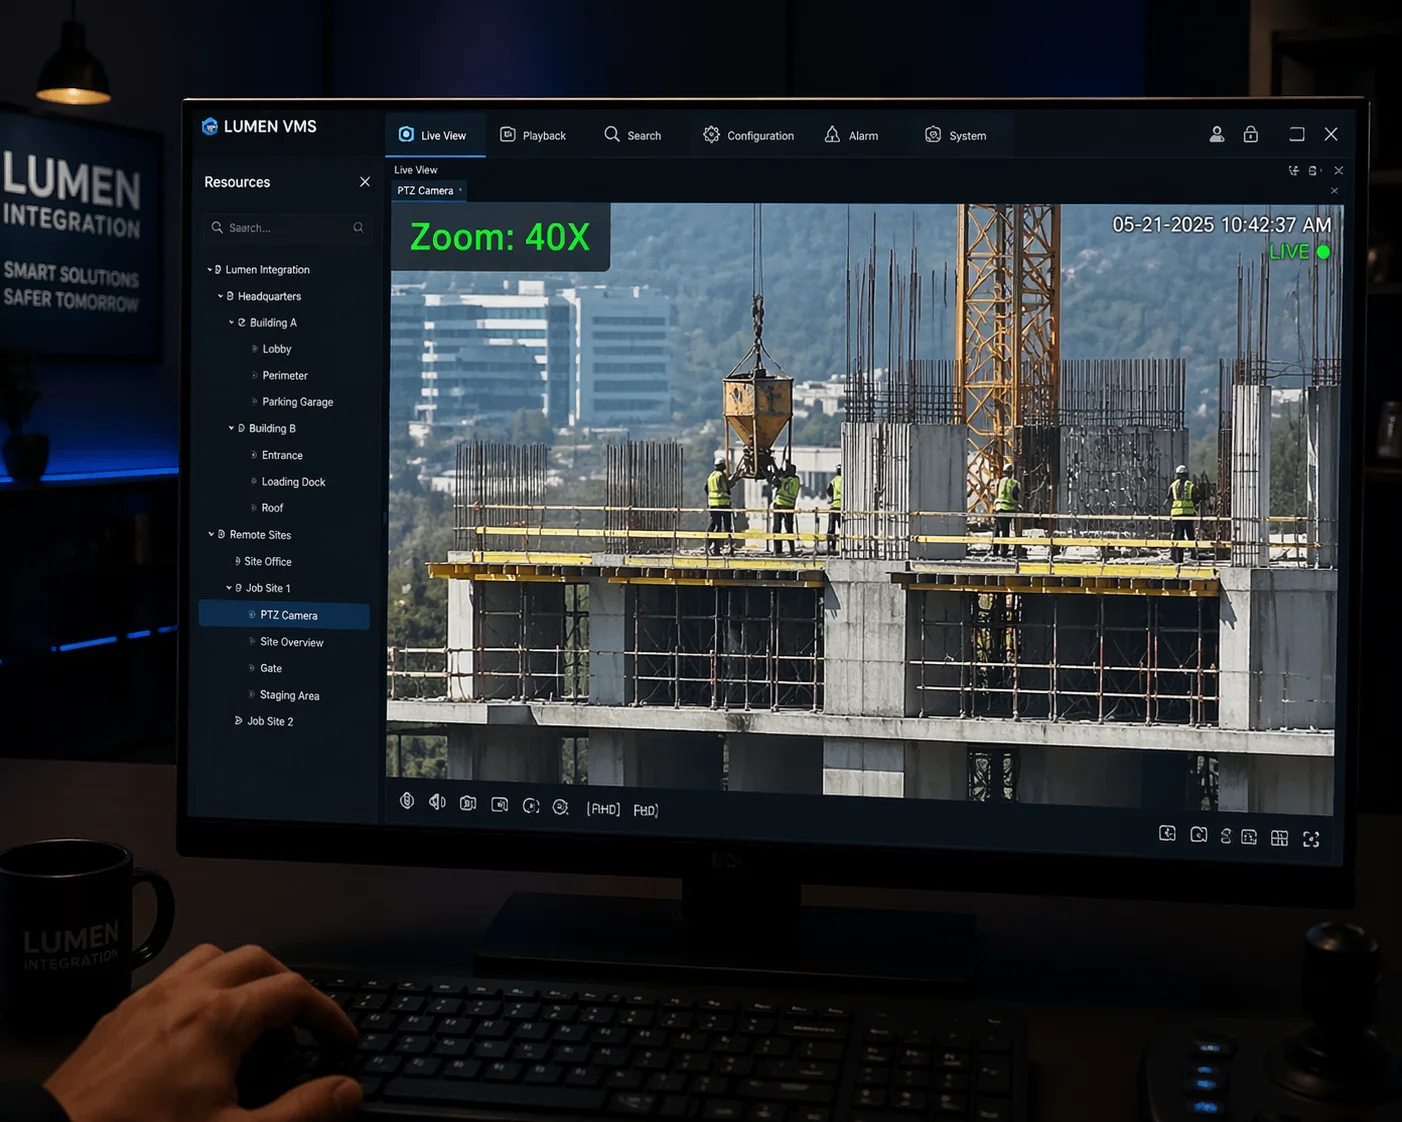
Can I Request a Live Video Demo to See the Lens Moving During 40X Zooming?
Most buyers skip this step. That is a mistake. A live demo reveals things no data sheet ever will.
I always request a live video call or recorded demo showing the full zoom range from 1X to 40X. During the demo, I listen for the motor sound and watch for smooth, gradual magnification. If the zoom jumps instantly and the image gets blurry, it is digital — not optical.
 live video demo PTZ camera lens moving 40X zoom test
How a Real 40X Optical Zoom Looks and Sounds
A true 40X optical zoom lens uses a stepper motor9 to move heavy glass elements inside the housing. This takes time. When I zoom from 1X to 40X on a real module, the process is smooth and gradual. I can hear a faint motor hum through the camera’s audio channel or even through the dome if I stand close enough. The image stays sharp during the entire travel. Focus may briefly adjust at certain points, but details remain clear throughout.
Digital zoom behaves differently. The jump happens almost instantly. There is no motor sound because no glass is moving. The image appears to “snap” closer, and within seconds, I notice soft edges and pixel blocks appearing. At 40X digital, a license plate at 500 meters becomes a useless blob of color. At 40X optical, I can still read the characters clearly.
What to Ask During the Demo
Here is what I tell every buyer to request during a live demo:
- Ask the supplier to zoom slowly from 1X to 40X while keeping the microphone on. Listen for the motor hum.
- Ask them to pause at 10X, 20X, and 40X. Compare sharpness at each level.
- Ask them to zoom past 40X. If the camera keeps zooming beyond 40X, everything after the optical limit is digital. Note the exact point where the image starts to break down.
- Ask them to show the OSD menu10 or web interface during the zoom. True 40X cameras display the current zoom ratio on screen.
The OSD Menu Trick
This is something I picked up after years of testing cameras at our facility. I bypass the client software and go directly into the camera’s built-in web page. I can also use RS485 commands to pull up the on-screen display. A real 40X camera will stop its zoom counter at 40. If the counter goes past 40 and the image quality drops sharply after a certain point — say after 10X or 20X — then everything beyond that point is digital padding. The camera told on itself. I just had to know where to look.
At Loyalty-Secu, when clients ask for a demo, I show the full zoom travel with the OSD overlay running. I want the buyer to see the zoom counter climb from 1 to 40 while the image stays sharp. I have nothing to hide because the optics are real.
What Specific Hardware Components Should I Check to Confirm True Optical Zoom?
Specs on paper are one thing. The hardware inside the camera tells the real story. I have opened enough cameras over the years to know exactly what to look for.
I check three hardware components: the physical length of the lens module (a true 40X module is at least 12–15 cm long), the type of gears driving the zoom (metal vs. plastic), and the sensor chip11 model printed on the PCB. These three items cannot be faked.
 hardware components confirm true optical zoom PTZ camera
The Physics of a 40X Lens Module
Optics follow physical laws. No marketing trick changes that. A 40X optical zoom lens needs enough glass elements and enough internal travel distance to shift from a wide focal length (around 5mm) to a long telephoto (around 200mm). This requires space inside the camera. The lens module will be at least 12 to 15 centimeters long. If the camera housing12 is very compact and shallow, it simply cannot fit a real 40X module inside. I always measure. If the dome is only 8 cm deep, there is no room for 40X glass. Basic physics wins every time.
Key Components to Inspect
| Component | What to Look For | Why It Matters |
|---|---|---|
| Lens module length | 12–15 cm minimum for 40X | Shorter modules cannot house enough glass for full optical travel |
| Zoom gear material | Metal (brass or steel) | Plastic gears wear out in 6 months of heavy use, causing focus drift13 |
| Sensor chip | Named brand (e.g., Sony IMX series) | High-quality sensors pair with real optical modules |
| Lens element count | 15+ elements in multiple groups | More glass elements allow greater zoom range and image correction14 |
| Motor type | Stepper motor with encoder | Ensures precise, repeatable zoom positioning |
Why Gear Material Predicts Long-Term Reliability
This is a point most buyers miss completely. Even if a camera has a real 40X module today, some low-cost factories cut corners on the gear train. They use plastic gears instead of metal ones. For the first few months, the camera works fine. But after six months of daily zooming — in and out, hundreds of times a day — plastic gears wear down. The teeth lose their shape. The lens elements no longer land in the correct position.
The camera develops a problem called focus drift. The image goes soft at certain zoom levels and never fully sharpens. For a PTZ camera mounted on a 20-meter pole at a remote construction site, focus drift means I need a crane truck to bring the camera down. That single truck rental can cost more than the camera itself. I have seen this happen to clients who chose the cheapest option. The initial savings disappeared overnight.
At Loyalty-Secu, I use metal gears in our 38X and 40X modules specifically to prevent this problem. The cost per unit is slightly higher. But the total project cost — including avoided truck rentals and avoided re-installations — is much lower.
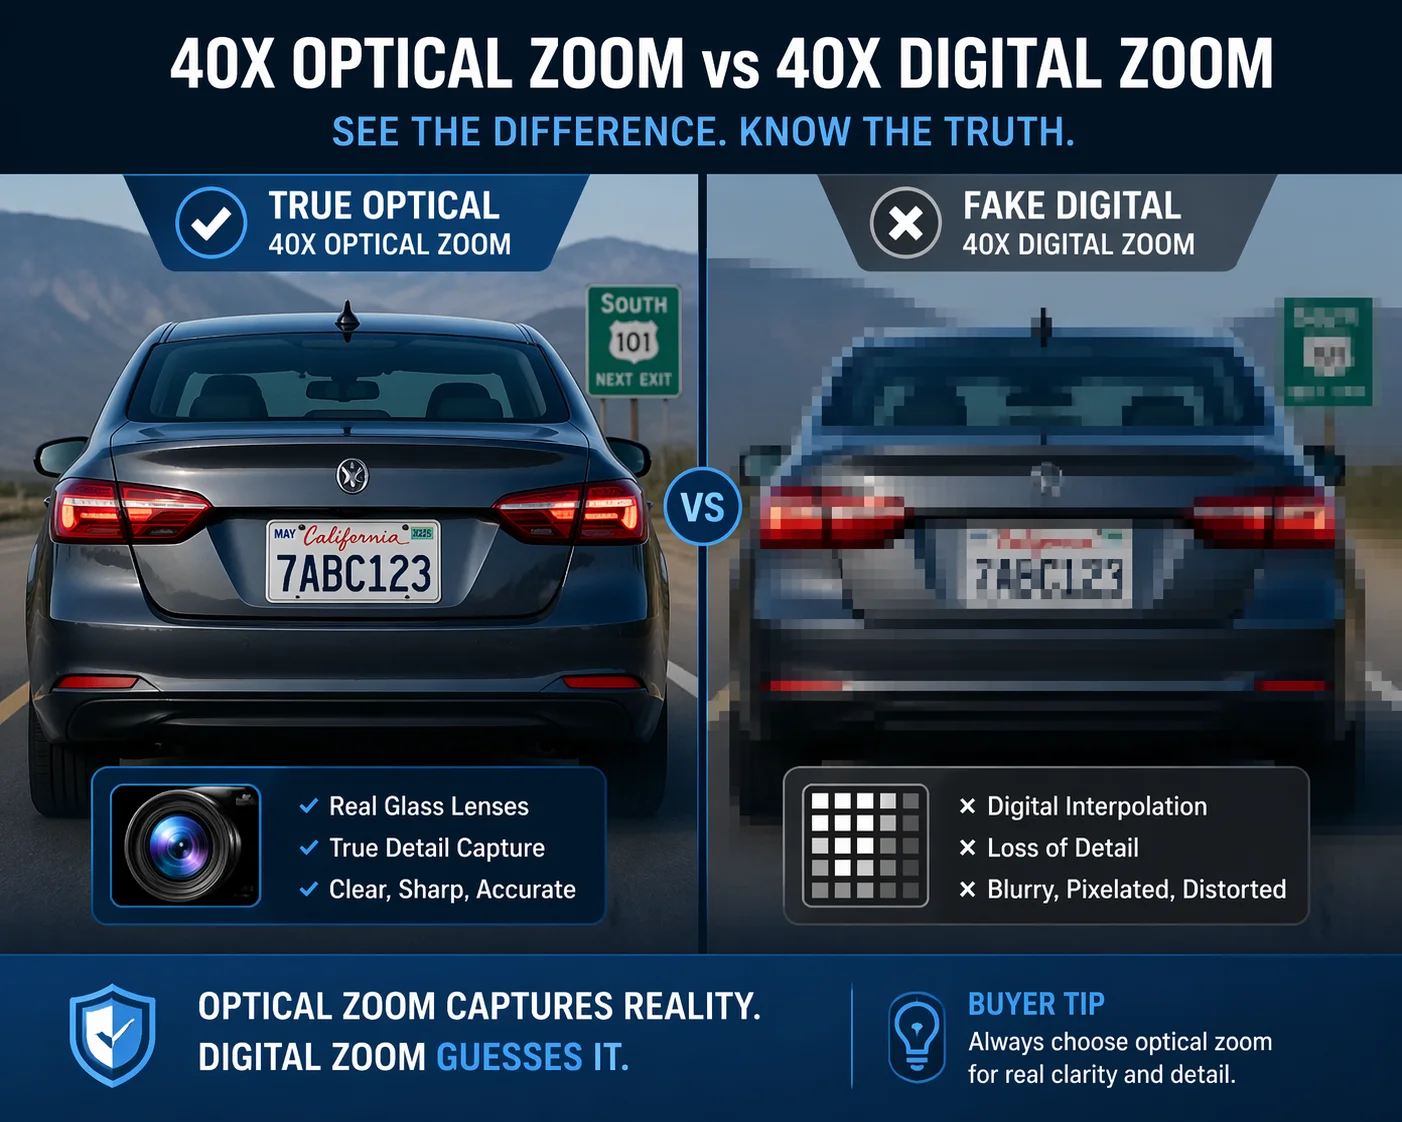
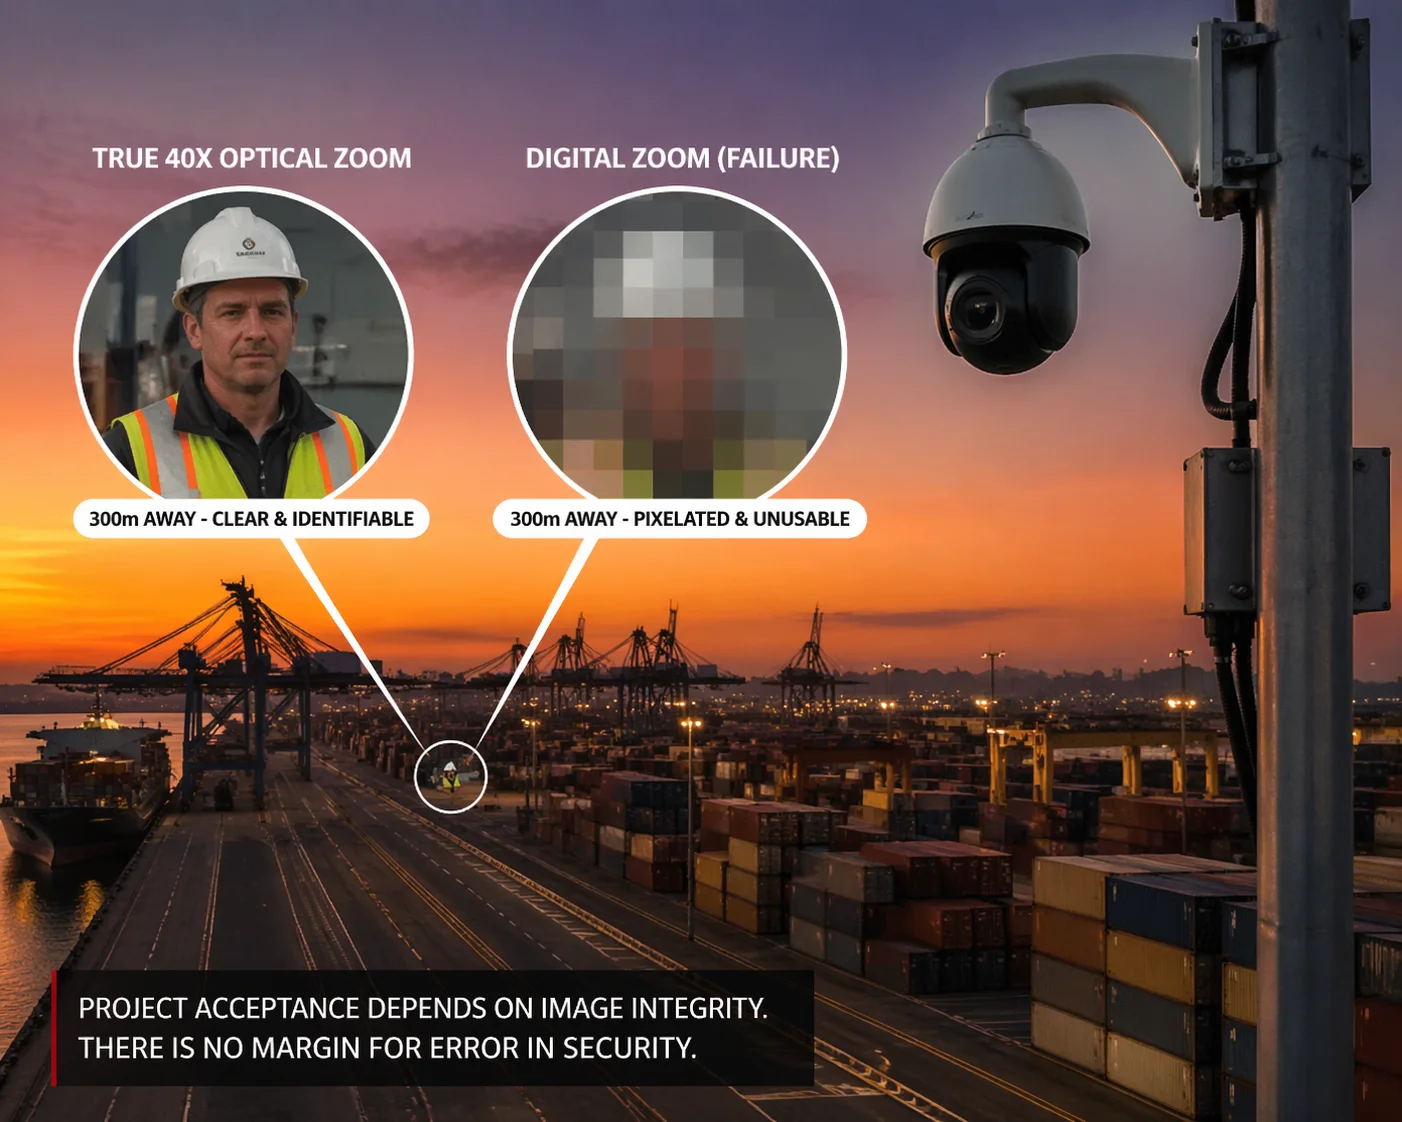
Why Does the Image Quality of My PTZ Camera Degrade at Maximum Zoom Levels?
I zoom in to 40X and the image turns into a blurry mess. This is the number one complaint I hear from buyers who purchased from the wrong supplier. It usually means one thing.
Image quality degrades at maximum zoom because the camera switches from optical zoom to digital interpolation at some point during the zoom travel. Optical zoom keeps the image sharp by physically adjusting the lens. Digital zoom just crops and enlarges pixels, which destroys fine detail.
 PTZ camera image quality degradation maximum zoom digital interpolation
Understanding the Quality Cliff
Most hybrid PTZ cameras have a specific point where optical zoom ends and digital zoom begins. I call this the “quality cliff15.” Up to that point, the image is clean and detailed. Past that point, quality drops fast. The camera is now just enlarging a small section of the sensor’s output. No new detail is being captured. I am looking at stretched pixels.
For example, a camera with 10X optical and 4X digital will produce good images up to 10X. From 10X to 40X (10 × 4 = 40), the image gets worse with each step. At 40X, a face at 300 meters looks like a blurred square of color. This is completely useless for security work.
How to Find the Quality Cliff
| Zoom Level | True 40X Optical Camera | 10X Optical + Digital Padding |
|---|---|---|
| 1X–10X | Sharp, full detail | Sharp, full detail |
| 10X–20X | Sharp, full detail | Noticeable softness begins |
| 20X–30X | Sharp, slight atmospheric haze possible | Heavy pixelation, blocky edges |
| 30X–40X | Still sharp under good conditions | Image is unusable for identification |
The Real-World Cost of the Quality Cliff
In my experience, the quality cliff is not just a technical issue. It is a business risk that can end a project. When a system integrator installs cameras on a government contract, there is always an acceptance test at the end. The client zooms to maximum and checks if they can identify targets at the required distance. If the image falls apart at 20X because the remaining 20X is digital filler, the project fails acceptance. The integrator faces penalties. Sometimes they lose the entire contract and their reputation along with it.
I have worked with clients who came to Loyalty-Secu after exactly this scenario. They bought cheap “40X” cameras from a no-name supplier to save money upfront. The project failed inspection. They had to replace every single camera on every pole. The total cost — including crane rentals, new labor hours, shipping for replacement units, and the new hardware itself — was three times what they would have spent buying real 40X optical cameras from the start.
This is why I always tell buyers: verify the zoom before you commit. Ask for the focal length range. Ask for the block camera model. Request a live demo with the OSD overlay showing the zoom counter. Open the camera and measure the lens module if you can. And if the price seems too good to be true for a 40X camera, it almost certainly is. The cheapest camera always becomes the most expensive camera when the project fails.
Conclusion
Verify focal length, inspect the hardware, and test image sharpness at full zoom. These three steps protect you from fake 40X claims and costly project failures every time.
-
Understanding true optical zoom helps you avoid misleading claims and ensures you invest in quality equipment. ↩
-
Knowing how to read focal length ranges can help you identify genuine optical zoom capabilities. ↩
-
A well-structured data sheet reveals essential information about camera specifications and performance. ↩
-
Assessing image sharpness is crucial for ensuring the camera meets your project requirements. ↩
-
Learn about digital interpolation to understand how it affects image quality and zoom performance. ↩
-
Measuring the field of view is essential for understanding the camera’s coverage capabilities. ↩
-
Knowing the block camera model helps you verify the quality and specifications of the camera. ↩
-
Knowing about precision glass elements can help you assess the quality of optical zoom lenses. ↩
-
Learning about stepper motors can help you understand how zoom mechanisms work in cameras. ↩
-
Understanding the OSD menu can provide insights into the camera’s features and performance. ↩
-
Understanding sensor chips helps you assess the quality and performance of the camera. ↩
-
Understanding the impact of housing design can help you choose cameras that fit your needs. ↩
-
Understanding focus drift can help you choose cameras that maintain sharpness over time. ↩
-
Understanding image correction can help you evaluate the quality of zoom lenses. ↩
-
Knowing about the quality cliff can help you identify the limits of a camera’s zoom capabilities. ↩