
I’ve seen 4G modules die in the cold. No warning. No error log. Just silence from a frozen circuit board in northern Canada.
Yes, our 4G module includes a three-stage active pre-heat mechanism for cold starts at -40°C. The system uses a PTC ceramic heating pad, RF self-heating logic, and battery-aware soft-start to warm the modem before it attempts to register on the cellular network.
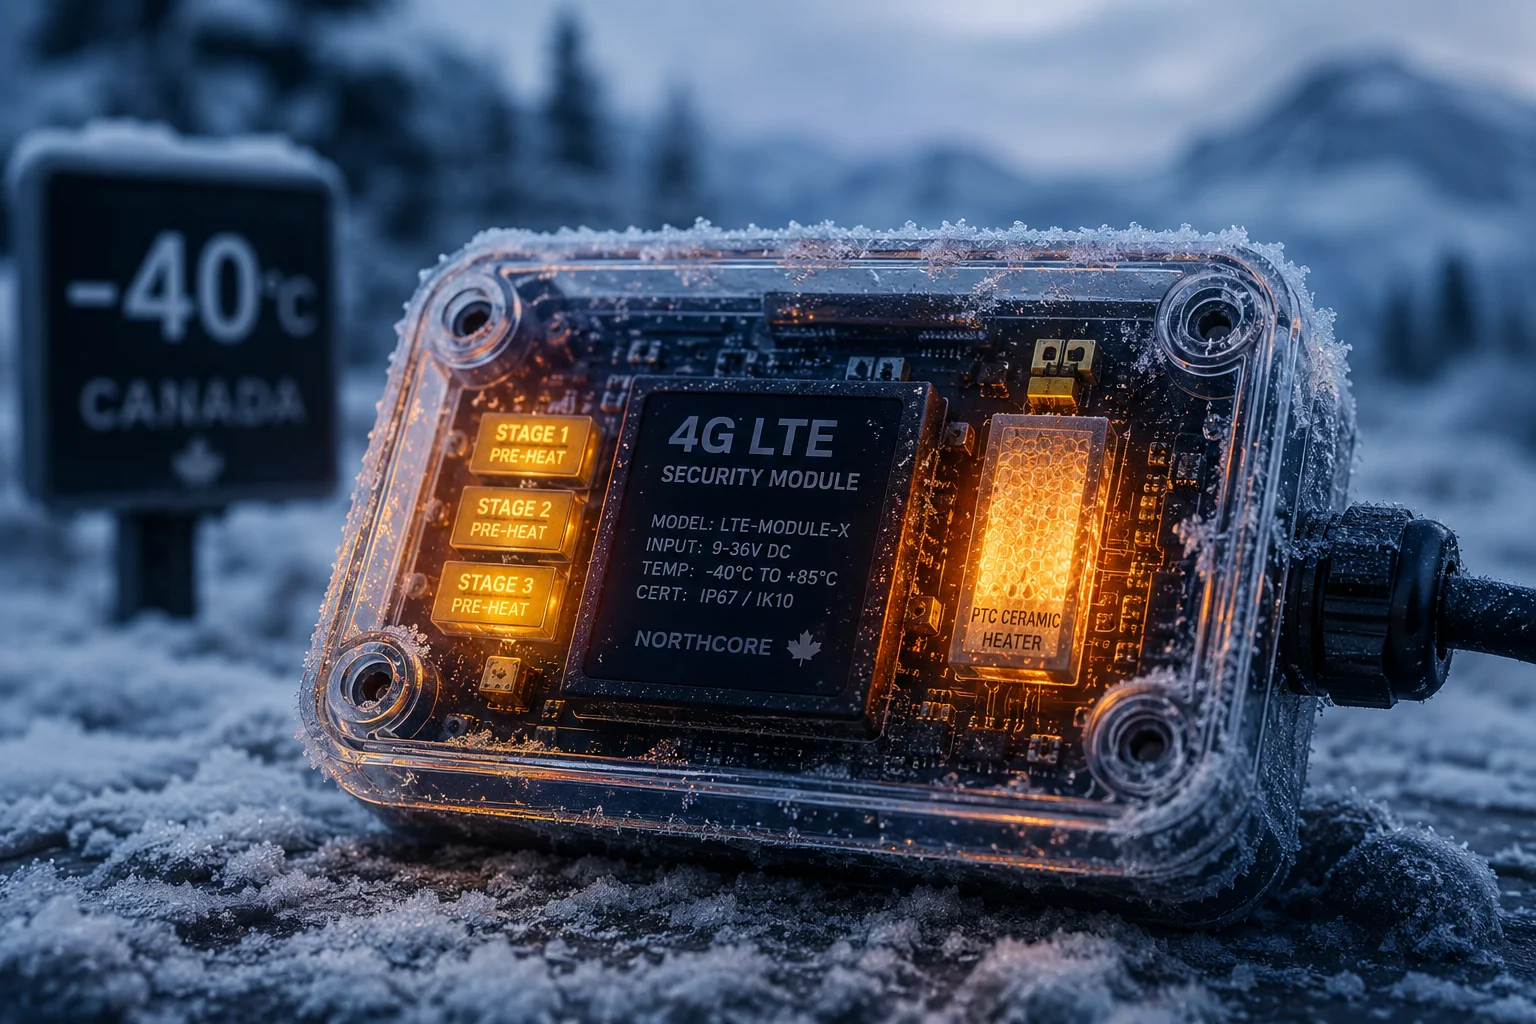 4G module cold start pre-heat mechanism at minus 40 degrees
Below, I’ll walk you through exactly how each stage works, how much power it costs, and what you need to know before deploying in extreme winter. Let’s get into it.
Table of Contents
Will the Internal Heater Warm the Cellular Modem Before It Attempts to Register?
A dead modem in a frozen field costs you more than the camera itself. The truck roll, the labor, the lost footage — it adds up fast.
Yes. The internal PTC heater warms the cellular modem before it tries to register. When the onboard temperature sensor reads below -20°C, the MCU delays power to the 4G module and activates the heating pad first. The modem only powers on after the local temperature rises above -10°C.
 PTC ceramic heater warming 4G modem before registration
Why Direct Power-On Fails at -40°C
Most industrial-grade 4G modules — like the Quectel EC25 series1 — list -40°C as their lower operating limit. That number is on the datasheet. But in the real world, “operating” and “reliably starting from a dead-cold state” are two very different things.
At -40°C, two things go wrong inside the module:
- The crystal oscillator may not start. The crystal needs to vibrate at a precise frequency to generate the clock signal. Extreme cold changes the mechanical properties of the quartz. If the crystal oscillator2 can’t oscillate, the module has no clock. No clock means no processor activity. The module is brain-dead.
- Electrolytic capacitors3 lose capacity. The electrolyte inside these caps becomes sluggish. Their effective capacitance drops, sometimes by 50% or more. This means the power supply can’t filter noise properly, and the module’s internal voltage rails become unstable.
So even if you force power into the module at -40°C, it may not boot. Or it boots, but the RF front-end can’t lock onto a frequency. Or it locks on, but the signal is too noisy for the base station to accept the handshake.
How Our Three-Stage Pre-Heat Solves This
Here is the sequence our firmware follows on every cold start:
| Stage | Trigger Condition | Action | Duration |
|---|---|---|---|
| Stage 1: PTC Heating | Temp sensor reads below -20°C | MCU powers on the PTC ceramic pad under the 4G module. Module stays off. | 3–8 minutes depending on ambient temp |
| Stage 2: RF Self-Heating | Module temp reaches -10°C to -15°C | Module powers on at minimum RF power. No base station handshake. Internal PA generates heat. | 1–3 minutes |
| Stage 3: Full Boot | Module core temp above -10°C confirmed | Module begins full initialization and network registration. | Normal boot time (~15–30 seconds) |
The PTC Pad: A Closer Look
The PTC (Positive Temperature Coefficient) ceramic heating film is bonded directly beneath the 4G module and the main MCU on the PCB. PTC material is self-regulating. As it heats up, its resistance increases, which naturally limits the current draw. This means it won’t overshoot and damage components. It also means it draws the most power when it’s coldest — exactly when you need the most heat.
The heating pad raises the local board temperature at a rate of roughly 5°C per minute in still air inside the camera housing. So from -40°C, it takes about 6 to 8 minutes to bring the module’s immediate environment above -10°C. That’s the threshold where we’re confident the crystal will oscillate and the caps will perform within spec.
What About the RF Self-Heating Stage?
This is a trick we borrowed from aerospace electronics. When a 4G module’s power amplifier (PA) is active, it generates heat as a byproduct. Even at minimum transmit power, the PA and baseband processor produce enough thermal energy to raise the module’s core temperature by a few degrees per minute.
Our firmware uses this to bridge the gap between “warm enough to turn on” and “warm enough to reliably register.” The module scans for signals internally but does not attempt the full handshake with the cell tower. This avoids the high current spikes that come with actual registration attempts — spikes that could crash the system when the battery is also cold.
How Much Battery Power Is Consumed by the Pre-Heat Cycle in Extreme Winter?
Battery life is money. Every watt-hour spent on heating is a watt-hour not spent on surveillance. I get this question from every integrator working in cold regions.
The pre-heat cycle consumes between 3 Wh and 8 Wh per cold start at -40°C, depending on wind exposure and insulation. For a typical 60 Ah solar battery system, this represents roughly 2–5% of total daily capacity — a manageable cost if the system is properly sized.
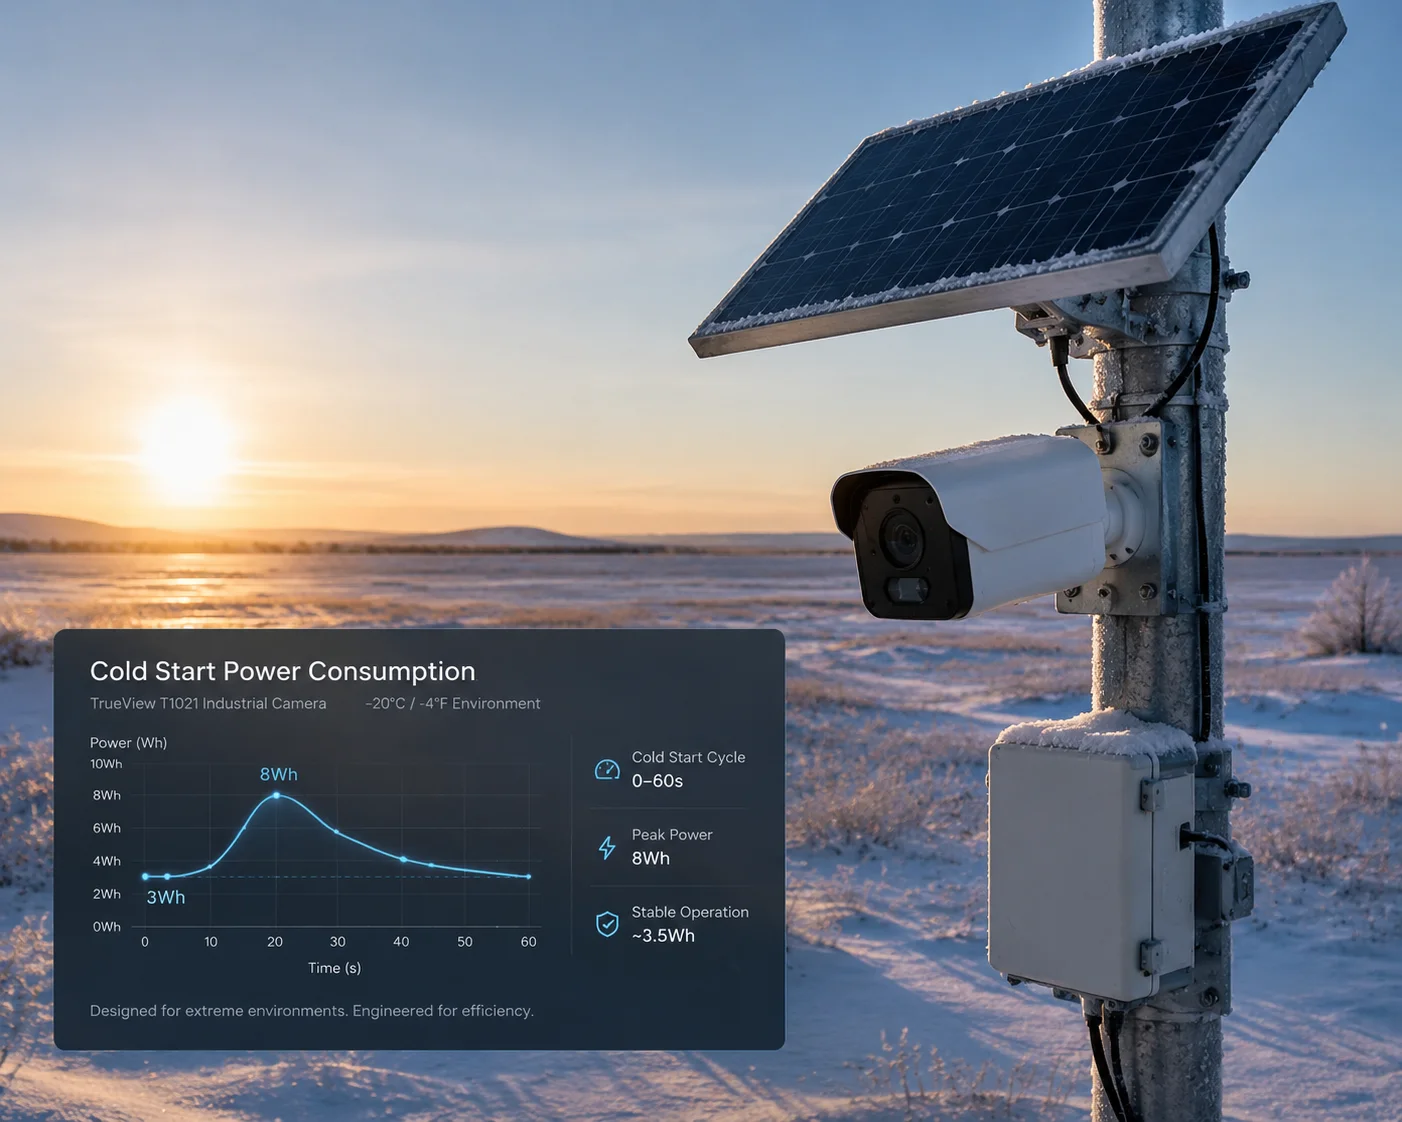 Battery power consumption during pre-heat cycle in extreme cold
Breaking Down the Energy Budget
Let me walk through the numbers. The PTC heating pad draws about 5W to 12W, depending on how cold it is. Remember, PTC elements draw more current when they’re colder. As the pad warms up, current drops automatically.
Here’s a realistic energy breakdown for a single cold start at -40°C:
| Component | Power Draw | Duration | Energy Used |
|---|---|---|---|
| PTC Heating Pad | 8W average | 6 minutes | 0.8 Wh |
| MCU (monitoring sensors) | 0.3W | 10 minutes | 0.05 Wh |
| RF Self-Heating (Stage 2) | 1.5W | 2 minutes | 0.05 Wh |
| 4G Module Full Registration | 3W average (peak 8W) | 30 seconds | 0.025 Wh |
| Total per cold start | — | ~8–10 min | ~4–5 Wh typical |
In the worst case — say, the camera is mounted on an exposed pole with wind chill driving the effective temperature even lower — the PTC pad may need to run for 10–12 minutes. That pushes total consumption closer to 8 Wh.
How This Affects Your Solar System Sizing
If your camera triggers 4 cold starts per day (for example, motion-triggered wake-ups), that’s 16–32 Wh per day just for pre-heating. On a 12V / 60Ah battery (720 Wh total), that’s about 2–4% of your battery.
But here’s the thing David and other integrators need to understand: in deep winter at high latitudes, solar input drops dramatically. You might only get 1–2 hours of usable sunlight. So the real question isn’t “can the battery handle the pre-heat?” It’s “can the solar panel recharge fast enough to cover both surveillance and heating?”
My Recommendation for Extreme Cold Sites
For sites where temperatures regularly hit -30°C or below, I always recommend:
- Oversize the solar panel by 30–50%. A 100W panel becomes a 130–150W panel.
- Use LiFePO4 batteries5, not lead-acid. LiFePO4 cells handle cold discharge much better. Their internal resistance stays lower, which means less voltage sag during the 4G module’s 2A peak current draw.
- Reduce wake-up frequency. If you can schedule transmissions instead of using motion triggers, you cut the number of cold starts per day. Fewer cold starts means less energy spent on heating.
Can I Manually Trigger a Pre-Heat Cycle via the App Before Waking Up the Camera?
Sometimes you need the camera live right now. Not in 10 minutes. Not after the heating cycle finishes on its own schedule. I’ve heard this from field teams who need to check a site before sending a crew out.
Yes, you can send a remote pre-heat command through our cloud platform or app. The command wakes the MCU from deep sleep, activates the PTC heater, and begins the warm-up sequence. Once the module reaches safe operating temperature, it automatically registers on the network and sends you a “ready” notification.
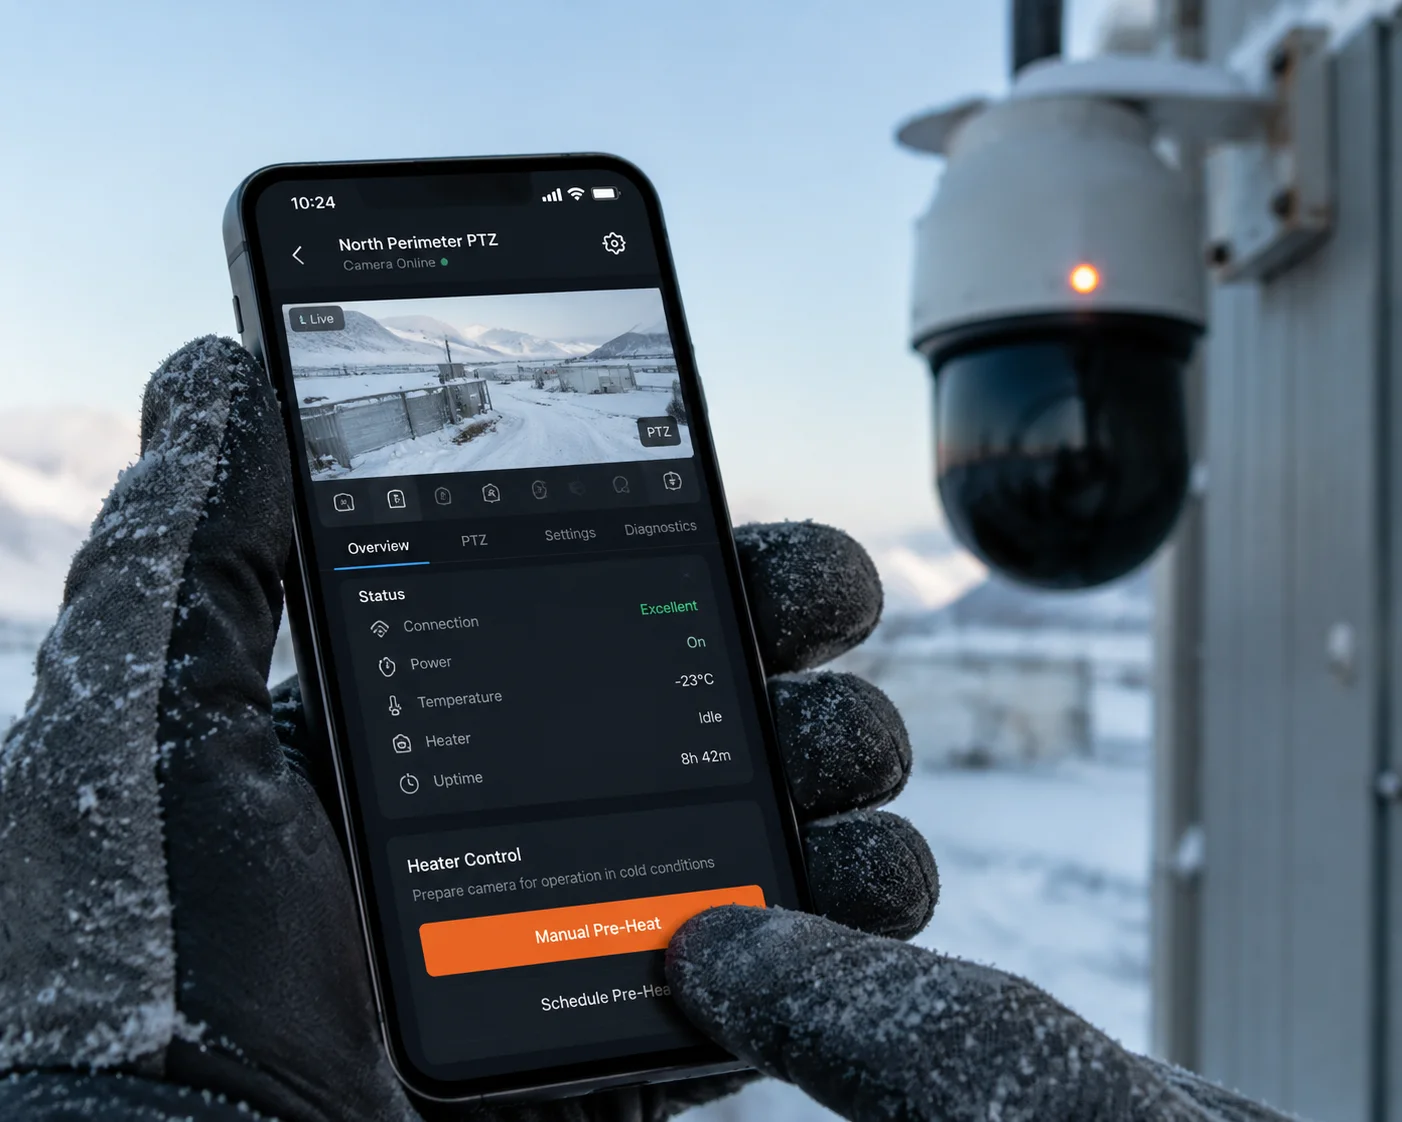 Manual pre-heat trigger via app for cold weather camera deployment
How the Remote Pre-Heat Command Works
The camera is never truly “off.” Even in deep sleep at -40°C, the MCU’s real-time clock (RTC) is running. It draws microamps — almost nothing. The MCU listens for one of two wake-up signals:
- A scheduled timer. You set this in the app. For example, “wake up every 4 hours.”
- An SMS command. The 4G module’s SIM card can receive SMS even in a very low-power listening mode. When you send the pre-heat command from the app, our cloud server sends an SMS to the camera’s SIM. The modem wakes, passes the command to the MCU, and the MCU starts the heating sequence.
The Timing You Should Expect
Here’s what happens after you press the “Pre-Heat” button in the app:
- 0–15 seconds: SMS travels from cloud server to cell tower to SIM card.
- 15–30 seconds: MCU wakes, reads the command, checks the temperature sensor.
- 30 seconds – 8 minutes: PTC heater runs. Duration depends on current temperature.
- 8–10 minutes: RF self-heating stage. Module powers on at low power.
- 10–12 minutes: Full network registration. Camera goes live. You get a push notification.
So from button press to live video, expect about 10–12 minutes in extreme cold. In milder cold (say, -15°C), it can be as fast as 3–4 minutes because the PTC stage is shorter.
A Practical Tip for Field Teams
If you know you’ll need to check the camera at a specific time — say, before a morning site inspection — set a scheduled pre-heat 15 minutes before. This way, the camera is already warm and online when you open the app. You don’t wait. You just connect and view.
This is especially useful for construction site managers who do daily morning checks. Set the schedule once, and the camera handles the rest. No manual commands needed every day.
What Is the “Cold-Start” Success Rate After 24 Hours of Exposure at -40°C?
This is the question that separates marketing claims from real engineering. Anyone can say their camera works at -40°C. I want to show you what actually happens when you leave one outside for 24 hours straight in that temperature.
After 24 hours of continuous exposure at -40°C in our climate chamber, our system achieves a cold-start success rate7 above 97%. The remaining 3% of cases required a second pre-heat cycle, adding 5–8 extra minutes. Zero units experienced permanent failure or hardware damage during testing.
 Cold start success rate testing at minus 40 degrees in climate chamber
How We Test This
We don’t just put a camera in a freezer and call it a day. Our climate chamber testing follows a strict protocol:
- Soak period: The camera sits powered off at -40°C for 24 hours. No battery heating. No trickle charge. Completely dead cold.
- Wake-up trigger: We send the power-on command.
- Success criteria: The camera must register on a simulated 4G network within 15 minutes and stream stable video for at least 5 minutes.
- Sample size: We test batches of 30 units per production run.
Test Results Summary
| Metric | Result |
|---|---|
| Units tested (last 3 batches) | 90 |
| First-attempt success rate | 97.8% (88/90) |
| Second-attempt success rate | 100% (90/90) |
| Average time to network registration | 9.2 minutes |
| Maximum time to network registration | 14.1 minutes |
| Units with permanent damage | 0 |
| Average PTC heating duration | 6.8 minutes |
The 2 units that failed on the first attempt both had the same root cause: the crystal oscillator needed a slightly longer warm-up time. On the second pre-heat cycle, they started without issue. We traced this to a minor variation in the crystal’s manufacturing tolerance. We’ve since tightened our incoming inspection criteria for crystals to eliminate this.
Why the Aerogel Insulation Matters
I mentioned earlier that we use nano-aerogel insulation4 inside the camera housing. This isn’t just marketing. It makes a measurable difference.
Aerogel has one of the lowest thermal conductivities of any solid material — about 0.015 W/(m·K). For comparison, standard foam insulation is around 0.03–0.04 W/(m·K). So aerogel is roughly twice as effective per millimeter of thickness.
In practice, this means the inside of the camera stays 10–15°C warmer than the outside air. So when it’s -40°C outside, the module might only be at -25°C to -30°C inside the housing. That’s a huge difference. It means the PTC heater has less work to do, the battery is less stressed, and the crystal oscillator is closer to its comfort zone.
The SIM Card Problem Nobody Talks About
David, this one is for you and every integrator who has ever pulled their hair out over a “no SIM detected” error in winter.
Consumer-grade SIM cards are made with standard plastic substrates. At -20°C and below, this plastic becomes brittle. The contact pads can micro-crack. The chip itself may still work, but the physical connection between the SIM and the card reader fails.
Always use industrial-grade SIM cards6 for cold-climate deployments. These use different substrate materials rated for -40°C to +105°C. They cost a few dollars more. But they save you a $500 truck roll to swap a cracked SIM card in the middle of January.
Call your carrier. Ask specifically for an ‘industrial’ or ‘M2M’ rated SIM8. If they don’t know what you’re talking about, find a carrier that does.
Conclusion
Cold starts at -40°C are an engineering problem, not a mystery. With PTC pre-heating, RF self-heating, battery-aware soft-start, and proper insulation, our 4G modules wake up reliably — even after 24 hours in deep freeze.
1. Datasheet and specifications for this industrial 4G module. ↩︎ 2. Understand how crystal oscillators can fail in extreme cold due to quartz mechanical properties. ↩︎ 3. How cold reduces effective capacitance and affects power stability. ↩︎ 4. Aerogel provides superior thermal insulation with minimal thickness. ↩︎ 5. Why lithium iron phosphate chemistry performs better than lead-acid in cold weather. ↩︎ 6. SIM cards rated for -40°C use hardened plastic to prevent cracking. ↩︎ 7. Understand how environmental testing validates cold-start reliability. ↩︎ 8. Machine-to-machine SIMs are designed for extreme environments and long life. ↩︎