
I lost a full night of footage once because a cheap relay setup kept cycling my searchlight on and off. That one failure cost me a truck roll to a remote Texas site.
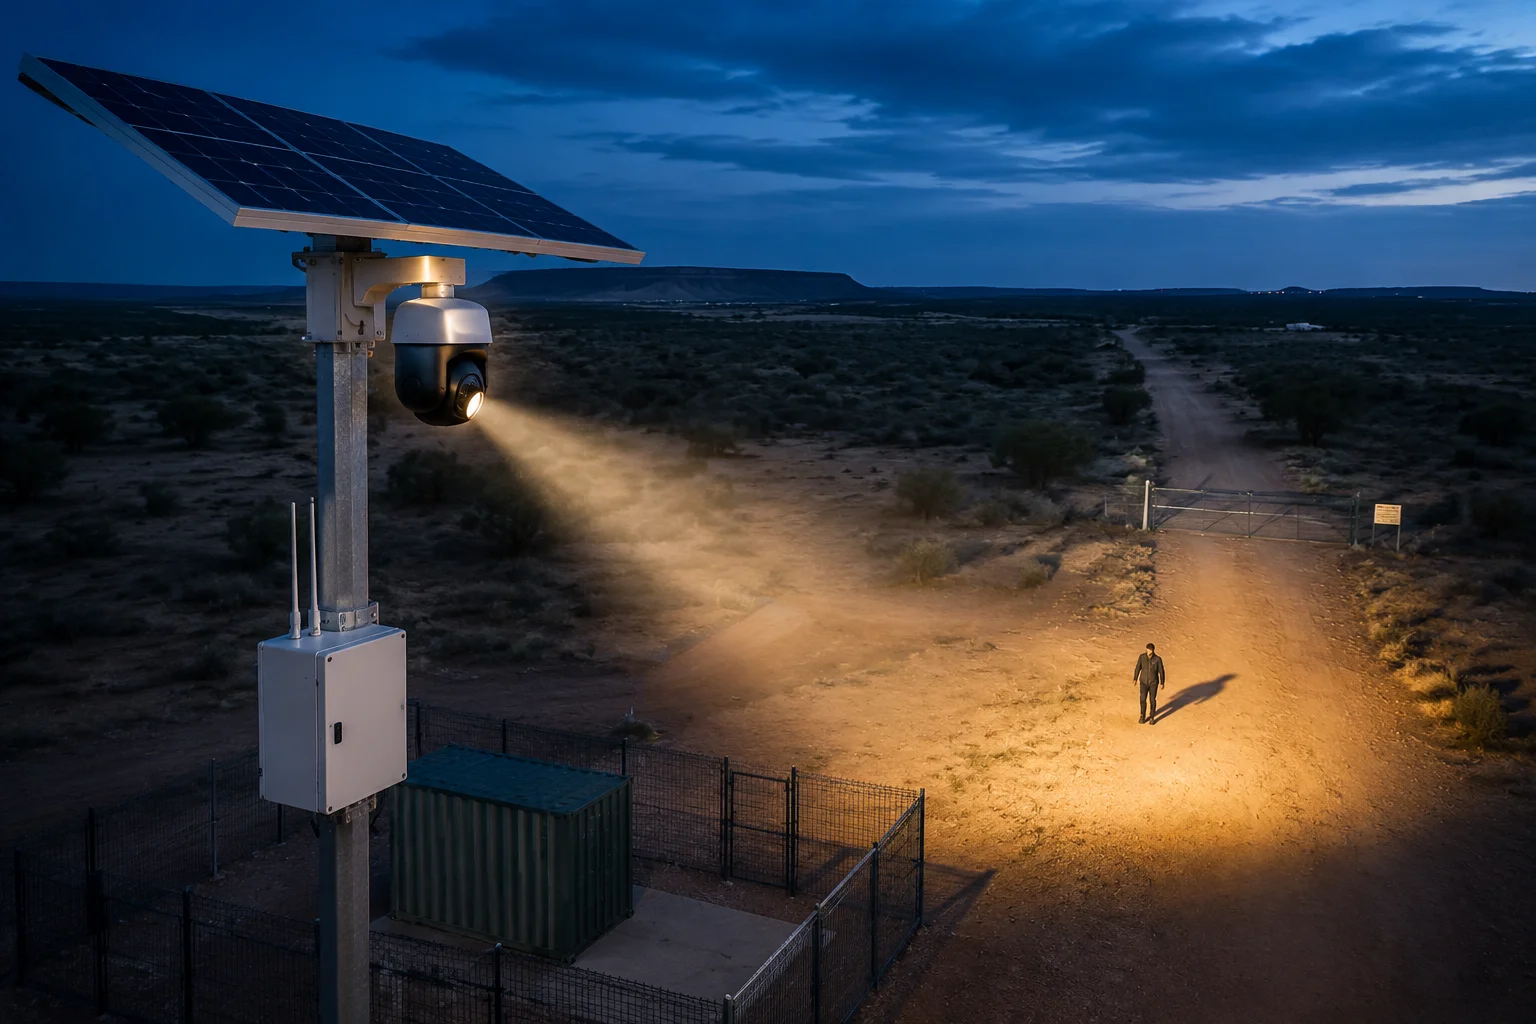
Yes, the Alarm Out1 on industrial PTZ cameras2 can trigger an external searchlight for a set duration like 60 seconds. The relay output acts as a dry-contact switch3. You configure the hold time in the camera’s web backend, and it controls exactly how long the light stays on after an alarm event fires.
 PTZ camera alarm out searchlight trigger duration
Below, I break down the exact wiring logic, software settings, load ratings, and app-based overrides so you can deploy this setup with confidence on your next off-grid project.
Table of Contents
How Do I Set the “Relay Pulse” Duration in the Web Backend for Temporary Lighting?
I spent two hours digging through menus the first time I tried to set a timed relay output. The setting was buried under “Linkage Method,” not where I expected it.
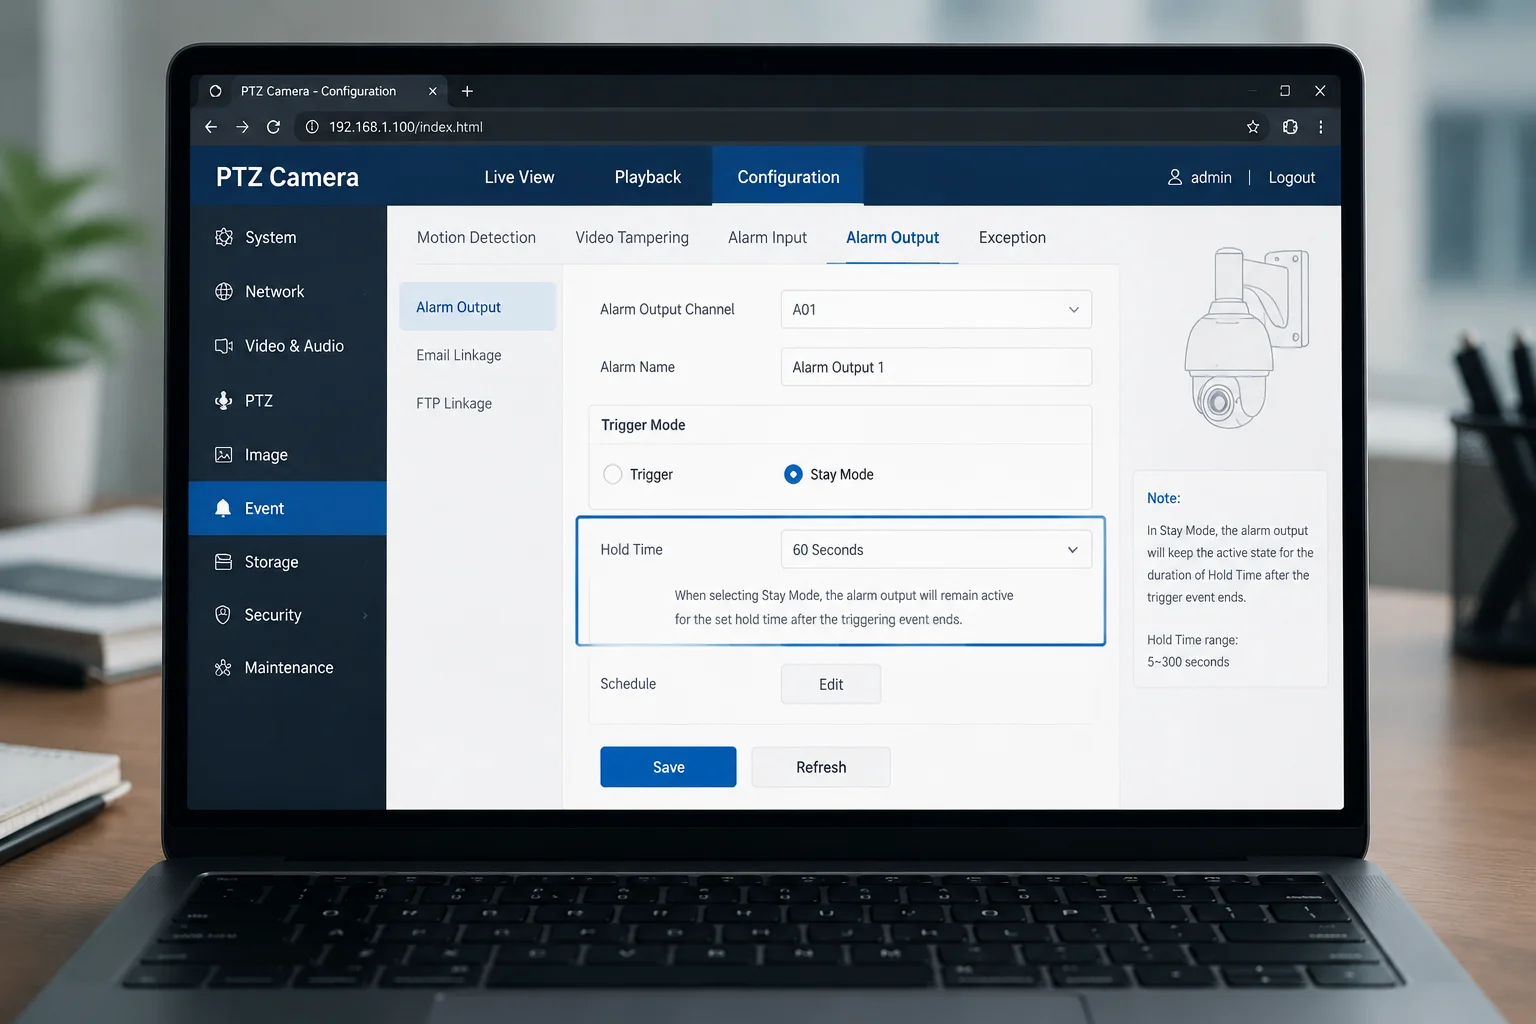
You set the relay pulse duration in the camera’s Event or Alarm Output settings page. Look for a field called “Hold Time4” or “Duration.” Enter your desired value in seconds — most systems support 1s to 600s. Choose “Stay” mode instead of “Pulse” mode for a continuous activation period.
 PTZ alarm output hold time relay pulse settings
Where to Find the Setting
The exact menu path depends on your camera’s firmware. But the logic is the same across most industrial PTZ platforms. You log into the web interface, navigate to the event management section, and locate the alarm output configuration.
Here is a typical path:
Configuration > Event > Basic Event > Alarm Output
Or on some firmware versions:
Configuration > Event > Linkage Method > Relay Output
Hold Time vs. Pulse Mode
This is where many installers get confused. There are two modes for the relay output:
| Mode | Behavior | Best Use Case |
|---|---|---|
| Pulse | Relay closes and opens in a short burst (typically 0.5s–2s) | Door strikes, buzzers |
| Stay / Hold | Relay closes and stays closed for a set duration | Searchlights, sirens, strobes |
| Manual | Relay stays closed until manually reset | Emergency lockdowns |
For a 60-second searchlight activation, you want “Stay” or “Hold” mode. Set the duration field to 60. The relay will close the moment an alarm triggers. It stays closed for exactly 60 seconds. Then it opens automatically.
Step-by-Step Configuration
- Open your browser and enter the camera’s IP address.
- Log in with your admin credentials.
- Go to
Event > Alarm Output. - Select the output channel (most PTZ cameras have 1 or 2 alarm outputs).
- Set the mode to “Stay” or “Duration.”
- Enter
60in the seconds field. - Save and test by triggering a manual alarm.
What About VMS Integration?
If you run your cameras through a VMS like Milestone or Blue Iris, you can also control the relay duration from the VMS side. Milestone lets you create rules that say: “When human detected, activate alarm output 1 for 60 seconds.” This gives you a second layer of control. But I always recommend setting the duration on the camera itself as a fallback. If the VMS loses connection over 4G, the camera still handles the relay timing locally.
A Common Mistake
Some installers set the hold time to 60 seconds but forget to disable the “re-trigger5” option. What happens? Every new motion event resets the 60-second timer. On a windy night, the light never turns off. Your battery drains to zero by morning. Disable re-trigger or set a cooldown period6 of at least 120 seconds between activations.
Can the External Light Be Linked Specifically to “Human Detection” While Ignoring Animals?
I had a client in rural Alberta whose searchlight was firing 30 times a night because of deer. His solar battery was dead by 3 AM every single night. We fixed it in one settings change.
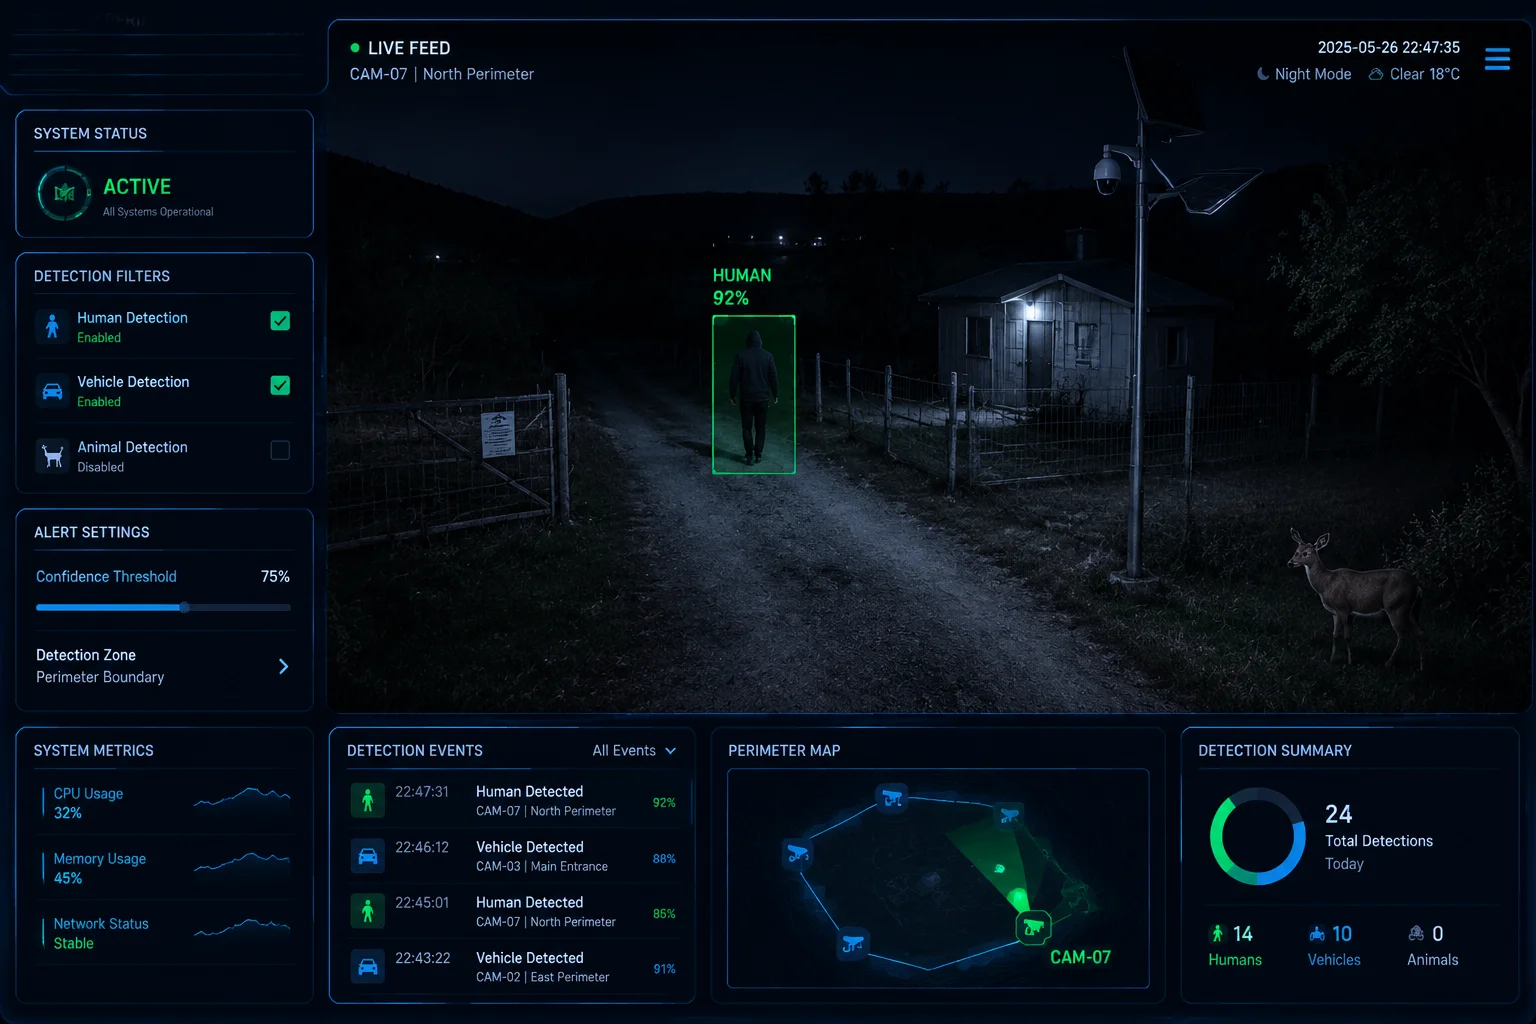
Yes, you can link the alarm output exclusively to Human or Vehicle detection using the camera’s AI classification engine. This filters out animals, swaying branches, and shadows. Only confirmed human or vehicle shapes will close the relay and activate your searchlight.
 AI human detection filter alarm output PTZ camera
How AI Filtering Works
Modern industrial PTZ cameras run onboard neural networks trained on human and vehicle shapes. When the camera detects motion, it does not immediately fire the alarm. Instead, it classifies the object first. Only if the object matches “Human” or “Vehicle” does the system proceed to the linkage action.
This is different from basic motion detection. Basic motion detection triggers on any pixel change. A bird, a cloud shadow, a spider on the lens — all of these fire the alarm. AI filtering eliminates over 95% of false triggers in my field experience.
Configuration Path
The setting is usually found here:
Configuration > Event > Smart Event > Intrusion Detection
Or:
Configuration > AI > [Perimeter Protection](https://www.hikvision.com/en/solutions/analytics/perimeter-protection/)<sup>[7](#footnote-7){#ref-7}</sup>
Inside that menu, you will see checkboxes for target types:
- ☑ Human
- ☑ Vehicle
- ☐ Others
Uncheck “Others.” Now only humans and vehicles trigger the alarm output.
Sensitivity and Confidence Threshold
Most cameras let you set a confidence threshold8. This is how sure the AI must be before it fires.
| Confidence Level | Effect | Recommended For |
|---|---|---|
| Low (30-50%) | More triggers, more false positives | High-security areas where missing a detection is unacceptable |
| Medium (50-70%) | Balanced performance | Most off-grid deployments |
| High (70-90%) | Fewer triggers, may miss some events | Battery-critical sites with heavy wildlife traffic |
For David’s Texas ranch deployment, I recommend medium confidence (around 60%). This catches most intruders while ignoring coyotes and rabbits.
Combining AI with Scheduling
Here is the real power move for off-grid solar sites. Combine AI filtering with a time schedule:
- Daytime (06:00–19:00): AI detection active, but alarm output disabled. Camera only sends push notifications.
- Nighttime (19:00–06:00): AI detection active AND alarm output enabled. Searchlight fires on human detection only.
This approach cuts your battery consumption dramatically. The searchlight — which is your biggest power draw — only activates when it matters most: at night, when a real person is on site.
Real-World Power Savings
In one deployment, switching from basic motion detection to AI-only triggering reduced nightly alarm output activations from 40+ down to 2-3. On a 200Ah battery system, that is the difference between the system surviving 3 cloudy days versus dying after 1.
Is the Alarm Out Circuit Rated to Handle the Inductive Load of a High-Power Relay?
I burned out an alarm output port on a $2,000 camera because I connected a 24V relay directly without a flyback diode. That was an expensive lesson I only needed to learn once.
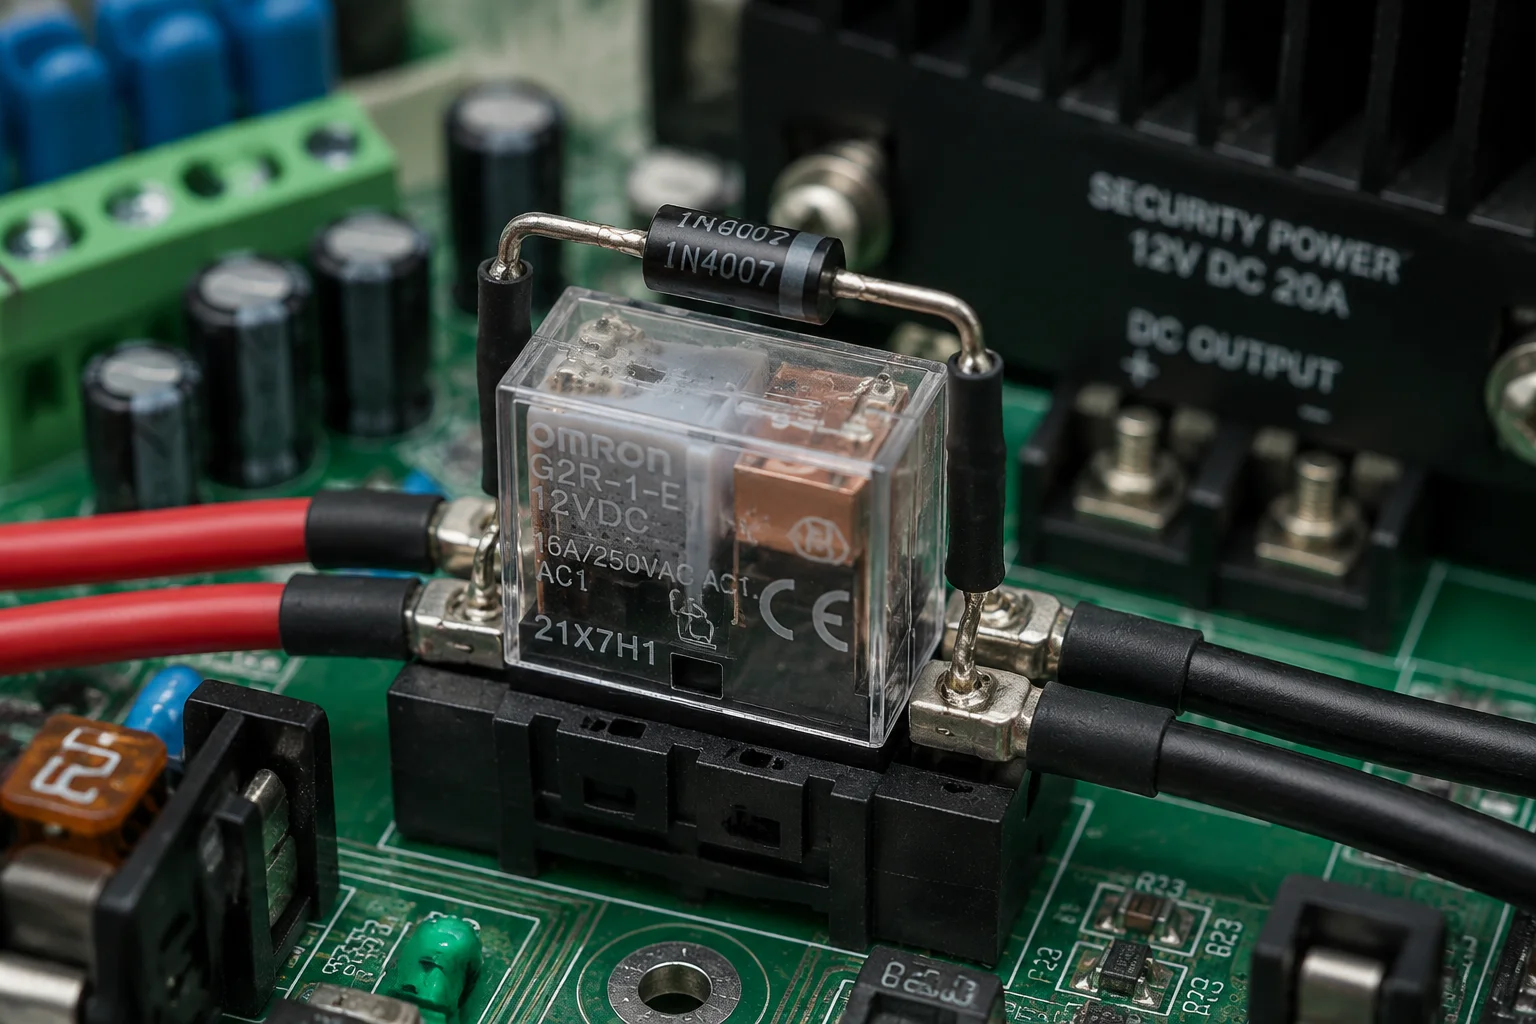
Most PTZ alarm output ports are rated for 12V/24V DC at 1A maximum. This is enough to drive a small interposing relay, but not enough for a high-power searchlight directly. Always use an intermediate relay with a flyback diode to protect the camera’s output circuit from inductive voltage spikes.
 Alarm out relay circuit flyback diode protection
Understanding the Alarm Out Specifications
The alarm output on an industrial PTZ camera is a dry contact. It does not supply power. It simply closes or opens a circuit. Think of it as a light switch — it controls the flow, but the electricity comes from somewhere else.
Typical specifications:
| Parameter | Typical Rating | Notes |
|---|---|---|
| Contact Type | Normally Open (NO) or Normally Closed (NC) | Most default to NO |
| Max Voltage | 30V DC | Do not exceed this |
| Max Current | 1A | Some models only support 0.5A |
| Contact Material | AgSnO₂ | Resistant to arc erosion |
| Mechanical Life | 100,000 cycles | Sufficient for years of operation |
Why You Need an Interposing Relay
A high-power LED searchlight (say, 100W at 12V) draws over 8 amps. You cannot run 8 amps through a contact rated for 1 amp. It will arc, weld shut, or burn the trace on the camera’s PCB.
The solution is simple. The camera’s alarm output drives a small 12V relay coil (draws about 70mA). That relay’s contacts then switch the high-current circuit for the searchlight.
The Flyback Diode
Here is the part most installers skip. A relay coil is an inductor. When you cut power to an inductor, it generates a voltage spike in the opposite direction. This spike can be 5-10 times the supply voltage. On a 12V coil, you might see a 60-100V spike. That spike travels back into the camera’s alarm output and damages the transistor that drives it.
The fix costs $0.05. Place a standard diode (1N4007) across the relay coil terminals, with the cathode on the positive side. This diode absorbs the spike. Your camera stays safe.
Wiring Diagram (Text Description)
- Camera Alarm Out (NO + COM) → connects to interposing relay coil (+ and -)
- 1N4007 diode across relay coil (cathode to +, anode to -)
- 12V battery positive → relay contact COM
- Relay contact NO → searchlight positive
- Searchlight negative → battery negative
Soft Start Consideration
If you pick an LED searchlight, choose one with a soft-start driver9. Without soft start, the initial inrush current can be 3-5 times the steady-state current. A 100W light might pull 40 amps for 20 milliseconds at startup. This surge can cause voltage dips on your 12V bus, which may reset your 4G modem or cause video artifacts. A soft-start driver ramps the current up over 100-200ms, keeping the bus stable.
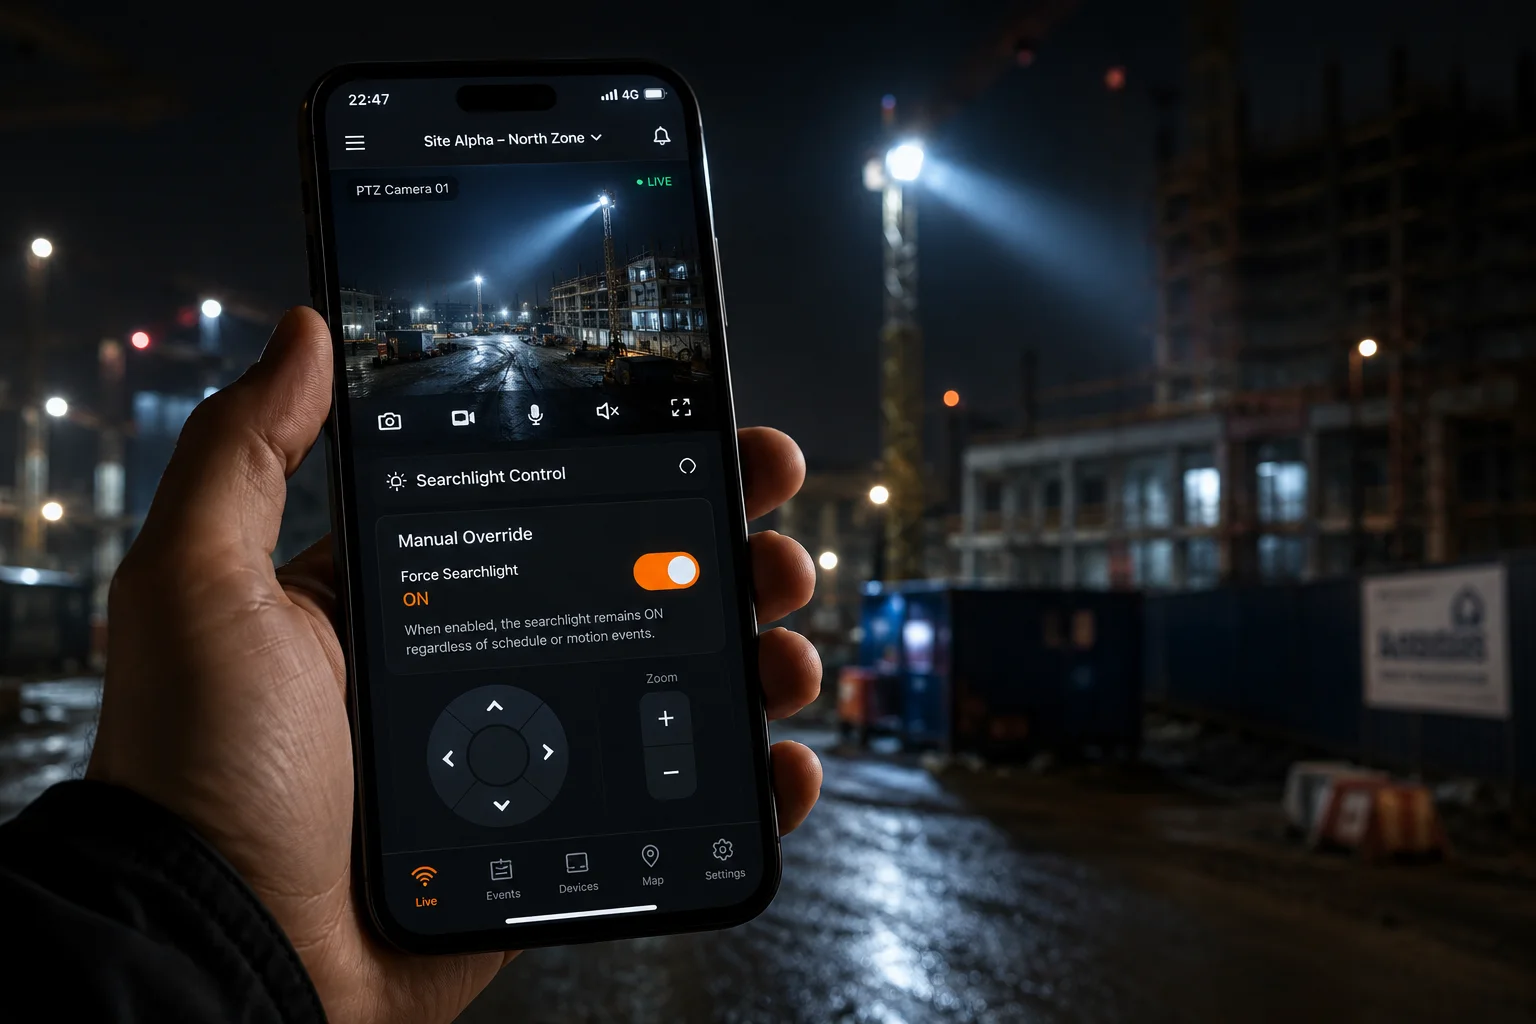
Can I Manually Override the External Light Timer Through the Mobile App?
I was on a call with a client at 2 AM when he spotted someone on his live feed. He wanted the light on immediately — not after the AI processed the scene. Manual override saved that situation.
Yes, most industrial PTZ cameras with alarm output support manual override10 through their mobile app or web interface. You can force the relay closed or open at any time, regardless of the programmed schedule or AI triggers. This gives you instant control over the searchlight from anywhere with a cellular connection.
 Mobile app manual alarm output override PTZ camera
How Manual Override Works
The mobile app (or web interface) sends a command to the camera over the 4G connection. The camera immediately closes or opens the alarm output relay. This bypasses all event-based logic. You are directly controlling the hardware switch.
On most platforms, you find this under:
Live View > Alarm Output > Manual Trigger
Or in the app:
Device > More > Alarm Output > ON/OFF
Override Modes
There are typically three states you can set manually:
- Force ON: Relay closes immediately. Light turns on. Stays on until you manually turn it off or a timeout expires.
- Force OFF: Relay opens immediately. Light turns off. Stays off until you release the override.
- Auto: Returns control to the event-based logic. The camera handles triggering based on AI detection and schedules.
Latency Over 4G
This is important for off-grid deployments. When you tap “ON” in the app, the command travels from your phone → cloud server → 4G network → camera. Total latency is typically 1-3 seconds. In an emergency, that is fast enough. But do not expect instant response like a local network.
If latency is critical, some cameras support SMS-based commands as a backup. You send a coded SMS to the camera’s SIM card number, and it triggers the relay. SMS delivery is usually under 5 seconds, even on congested networks.
Setting a Manual Override Timeout
Here is a tip I always configure for my clients. Set a maximum manual override duration — say, 10 minutes. If someone turns the light on manually and forgets to turn it off, it automatically reverts to “Auto” mode after 10 minutes. This prevents a scenario where the searchlight stays on all night and drains the battery because someone fell asleep with the app open.
App Compatibility
Not all apps support alarm output control equally. Here is what to check before you commit to a platform:
- Does the app show alarm output status in real time?
- Can you trigger ON/OFF from the live view screen (not buried in menus)?
- Does it support widgets or shortcuts for one-tap activation?
- Can you set permissions so only certain users have override access?
For multi-site deployments, I recommend testing the app’s alarm output control during your evaluation phase. Some budget apps hide this feature or make it unreliable over 4G connections.
Conclusion
The Alarm Out on industrial PTZ cameras is a reliable dry-contact switch that can trigger external searchlights for precise durations. Pair it with AI filtering, proper relay wiring, and manual app override for a complete active deterrence system on any off-grid site.
1. Definition and typical applications of alarm output terminals on security cameras. ↩︎ 2. Overview of Pan-Tilt-Zoom cameras, their features, and use in surveillance. ↩︎ 3. Explanation of dry contact relays and how they isolate control circuits. ↩︎ 4. How to configure the hold time (duration) for an alarm output on Hikvision cameras. ↩︎ 5. Explanation of re-trigger behavior and how it can cause lights to stay on permanently. ↩︎ 6. Why a cooldown period is important to prevent excessive relay activations. ↩︎ 7. Hikvision’s perimeter protection feature that uses AI to detect intrusions. ↩︎ 8. Definition of confidence thresholds in AI object detection and how to adjust them. ↩︎ 9. How soft-start LED drivers limit inrush current and protect power supplies. ↩︎ 10. Guide to manually controlling alarm output via mobile app or web interface. ↩︎