
I’ve seen too many installers waste half a day and a crane rental just to swap a dead battery on a pole-mounted solar camera. That’s a problem worth solving at the design stage.
Yes. Our battery box uses a modular slide-on mount that lets a single technician remove and replace the lithium pack in under 5 minutes, without touching the bracket, the solar panel, or the PTZ camera above it. The electrical connection uses a waterproof quick-connector, so no wiring work is needed either.
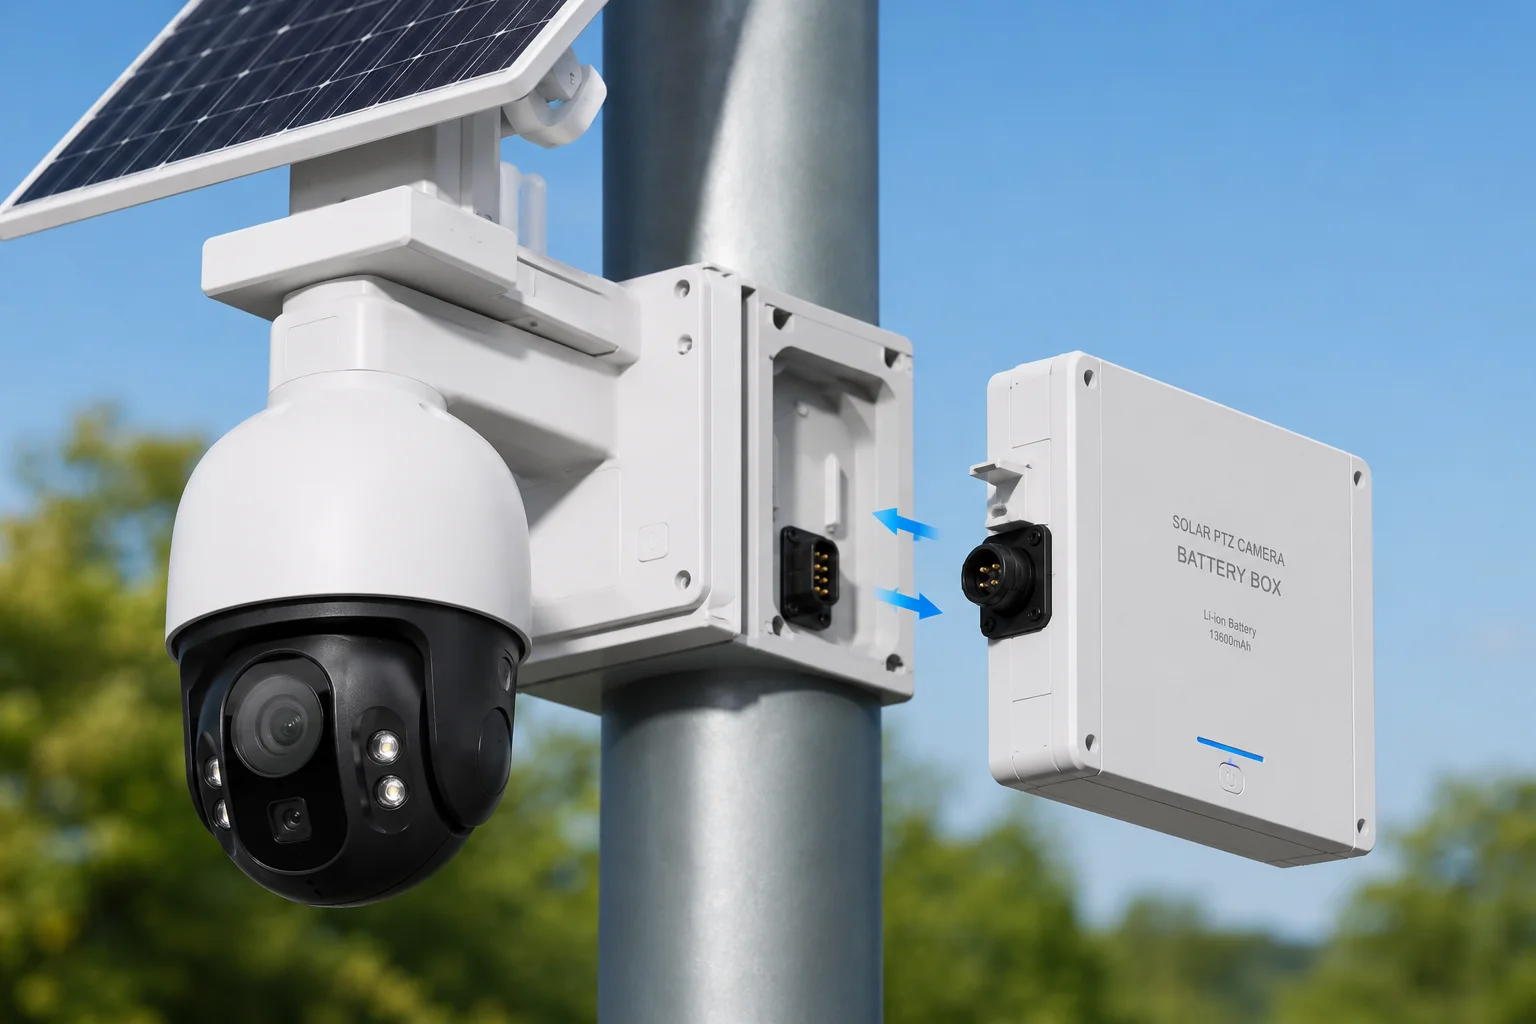 solar PTZ camera battery box replacement design
Below, I’ll walk you through exactly how this works, step by step, so you can judge whether it fits your field operations.
Table of Contents
Can My Technician Swap the Lithium Pack in Under 5 Minutes Using a Simple Side-Access Door?
I used to think “tool-free replacement” was just marketing talk. Then I watched a field tech in Texas struggle for 40 minutes with a bolt-on battery enclosure at the top of a 6-meter pole. That day changed how we design things.
A trained technician can complete the full battery swap in 3 to 5 minutes. The process has only three actions: unplug the connector, loosen one security screw, and slide the box upward off the rail. No side-access door is needed because the entire box lifts away as one unit.
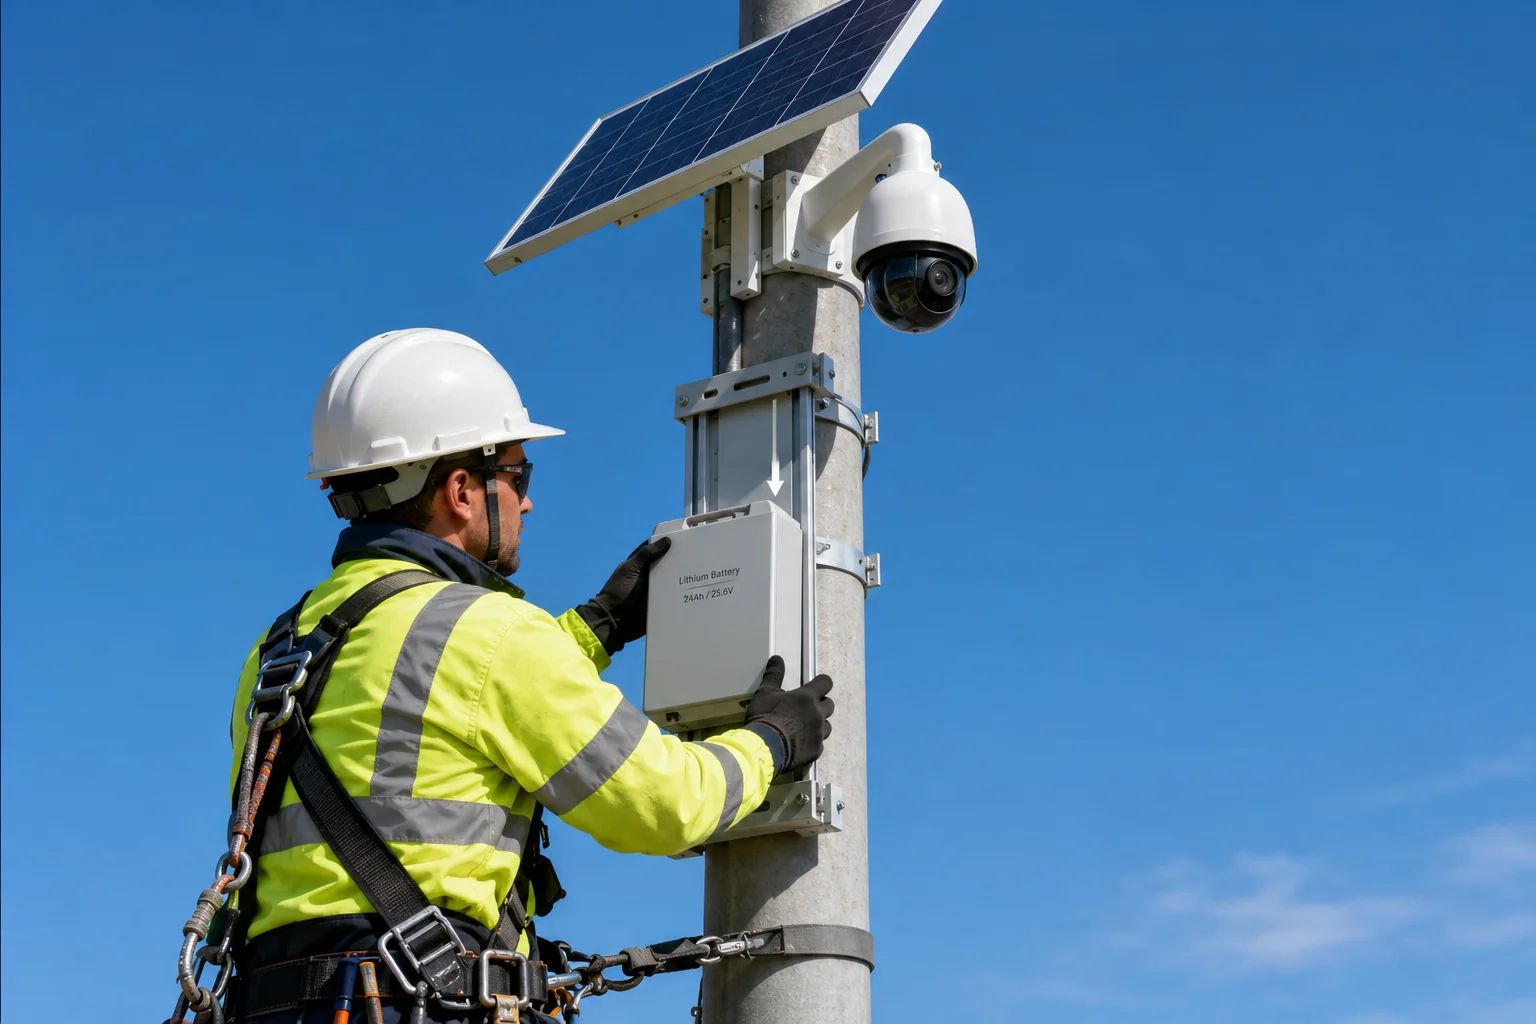 technician replacing battery box on solar camera pole
Why a Full-Box Removal Beats a Side-Access Door
Many competitors use a hinged door on the battery enclosure. You open the door, disconnect internal wires, pull out the cells, and insert new ones. This sounds simple on paper. In reality, it creates problems at height.
First, a side door means the technician needs both hands free to handle loose cells while standing on a ladder. That’s a safety risk. Second, internal wiring inside the box means small screws, tight spaces, and the chance of cross-wiring. Third, an opening door needs a hinge and a latch, both of which are failure points for water ingress over time.
Our approach is different. We treat the entire battery box as a single replaceable module. The box slides onto a fixed rail on the main pole. When it’s time to replace, you slide the whole box off and carry it down. Then you bring up a fresh, pre-charged box and slide it on. The old box goes back to the shop for cell replacement in a comfortable environment.
The 5-Minute Workflow Breakdown
| Step | Action | Time Required | Hands Needed |
|---|---|---|---|
| 1 | Climb to battery position | 1–2 min | Both (climbing) |
| 2 | Unplug IP67 aviation connector | 10 sec | One hand |
| 3 | Loosen hex security screw | 20 sec | One hand + tool |
| 4 | Slide box upward off rail | 10 sec | Both hands |
| 5 | Slide new box onto rail | 10 sec | Both hands |
| 6 | Tighten security screw | 20 sec | One hand + tool |
| 7 | Plug in connector | 10 sec | One hand |
Total hands-on time at the top of the pole: about 80 seconds. The rest is climbing. This is why we say “under 5 minutes” even for a 6-meter installation.
What This Means for Labor Costs
In North America, a single truck roll for a security system service call costs between $150 and $300. If that call requires two technicians, a ladder truck, or extra time because the battery is hard to reach, the cost doubles. Our slide-on design keeps it to one person, one ladder, and one trip. Over a 5-year battery lifecycle, this saves your client real money.
Is the Battery Compartment “Plug-and-Play” with an Internal Waterproof Quick-Connector?
I’ve repaired enough corroded screw terminals in outdoor junction boxes to know that exposed copper and weather don’t mix. Every wire-to-screw connection is a future failure point.
Yes. The battery box connects to the system through a single IP67-rated aviation quick-connector1 mounted on the outside of the enclosure. You twist to unlock, pull to disconnect, and push to reconnect. No wire stripping, no screw terminals, no junction box access required.
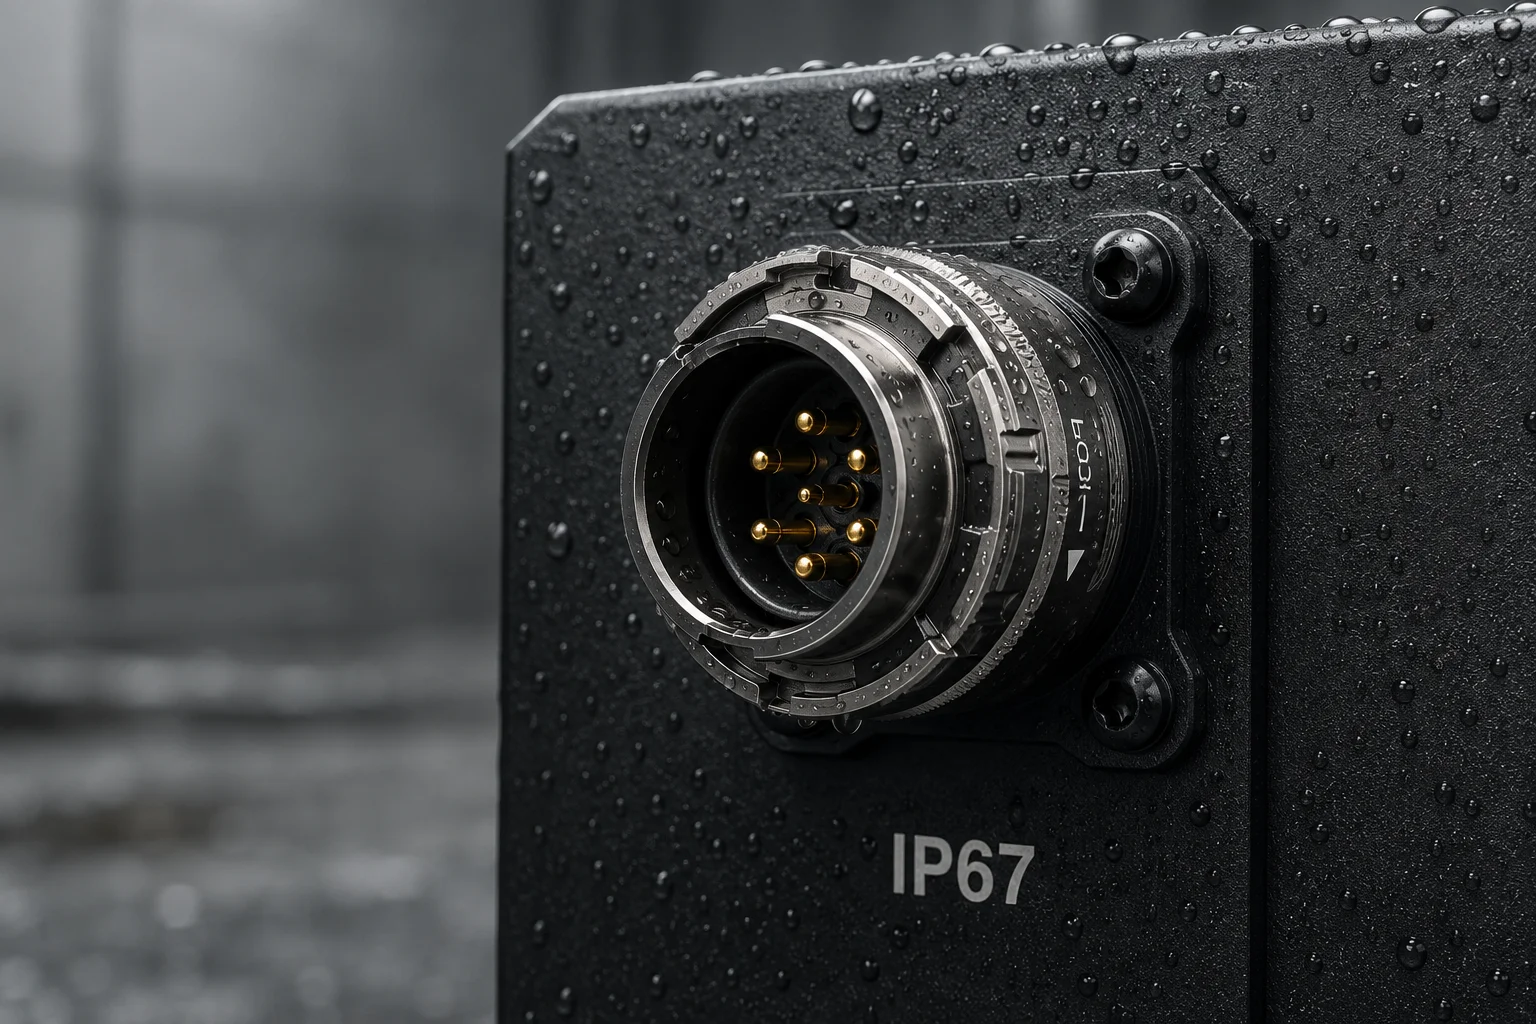 IP67 aviation connector on solar camera battery box
How the Connector Works
The aviation connector we use has a bayonet twist-lock2. You twist the outer ring about 30 degrees to unlock it, then pull the plug straight out. To reconnect, you push the plug in until it clicks, then twist the ring to lock. The whole action takes one hand and about 5 seconds.
Inside the connector, gold-plated copper pins3 carry the DC power from the battery to the charge controller and camera system. The IP67 rating means it can survive temporary submersion in water. In normal pole-mounted use, it handles rain, snow, dust, and UV exposure without degradation.
Why We Put the Connector on the Outside
Some designs hide the electrical connection inside the battery box. This means you must open the box to disconnect it. That defeats the purpose of quick replacement. By placing the connector on the exterior surface of the box, we allow the technician to disconnect power before removing the box. This is safer and faster.
Connector Specifications
| Parameter | Value | Why It Matters |
|---|---|---|
| IP Rating | IP67 | Survives rain, dust, and temporary flooding |
| Pin Material | Gold-plated copper | Resists corrosion, maintains low resistance |
| Rated Current | 10A | Handles peak charge and discharge loads |
| Locking Type | Bayonet twist-lock | Won’t vibrate loose in wind |
| Mating Cycles | 1,000+ | Lasts decades of annual replacements |
| Cable Gauge | 14 AWG silicone wire4 | Flexible in cold weather, UV resistant |
The “No Electrician Needed” Advantage
In many regions, connecting or disconnecting hardwired electrical systems requires a licensed electrician. A plug-and-play connector changes the classification of this task. It becomes a mechanical swap, not an electrical modification. This means your general installer or even the end client’s maintenance staff can perform the replacement. For SOHO security dealers in the US, this is a strong selling point. You can tell your customer: “You don’t need to call us back. Just keep a spare battery box charged in your garage.”
Will the System Remain Balanced and Safe While the Heavy Battery Module Is Being Removed?
I worry about this one personally. A lithium battery pack5 for a solar PTZ system weighs between 5 and 12 kg. Removing that much weight from one side of a pole-mounted system could shift the center of gravity and stress the bracket.
Yes. The battery box mounts directly below the center axis of the main pole, not off to one side. When you remove it, the weight distribution stays symmetrical. The bracket, solar panel, and camera remain stable and undisturbed throughout the swap.
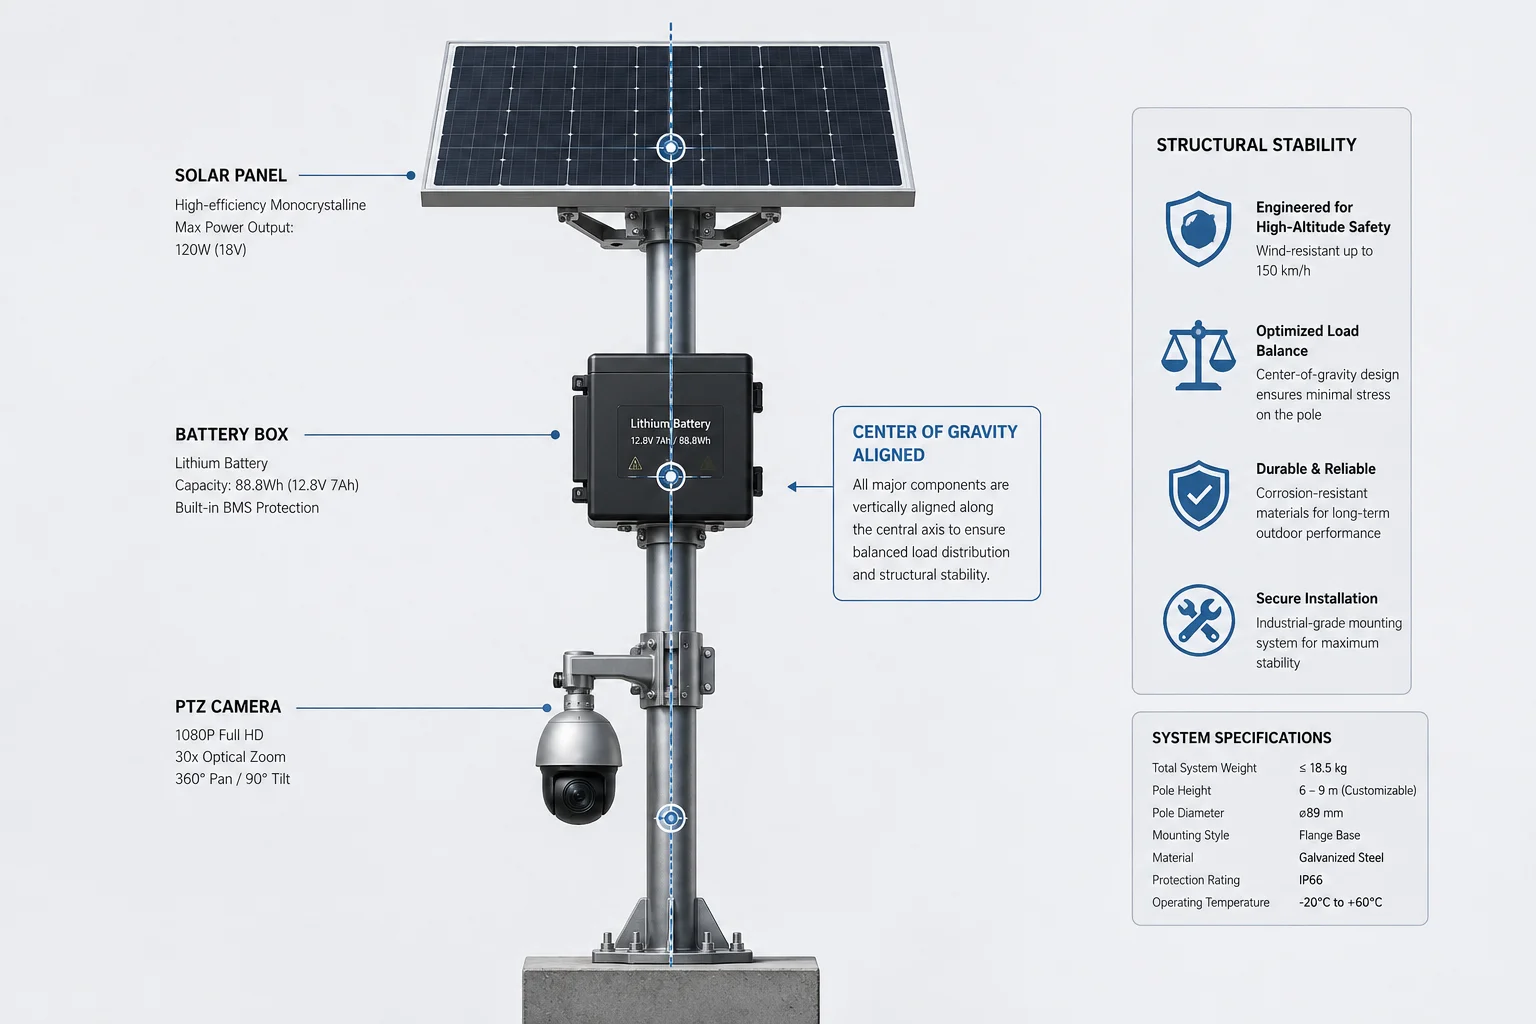 balanced pole mount design for solar camera system
Center-Axis Mounting Logic
Think of a pole-mounted system like a tree. The pole is the trunk. The solar panel and camera sit at the top like branches. If you hang a heavy fruit (the battery) off to one side, the tree leans. If you hang it directly below the center, the tree stays straight.
We mount the battery box on the south-facing side of the pole, directly below the solar panel, aligned with the pole’s vertical center line. The mounting rail is welded symmetrically. When the box is present, it adds downward force along the pole axis. When you remove it, that force disappears, but no lateral or rotational force is introduced.
What About Wind Load During Removal?
This is a fair concern. While the battery is off, the system is lighter and has a slightly different wind profile. However, the battery box is a compact rectangular shape with low wind resistance. Its removal does not significantly change the system’s wind load characteristics. The bracket is engineered to handle the full wind load of the solar panel (which has a much larger surface area) with or without the battery attached.
Safety During the Swap
The removal process takes about 10 seconds of actual physical handling. During this brief window:
- The pole clamp and bracket bolts carry the same load they always carry minus the battery weight
- The solar panel angle does not change
- The PTZ camera stays in its housing, untouched
- No tools contact the bracket structure itself
The only moment of increased risk is when the technician holds the battery box with both hands while on a ladder. We recommend using a tool belt or rope to lower the old box to the ground rather than climbing down one-handed.
How Do You Prevent Unauthorized Access to the Battery While Keeping It Accessible for Service?
I’ve had clients in rural areas lose batteries to theft. A $400 lithium pack on an unguarded pole in a remote field is a target. But if you make it too hard to remove, your own technician suffers.
We use a hidden hex-socket security screw at the base of the mounting rail. Without the correct tool, the box cannot slide off. The screw head is recessed and non-standard, so common tools won’t fit. But for authorized service, one turn of the correct key releases the box instantly.
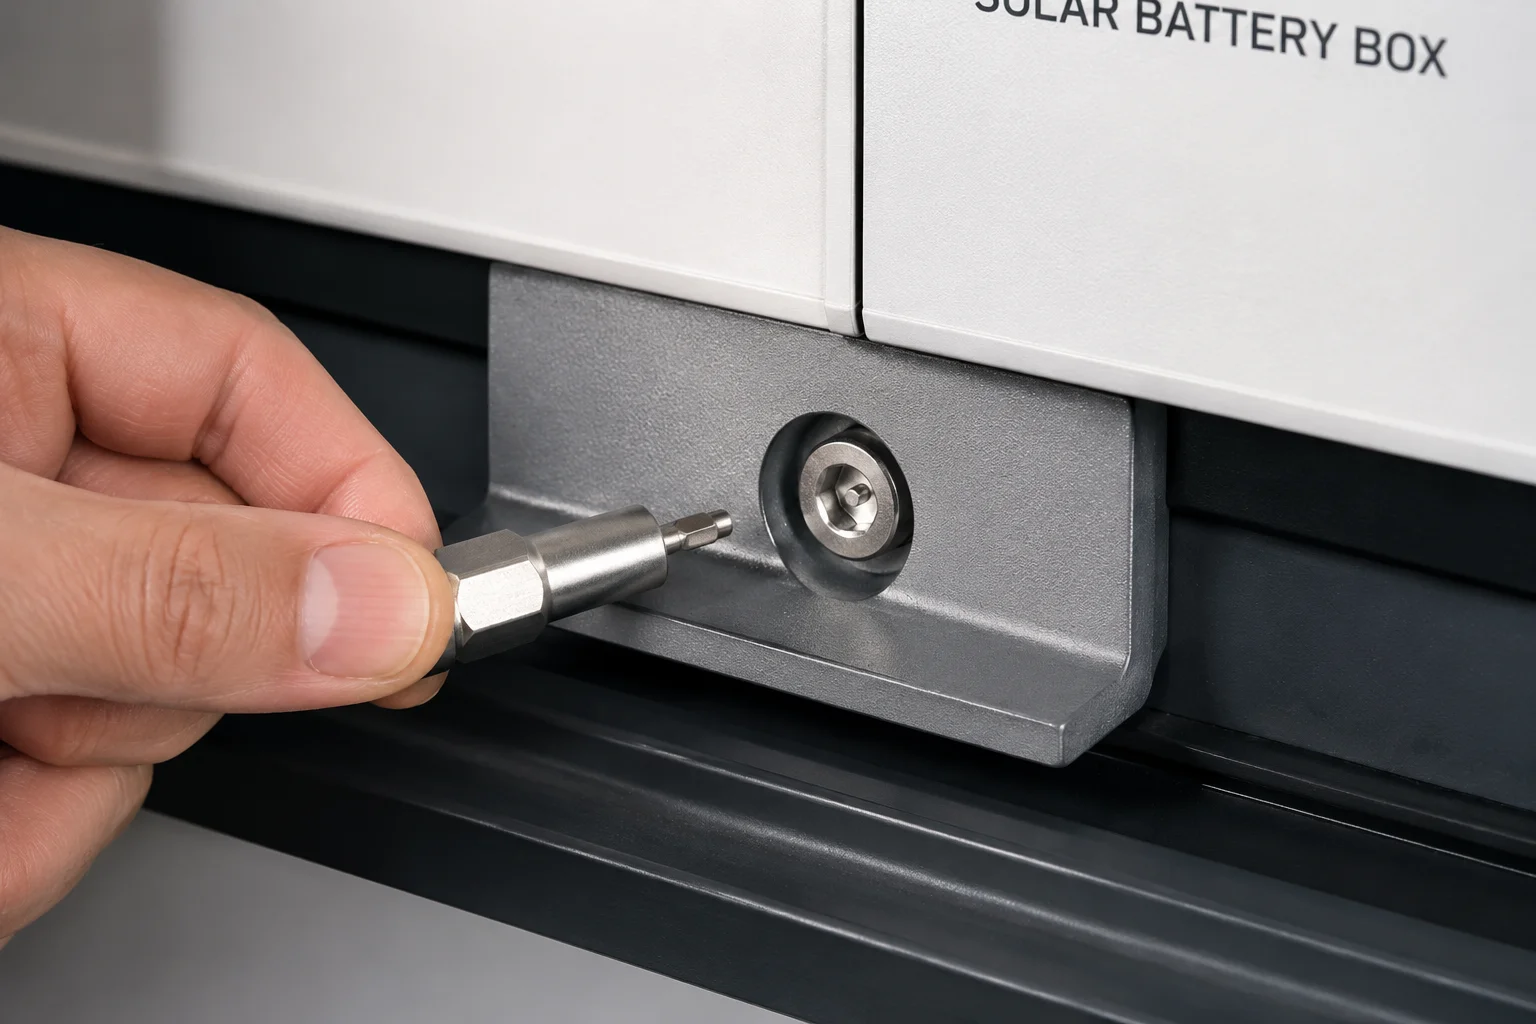 anti-theft security screw on battery box mount
The Balance Between Security and Serviceability
This is a real engineering trade-off. Maximum security would mean welding the box to the pole. Maximum serviceability would mean no fasteners at all. We sit in the middle with a single-point locking system that is:
- Fast to open with the right tool (under 20 seconds)
- Impossible to open without it (no standard Allen key, no Phillips, no flathead will work)
- Invisible to casual observers (the screw sits in a recessed pocket on the underside of the rail)
What Kind of Screw Do We Use?
The screw is a pin-in-hex security screw6. It looks like a standard hex socket, but has a pin in the center that blocks normal Allen keys. You need a matching hollow-center bit to engage it. These bits are not sold in general hardware stores. We include two bits with every system shipment, and replacements are available on request.
Layered Deterrence Strategy
No single lock stops a determined thief with unlimited time. But pole-mounted systems have a natural advantage: height. A thief needs a ladder, the correct specialty tool, and enough time to work at height without being noticed. Combined with the camera system itself (which can send tamper alerts), this creates multiple layers of deterrence:
- Height barrier — requires a ladder, which is conspicuous
- Tool barrier — requires a non-standard security bit
- Visibility barrier — the screw location is not obvious from the ground
- Alert barrier — if the system has backup power (capacitor or secondary cell), it can send a tamper notification when power is interrupted
Recommendation for High-Theft Areas
For deployments in areas with known theft risk, I suggest two additional measures. First, use a cable lock through the mounting rail as a secondary physical barrier. Second, enable the ‘ power-loss alert7 ‘ feature in the camera firmware so the monitoring center gets an immediate notification if someone disconnects the battery. These are low-cost additions that significantly raise the difficulty for opportunistic theft.
Conclusion
The battery box is a plug-in module, not a permanent part of the bracket. One person, one tool, five minutes. That’s the design goal, and that’s what we deliver to protect your long-term investment in the mounting infrastructure.
1. Understand the IP67 rating and its implications for waterproof connectors. ↩︎ 2. Learn how bayonet-style locking rings provide secure and quick connections. ↩︎ 3. Gold plating prevents corrosion and ensures low-resistance connections in harsh environments. ↩︎ 4. Reference for wire gauge and silicone insulation properties for outdoor use. ↩︎ 5. Understanding lithium battery maintenance and lifespan for outdoor solar systems. ↩︎ 6. Detailed overview of tamper-proof fasteners, including pin-in-hex designs. ↩︎ 7. How power-loss alerts work in security cameras to prevent tampering. ↩︎