
I spent weeks trying to read plates from my PTZ camera footage. Every frame was blurry. The problem was not the lens. It was the shutter speed.
For clear long-distance license plate capture, set your shutter speed between 1/500s and 1/2000s. Faster vehicles need faster shutter speeds. At 60 mph, use at least 1/1000s to 1/2000s. Pair this with proper IR lighting and controlled gain to keep the image bright enough for recognition.
 PTZ camera shutter speed for license plate capture
Below, I break down the exact shutter settings for different speeds, how to handle nighttime headlights, how to use Shutter Priority mode, and how to automate the whole process. If you deal with LPR projects, this guide will save you hours of trial and error.
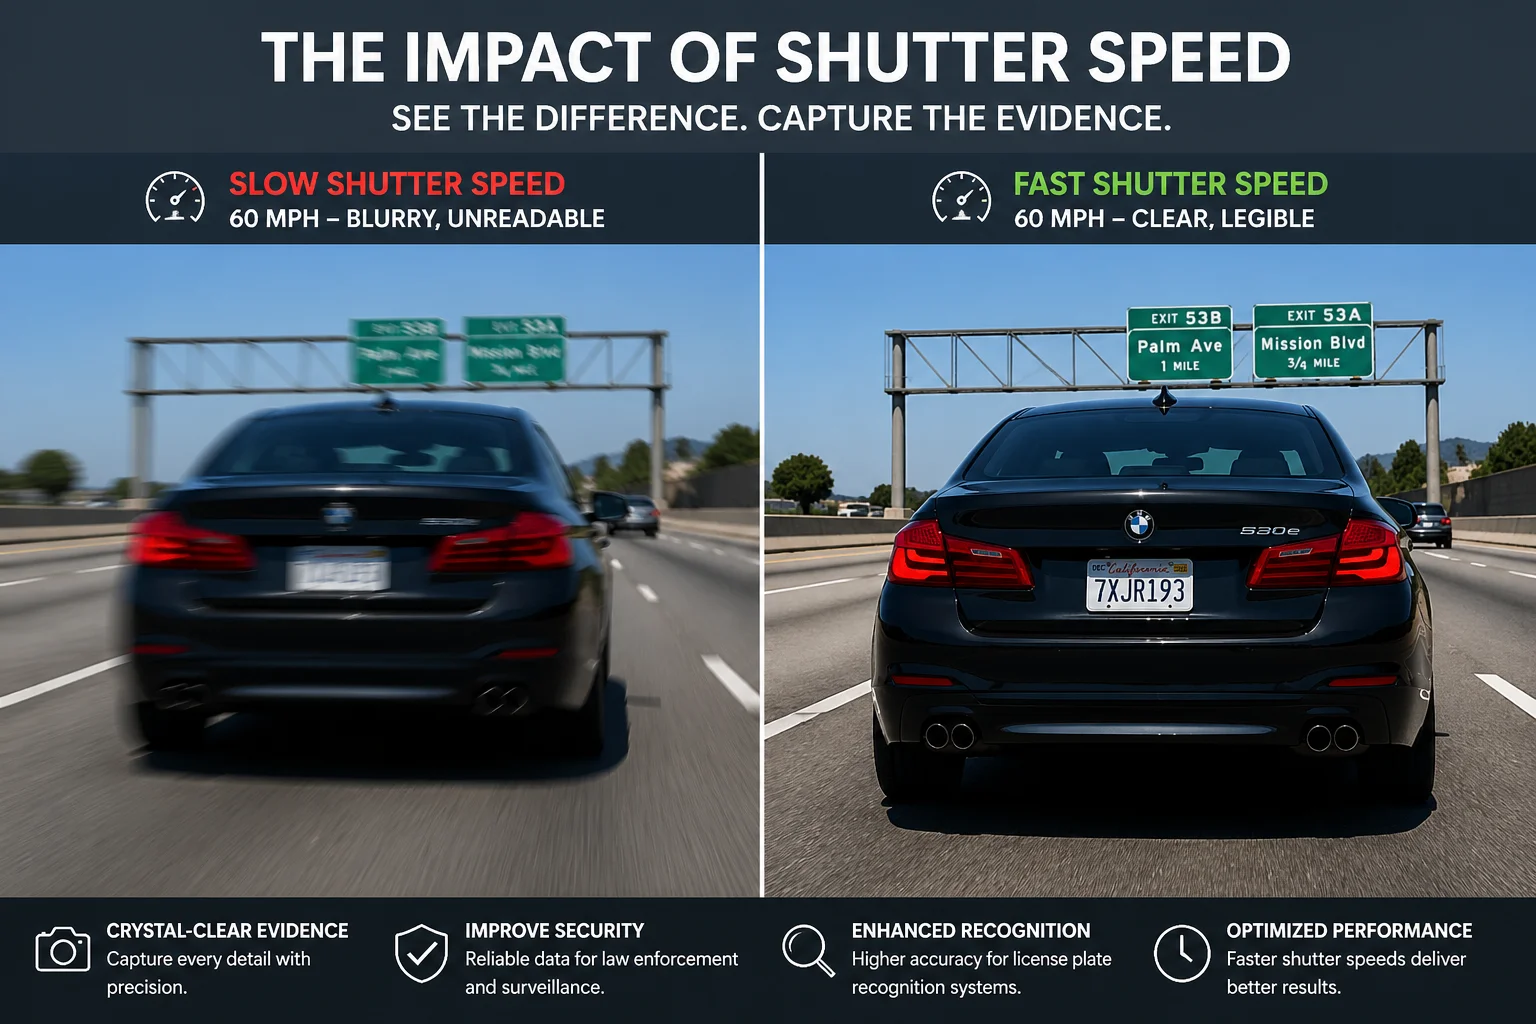
What Is the Minimum Shutter Speed I Need to Freeze a Vehicle Moving at 60 mph?
I once delivered a highway monitoring project. The client called me the next day. Every single plate was a white blur. I had left the camera on “Auto” exposure.
At 60 mph, a vehicle moves about 88 feet per second. To freeze the license plate, you need a shutter speed of at least 1/1000s. For better results at long range with a telephoto lens, use 1/2000s or even 1/4000s.
 Shutter speed setting for 60 mph vehicle license plate
Why Does Motion Blur Destroy License Plates?
Here is the simple math. A car at 60 mph travels roughly 26.8 meters every second. If your shutter speed is 1/100s, the car moves about 26 centimeters during that single frame. That is enough to smear every character on the plate into an unreadable mess. The letters overlap. The numbers blend together. No software can fix that.
The goal is simple. You want the car to move less than one pixel during the exposure. When you use a long zoom lens at 200 meters away, one pixel covers a very small area. So the shutter must be very fast.
Shutter Speed Reference by Vehicle Speed
I use this table as my starting point for every LPR project. Then I fine-tune on site.
| Vehicle Speed | Recommended Shutter (Daytime) | Recommended Shutter (Night with IR) |
|---|---|---|
| Parking lot / Gate (0–15 mph) | 1/250s – 1/500s | 1/250s – 1/500s |
| City road (20–35 mph) | 1/500s – 1/1000s | ≥ 1/500s |
| Urban highway (35–50 mph) | 1/1000s | 1/500s – 1/1000s |
| Highway / Freeway (60+ mph) | 1/1000s – 1/2000s | 1/1000s – 1/2000s |
The Pixel Density Rule
Freezing motion is only half the job. I always remind my clients: the plate must also be big enough in the frame. For reliable recognition, you need at least 100 pixels across the width of the plate. 120 to 150 pixels is even better.
This means you must use enough optical zoom. A PTZ camera with 38X or 40X zoom can pull a plate into focus from over 100 meters away. But if you don’t zoom in enough, the plate will be tiny. Even with zero motion blur, the characters will be too small for any LPR software 1 to read.
So the correct order is: first, zoom in until the plate fills enough of the frame. Then, set the shutter speed based on vehicle speed. Do not reverse this order.
What Happens If You Go Too Fast?
If you push the shutter to 1/4000s, the exposure time is extremely short. Very little light reaches the sensor. The image gets dark. I cover how to fix this in the sections below. But the key point here is: always start with the shutter speed that matches your target vehicle speed, and then solve the brightness problem separately.
How Can I Prevent the Headlights from Overexposing the License Plate at Night?
I have seen this problem on almost every night-time LPR installation I have worked on. The plate area turns into a bright white rectangle. The headlights wash everything out.
Enable HLC (High Light Compensation) on your PTZ camera. HLC suppresses the bright headlight glare and reveals the plate details behind it. Combine HLC with a fast shutter speed of 1/500s to 1/2000s, proper IR illumination, and controlled gain to get readable plates at night.
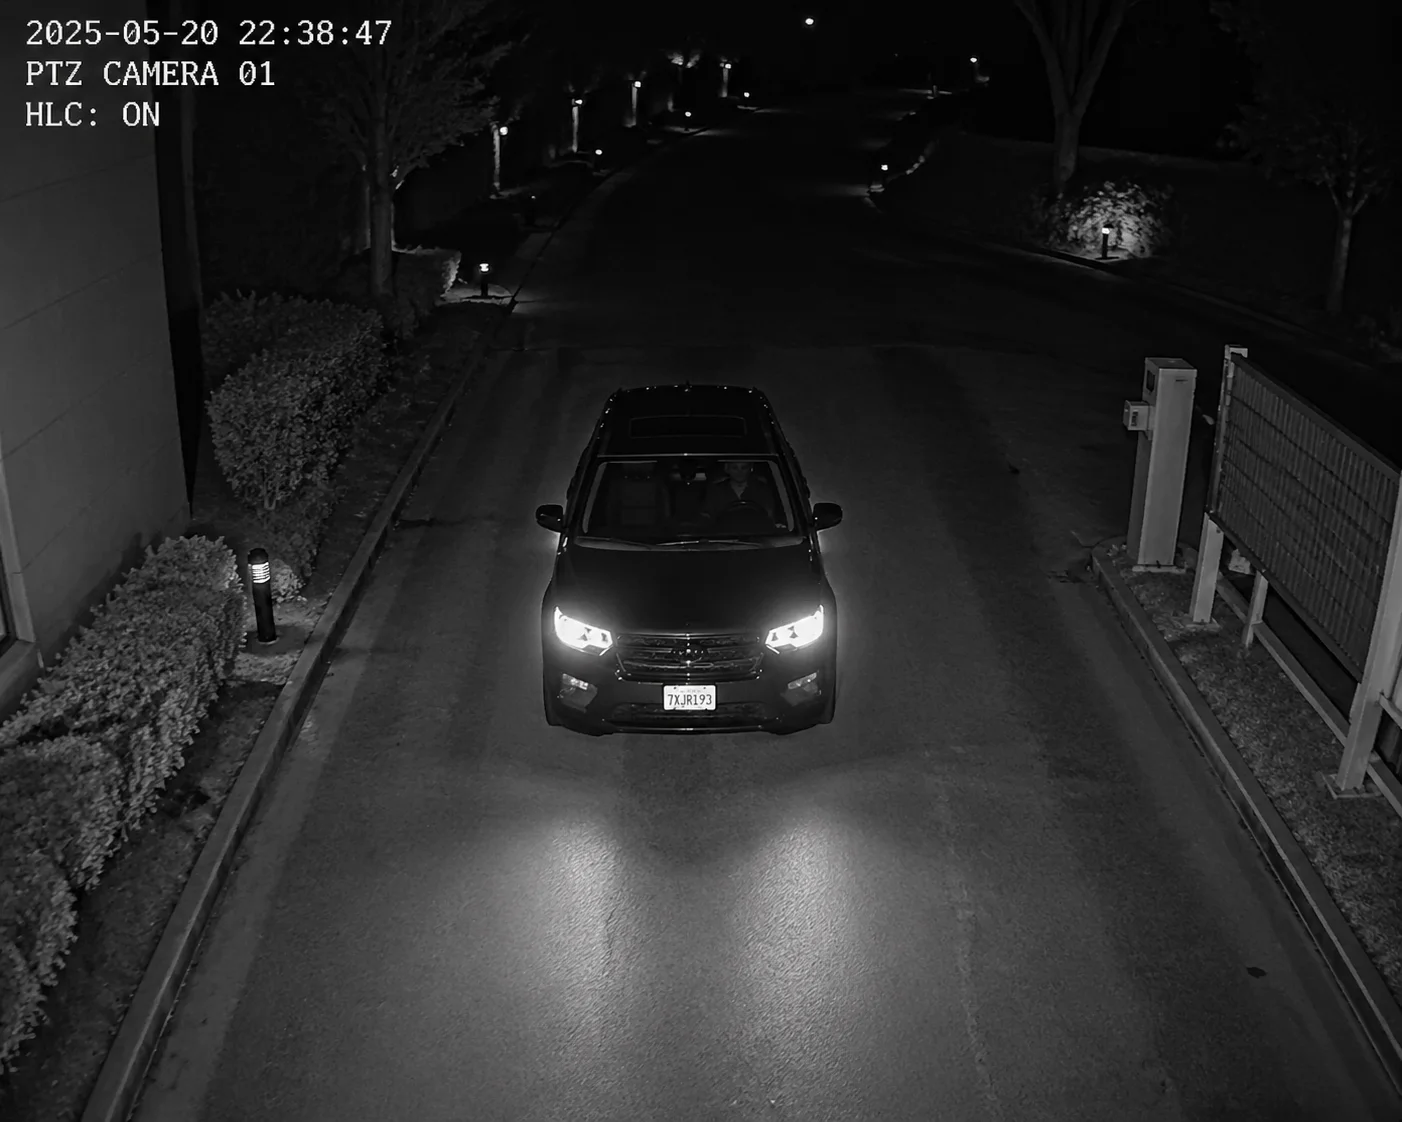 HLC headlight suppression for nighttime license plate capture
Why Do Headlights Ruin License Plates?
Modern LED headlights are extremely bright. When a car drives toward your camera at night, the headlights create a massive bloom of light around the front of the vehicle. The camera sensor gets flooded with light in that area. The plate, which sits right between or below the headlights, gets lost in the glare.
This is not a focus problem. It is not a resolution problem. It is a dynamic range problem. The headlights are thousands of times brighter than the plate surface. Without intervention, the camera’s auto exposure tries to balance the whole scene and the plate area becomes completely white.
The Three Tools You Need at Night
I always configure these three settings together for any night LPR deployment:
1. HLC (High Light Compensation)
HLC is different from WDR. WDR tries to balance the entire scene. HLC specifically targets the brightest spots in the frame and suppresses them. It darkens the headlight area so the plate behind it becomes visible. Most PTZ cameras from Chinese manufacturers support HLC. Look for it in the image settings or exposure menu.
2. External IR Illumination
The built-in IR LEDs on most PTZ cameras cover maybe 30 to 50 meters. For long-distance plate capture at 80 or 100 meters, that is not enough. I always recommend adding an external IR illuminator 2. A narrow-beam IR light pointed at the capture zone will reflect off the plate’s retro-reflective coating and make the characters pop out clearly.
3. Gain Control
When the shutter is fast and it is dark outside, the camera will try to boost the gain (ISO) to brighten the image. Too much gain adds noise. Noise destroys the sharp edges of plate characters. I keep gain below 20–30 dB. If the image is still too dark at that gain level, I add more external light instead of pushing gain higher.
Night Settings Quick Reference
| Setting | Recommended Value | Why |
|---|---|---|
| Shutter Speed | 1/500s – 1/2000s (based on speed) | Freeze the plate, no blur |
| HLC | ON | Suppress headlight glare |
| WDR | OFF at night | WDR adds noise in low light |
| Gain / AGC | ≤ 20–30 dB | Keep noise low, protect character edges |
| IR Illumination | External, narrow beam | Light up the plate from distance |
| Aperture | Max open (F1.0 – F1.2) | Let in as much light as possible |
A Common Mistake I See
Many integrators turn on WDR at night thinking it will help. In my experience, WDR in low-light conditions actually increases image noise. The camera blends multiple exposures, and this process amplifies noise in the dark areas. For night LPR, I turn WDR off and rely on HLC plus strong IR instead. The results are much cleaner.
Does My PTZ Camera Support “Shutter Priority” Mode for Consistent Plate Recognition?
I get this question a lot from integrators who are used to working with fixed LPR cameras. They want to know if a PTZ ball camera can do the same job. The short answer surprised many of them.
Yes, most professional PTZ cameras support Shutter Priority mode. In this mode, you lock the shutter speed at a fixed value like 1/1000s. The camera then adjusts gain and iris automatically to maintain brightness. This is the best mode for consistent license plate capture.
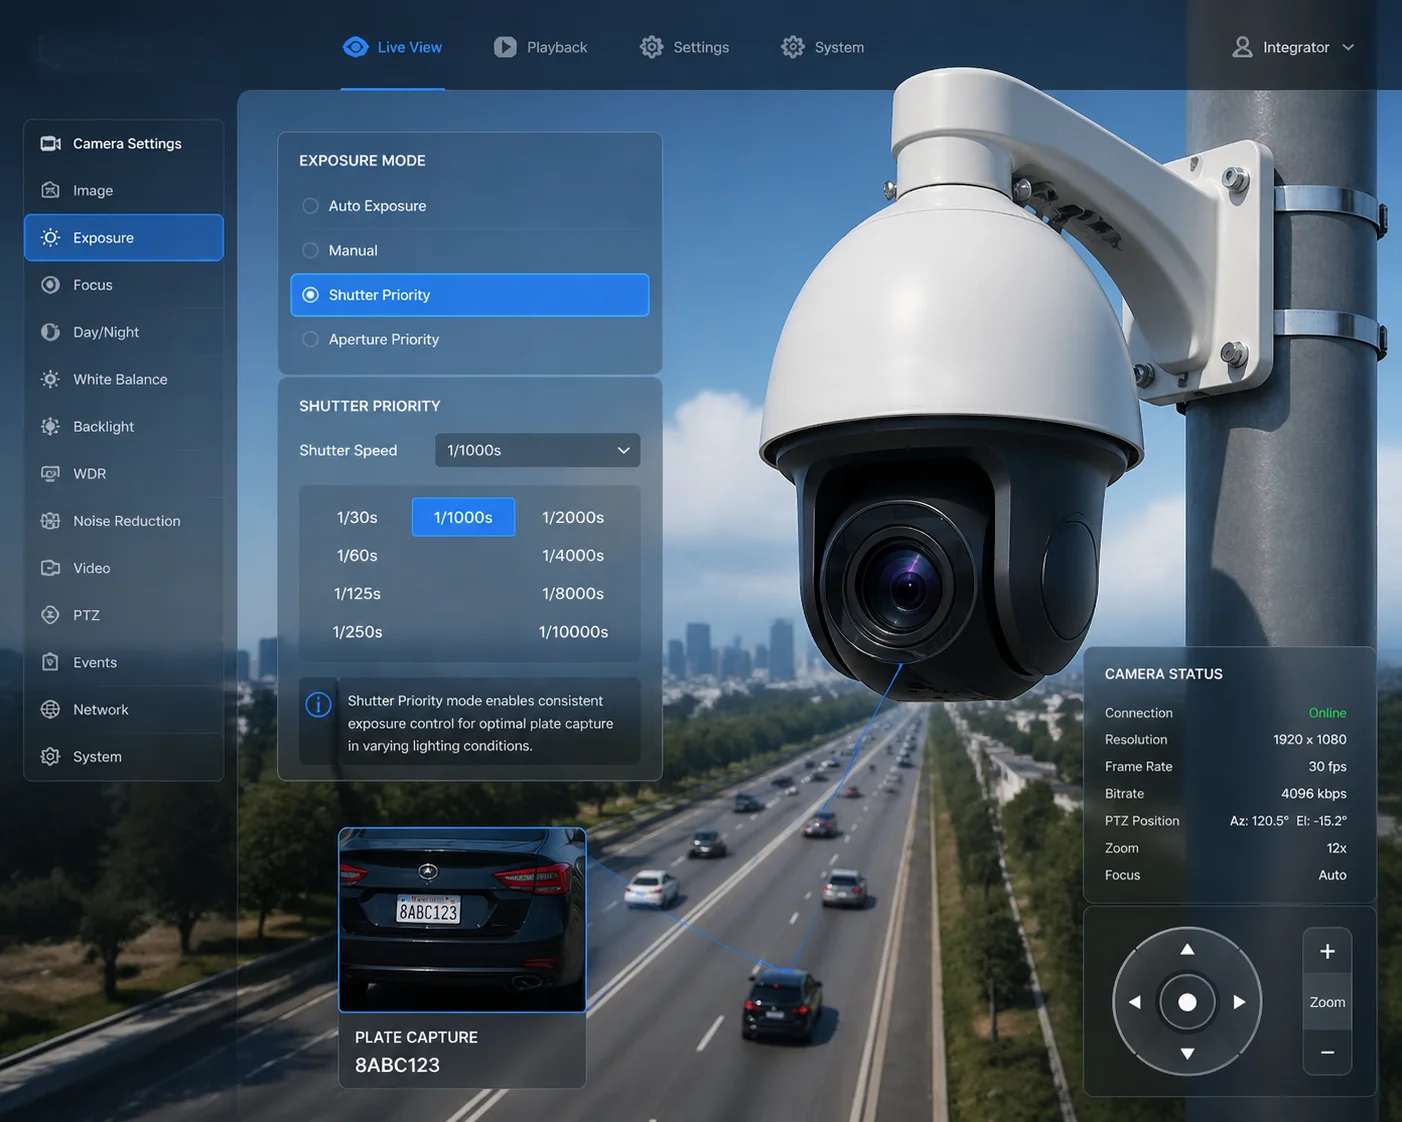 PTZ camera shutter priority mode for LPR
How Shutter Priority Works on a PTZ Camera
When you set the exposure mode to “Shutter Priority,” you are telling the camera one thing: never change the shutter speed. The camera will obey. If the scene gets darker, it will open the aperture wider. If it is already at maximum aperture, it will increase gain. But the shutter stays locked.
This is exactly what you want for LPR. Motion blur is your biggest enemy. By locking the shutter, you remove the risk that the camera will slow down the shutter on a cloudy day or at dusk and give you blurry plates.
Where to Find This Setting
On most Chinese-manufactured PTZ cameras, including the models we produce at Loyalty-Secu, you will find the exposure mode in the Web interface under Image Settings > Exposure. The options usually include:
- Auto — The camera controls everything. Bad for LPR.
- Manual — You control shutter, gain, and iris. Full control but requires more setup.
- Shutter Priority — You lock the shutter. The camera handles the rest. Best for LPR.
- Iris Priority — You lock the aperture. Not useful for plate capture.
I always recommend Shutter Priority as the starting point. If the client wants full control, Manual mode works too. But never leave it on Auto for any LPR application.
What About Preset Positions?
Here is a detail many people miss. A PTZ camera can store different exposure settings for different preset positions. This means you can have one preset aimed at the parking entrance with a shutter of 1/500s, and another preset aimed at the highway lane with shutter at 1/2000s. Each preset recalls its own image settings when activated.
This is very powerful for projects where one PTZ covers multiple capture zones. I use this feature in almost every project. Set the preset, lock the zoom, lock the focus, and lock the shutter. When the camera moves to that preset, everything loads automatically.
Manual Focus Is Critical at Long Range
At high zoom levels like 30X or 38X, the depth of field becomes very shallow. Auto focus can hunt back and forth and miss the plate entirely. I always switch to manual focus for LPR presets. Here is my process:
- Move the PTZ to the capture preset position.
- Zoom in to the target distance.
- Wait for a vehicle to pass.
- Use fine-step focus adjustment through the Web interface.
- Lock the focus.
This takes a few minutes but saves countless missed plates. I have seen auto focus fail at exactly the worst moment — when a truck passes and the camera refocuses on the truck body instead of the plate.
Can I Automate the Shutter Speed Changes Based on the Time of Day?
I manage several remote solar-powered sites for my clients. I cannot send a technician to change settings every morning and evening. I need the camera to switch settings on its own.
Yes, most professional PTZ cameras support scheduled profiles or day/night configuration switching. You can set one exposure profile for daytime with a shutter of 1/1000s and WDR on, and a different profile for nighttime with a shutter of 1/2000s, HLC on, and WDR off. The camera switches automatically based on time or light level.
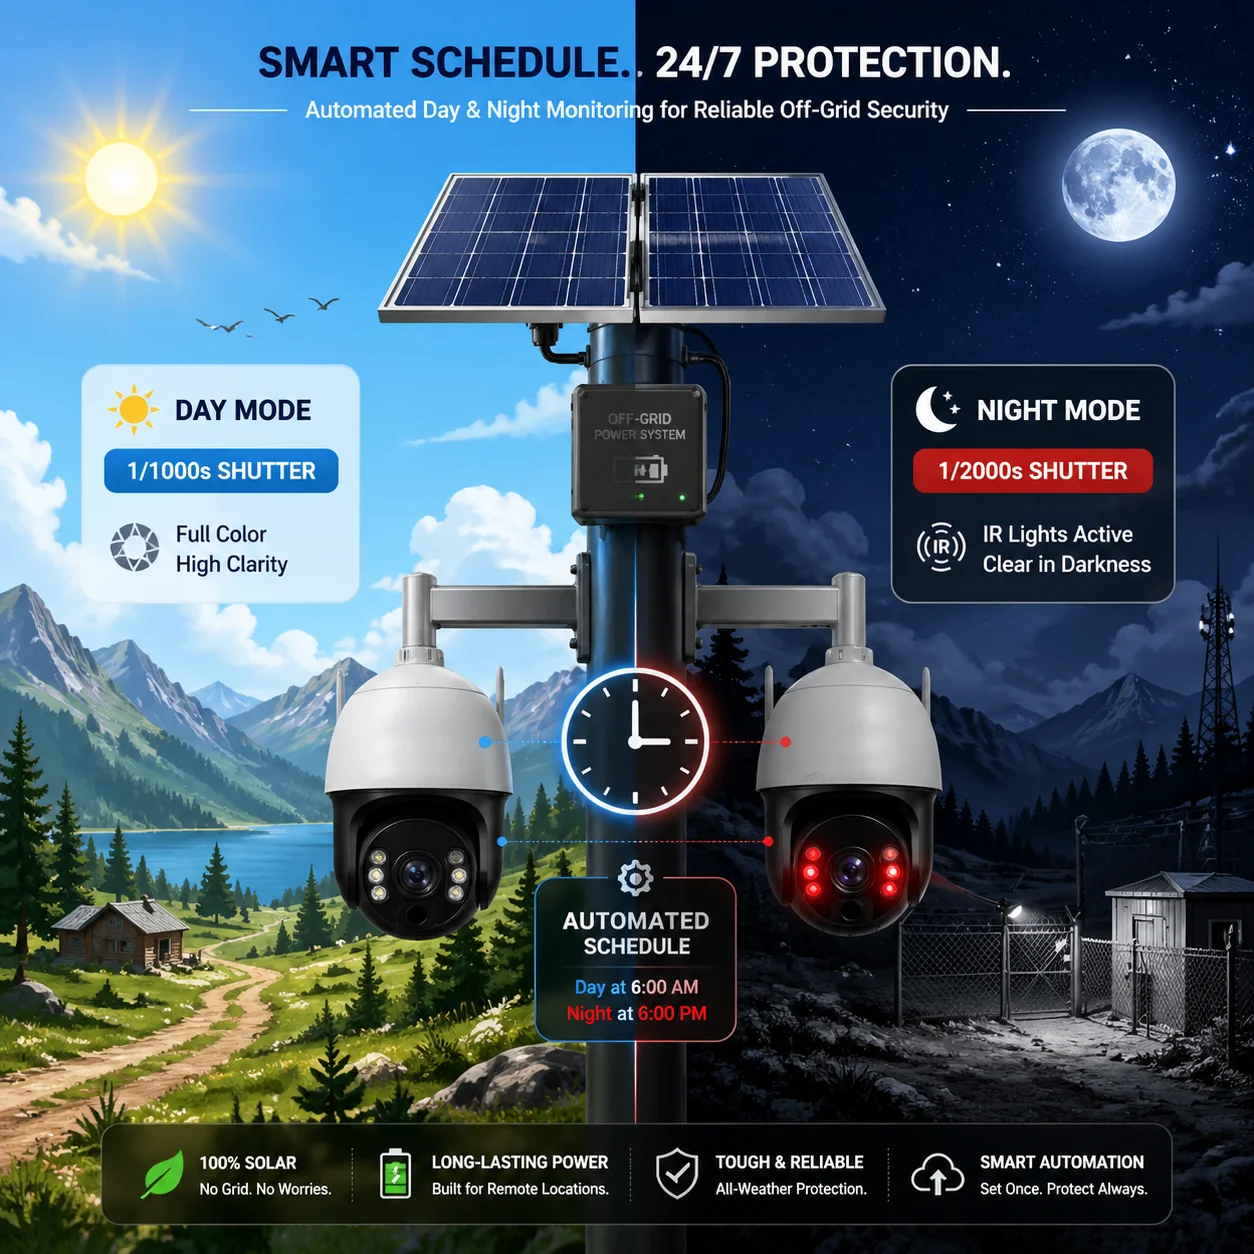 Automated day night shutter speed scheduling for PTZ camera
Why You Need Two Different Profiles
Daytime and nighttime are two completely different lighting environments. The settings that work perfectly at noon will fail at midnight. And the settings that work at midnight will overexpose the image at noon. You cannot use one setting for both.
During the day, you have plenty of light. A fast shutter of 1/1000s works easily. WDR helps balance shadows and bright sky. Gain stays low. The image is clean and sharp.
At night, everything changes. Light drops dramatically. You still need a fast shutter for moving vehicles. But now you need HLC to fight headlights. WDR should be off because it adds noise. Gain will be higher. IR lights must be on.
Setting Up Scheduled Profiles
Here is how I typically configure a PTZ camera for a client like David who needs reliable LPR around the clock:
Daytime Profile (6:00 AM – 6:00 PM)
- Exposure Mode: Shutter Priority
- Shutter Speed: 1/1000s
- WDR: ON
- HLC: OFF
- Gain Limit: 15 dB max
- IR: OFF
Nighttime Profile (6:00 PM – 6:00 AM)
- Exposure Mode: Shutter Priority
- Shutter Speed: 1/2000s
- WDR: OFF
- HLC: ON
- Gain Limit: 25 dB max
- IR: ON (internal + external if needed)
- Aperture: Maximum open
The exact menu path depends on the camera model. On our Loyalty-Secu PTZ cameras, this is found under System > Schedule > Image Profile. You select the time range and assign a saved image configuration to each period.
Remote Adjustment Over 4G
Many of my clients deploy PTZ cameras on solar-powered poles in remote areas. They connect through 4G LTE 3. Here are a few things I tell every client about remote tuning:
- Do not try to watch live video and adjust settings at the same time over 4G. The latency makes it frustrating. Instead, adjust the settings, save them, and then check a recorded clip later.
- Use the snapshot function. Take a snapshot during vehicle passage and download the JPEG. Check if the plate is readable. This uses much less bandwidth than live streaming.
- If the site has very different traffic speeds at different times (like a school zone), consider creating three profiles instead of two — morning rush, midday, and night.
Day/Night Configuration Summary
| Parameter | Daytime Setting | Nighttime Setting |
|---|---|---|
| Shutter Speed | 1/1000s | 1/2000s |
| WDR | ON | OFF |
| HLC | OFF | ON |
| Gain Limit | ≤ 15 dB | ≤ 25 dB |
| IR Light | OFF | ON |
| Aperture | Auto | Max open (F1.0–F1.2) |
A Tip for 4G Solar Sites
On solar-powered deployments, every watt matters. External IR illuminators draw power. I always recommend using a timer or photocell to turn the external IR light on only at night. This saves battery and extends system uptime. The camera’s scheduled profile already handles the image settings. The IR light just needs a simple on/off trigger synced to the same schedule.
Conclusion
Lock your shutter speed, add proper lighting, and use scheduled profiles. These three steps will give you clean, readable plates day and night from your PTZ camera.
1. Automatic number plate recognition software and algorithms. ↩︎ 2. Infrared illuminator types for nighttime surveillance. ↩︎ 3. 4G LTE network latency for remote camera tuning. ↩︎ 4. Optical zoom requirements for license plate pixel density. ↩︎ 5. High Light Compensation (HLC) for headlight suppression. ↩︎ 6. Gain and ISO settings for low-noise LPR capture. ↩︎ 7. Shutter Priority vs Manual exposure for vehicle tracking. ↩︎ 8. PTZ preset position configuration for multiple LPR zones. ↩︎ 9. Depth of field at high zoom for license plate focus. ↩︎ 10. Day/night image profile scheduling for PTZ cameras. ↩︎