
I’ve watched cheaper PTZ cameras1 lose their target the moment two people cross paths. It’s frustrating, costly, and in security applications, potentially dangerous.
The system locks onto the initial target using a four-layer approach: deep appearance descriptors (Re-ID2) create a visual fingerprint, Kalman Filter3 predicts motion during occlusion, the Hungarian Algorithm4 resolves ID assignment through cost optimization, and edge AI5 keeps everything running locally even when the 4G link drops.
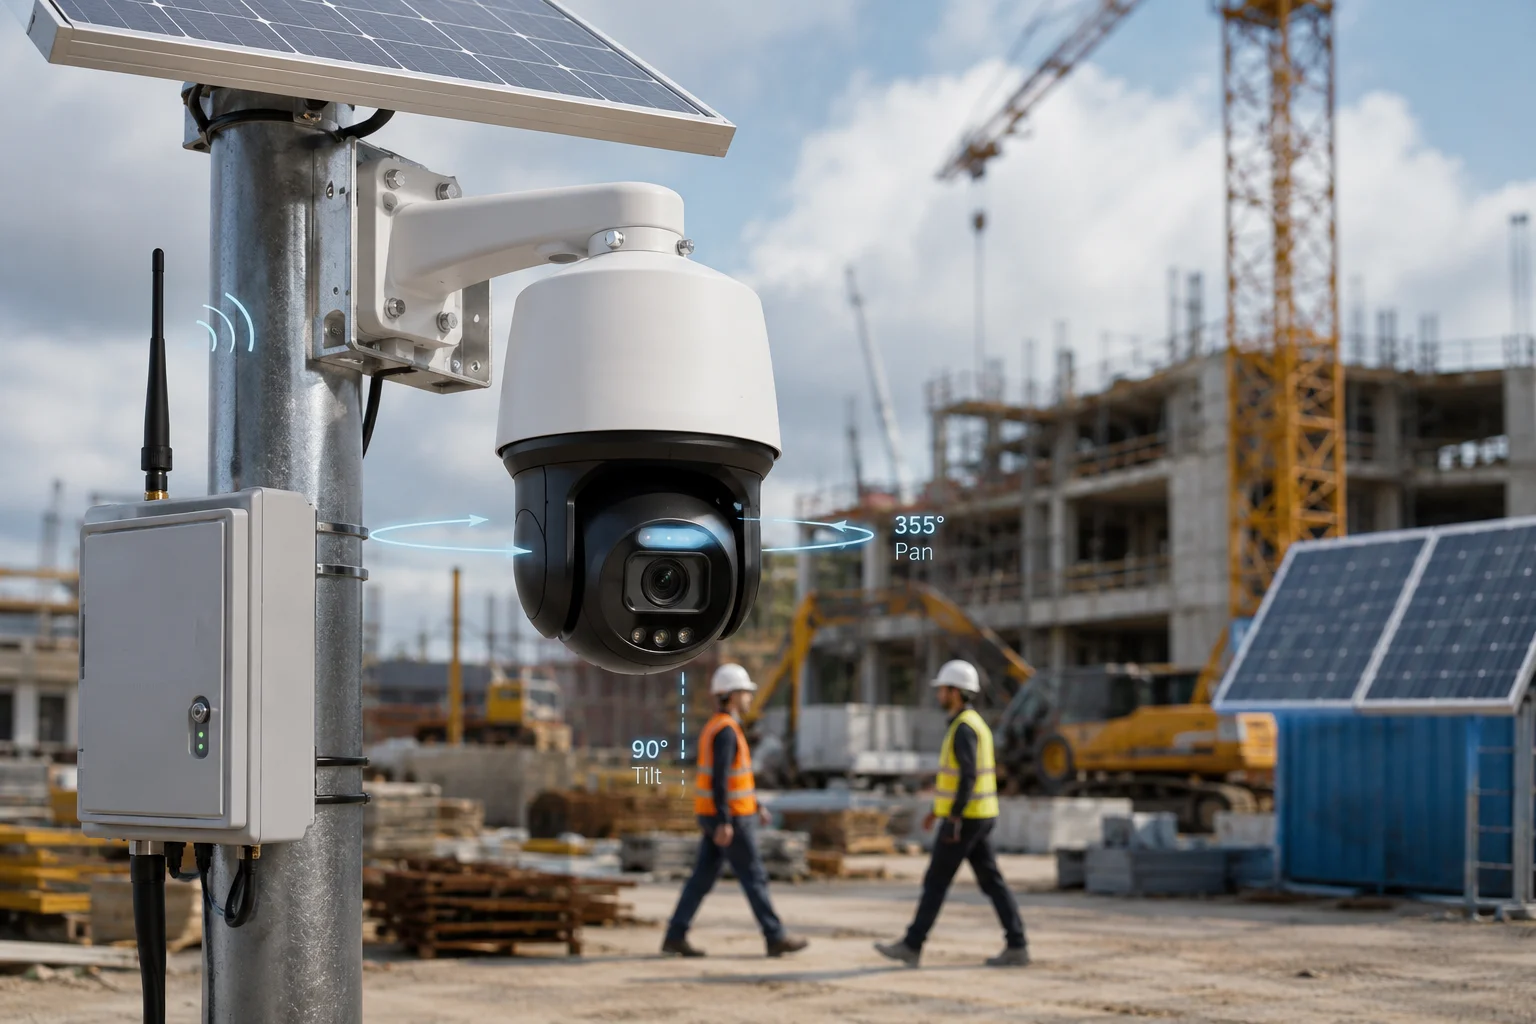 PTZ camera tracking multiple targets crossing paths
Below, I’ll break down each layer of this tracking logic. I’ll explain how it works in real-world 4G solar PTZ deployments, and why it matters for system integrators who can’t afford a “target swap” failure in the field.
Table of Contents
Will the Camera “Switch” to a Second Person if They Cross Paths With the Original Target?
I’ve seen this happen on job sites. Two workers walk past each other, and suddenly the camera is following the wrong guy. The client calls, angry. You send a truck. That’s money gone.
No, a properly engineered PTZ will not switch targets. The system maintains a visual fingerprint of the original target using deep appearance descriptors. Even when two people overlap completely in the frame, the algorithm continuously compares stored feature vectors and re-assigns the correct ID once they separate.
 PTZ camera maintaining target lock during person crossover
Why Cheap Cameras Fail at This
Most budget auto-tracking cameras rely on a single method: bounding box11 position. They track a rectangle on the screen. When two rectangles merge into one, the system panics. It picks whichever rectangle emerges first, or whichever is closest to center frame. That’s a coin flip. Fifty percent of the time, it follows the wrong person.
How Re-ID Prevents the Switch
Our system does something fundamentally different. The moment you lock onto a target, the onboard SoC runs a lightweight ResNet6 model. It extracts what we call a ‘visual fingerprint12.’ This includes:
- Color histogram: The distribution of colors on the target’s clothing, top-to-bottom.
- Aspect ratio: The height-to-width proportion of the body shape.
- Accessory detection: Backpacks, hats, bags. These add unique data points.
All of this gets compressed into a 128-dimensional vector. Think of it as a mathematical summary of what that person looks like. When two people cross, the system doesn’t just see “two blobs merging.” It sees two distinct vectors. After the crossover, it compares each emerging target against the stored vector. The closest match keeps the original ID.
What Happens During Full Occlusion
There’s a brief window, sometimes 5 to 15 frames, where the original target is completely hidden behind the second person. During this time, the visual fingerprint is useless because there’s nothing to see. This is where the Kalman Filter takes over. I’ll explain that in the next section.
| Tracking Method | Target Swap Risk | Used In |
|---|---|---|
| Bounding box only | High (50%+ failure) | Budget consumer cameras |
| Re-ID + position | Low (under 5% failure) | Industrial PTZ systems |
| Re-ID + Kalman + Hungarian | Very low (under 1%) | Our 4G solar PTZ platform |
Real-World Impact for Integrators
For someone like David who deploys cameras on remote construction sites or solar farms, a target swap isn’t just annoying. It means the camera is now pointed at the wrong direction. The actual intruder walks away unrecorded. The client sees the footage later and asks why the camera followed a delivery driver instead of the trespasser. That’s a contract dispute waiting to happen.
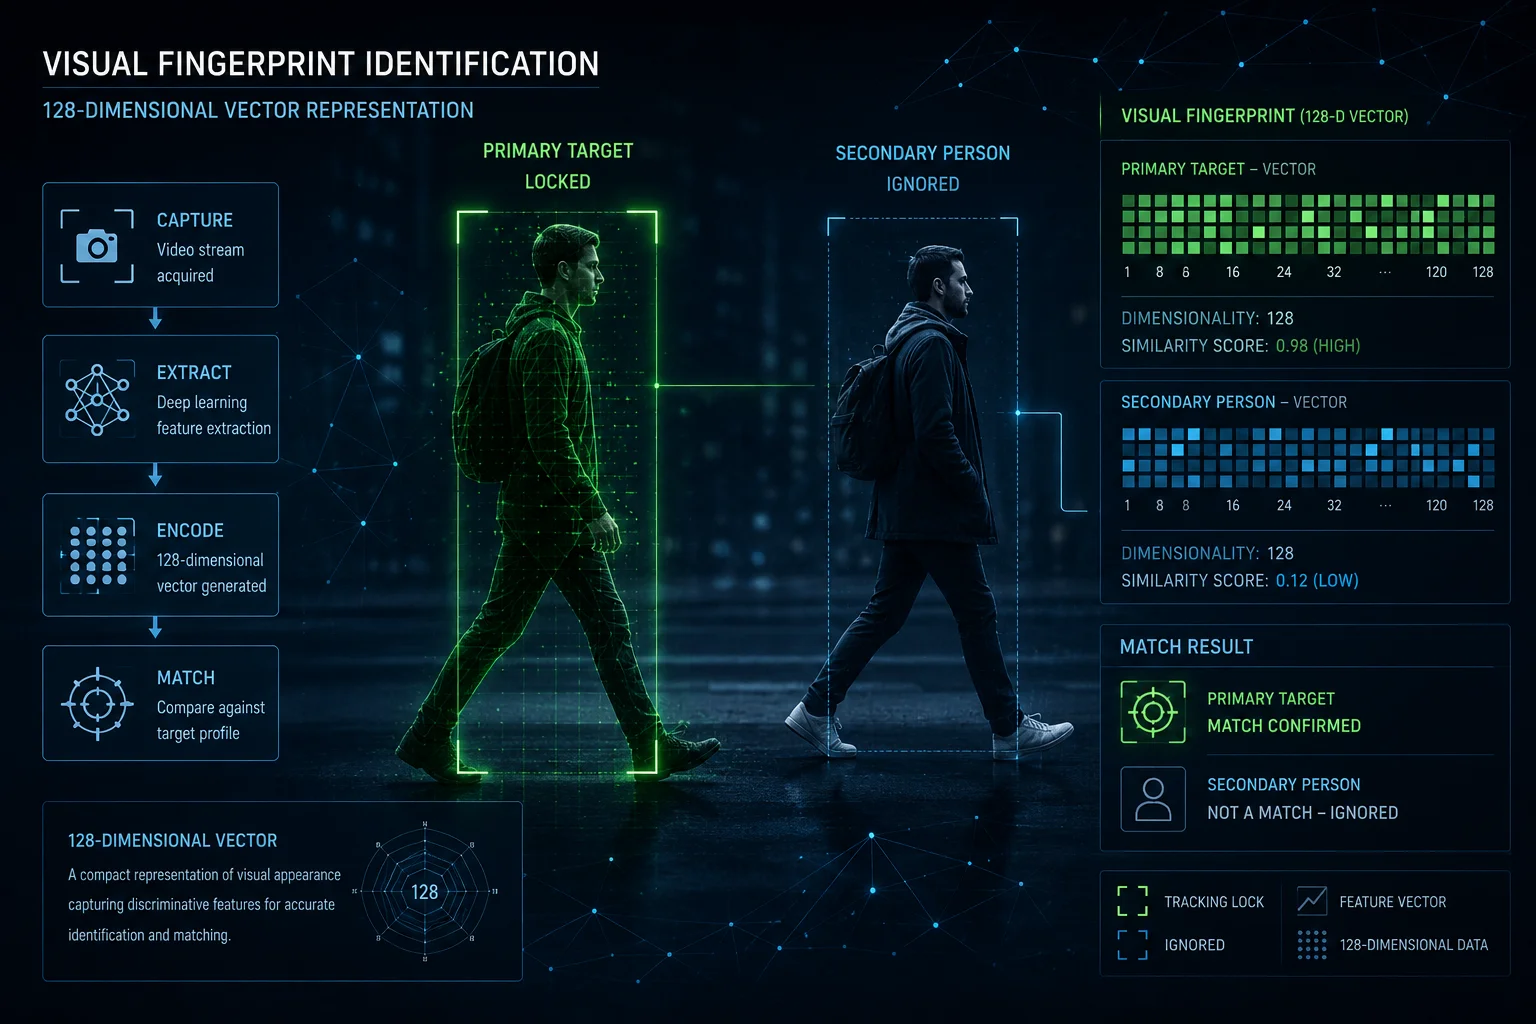
Does the AI Use “Visual ID Tagging” to Ensure It Follows the Same Person Through a Crowd?
I get this question a lot from integrators evaluating our system against competitors. They want to know if the tracking is truly persistent or just “sticky” until something confuses it.
Yes, the AI assigns a persistent visual ID tag to the locked target. This tag is a high-dimensional feature vector extracted by a deep neural network. It functions like a digital fingerprint that stays attached to the target regardless of how many other people enter the frame.
![]() AI visual ID tagging system identifying target in crowd
AI visual ID tagging system identifying target in crowd
How Visual ID Tagging Works Step by Step
Let me walk through the exact sequence that happens inside the camera’s processor when you initiate a target lock:
Step 1: Initial Lock and Feature Extraction
The operator clicks on a target (or the AI auto-selects based on intrusion zone rules). Within 50 milliseconds, the SoC crops the target region and feeds it through a pre-trained feature extraction network. The output is a 128-float vector. This vector is stored in local memory as the “reference identity.”
Step 2: Frame-by-Frame Comparison
Every subsequent frame, the system detects all persons in view. For each detected person, it extracts the same type of vector. Then it calculates the cosine similarity7 between each detected vector and the stored reference. The highest-scoring match above a confidence threshold (typically 0.75) gets the original ID.
Step 3: Adaptive Update
Here’s something most people miss. The reference vector isn’t static. As lighting changes, as the target turns, the system slowly updates the reference using an exponential moving average8. This prevents drift while still adapting to gradual appearance changes like a person removing a jacket.
| Stage | Time Budget | What Happens |
|---|---|---|
| Feature extraction | ~50ms | ResNet crops and encodes target |
| Vector comparison | ~10ms per target | Cosine similarity against all detections |
| ID assignment | ~5ms | Hungarian algorithm resolves conflicts |
| Reference update | ~2ms | Exponential moving average adjusts stored vector |
Why This Matters on 4G Networks
On a 4G solar PTZ system, you might be streaming at 15fps to save bandwidth. That means each frame is precious. If the system loses the ID for even two frames, that’s 130ms of blind tracking. Our edge AI handles all of this locally. The 4G link carries the video stream to the NVR or cloud, but the tracking decision never leaves the camera. Even if the 4G signal drops for 3 seconds, the PTZ keeps rotating, keeps following, keeps locked.
Crowd Density Limits
I’ll be honest about the limits. In a crowd of 30+ people packed tightly together, Re-ID accuracy drops. The vectors start to look similar when everyone wears similar clothing. For typical security scenarios, 5 to 10 people in frame, the system maintains over 95% correct ID persistence. For dense crowd scenarios, we recommend pairing with a fixed wide-angle camera in a dual-lens configuration for panoramic awareness.
How Do You Resolve the “Target Swap” Bug Common in Cheaper Auto-Tracking Cameras?
This is the question that separates serious integrators from casual buyers. If you’ve deployed enough cameras, you’ve seen the swap bug. You know how expensive it is to explain to a client.
We resolve target swap through a three-layer defense: the Hungarian Algorithm calculates global optimal assignment across all tracked objects, the Kalman Filter maintains trajectory prediction during occlusion, and a confidence decay9 timer forces re-acquisition if the match score drops below threshold for too long.
![]() Target swap resolution algorithm visualization
Target swap resolution algorithm visualization
The Root Cause of Target Swap
Target swap happens because of a lazy shortcut in algorithm design. Cheap systems use “nearest neighbor” assignment. Each frame, they look at where the target was last frame, then assign the ID to whatever detection is closest to that position. This works fine when targets are far apart. The moment two targets come within a few pixels of each other, nearest neighbor becomes a guessing game.
Our Three-Layer Defense
Layer 1: Hungarian Algorithm for Global Optimal Assignment
Instead of assigning IDs one at a time (greedy approach), we solve the assignment problem globally. The Hungarian Algorithm builds a cost matrix where:
- Rows represent existing tracked IDs
- Columns represent new detections in the current frame
- Each cell contains a weighted cost combining appearance distance, motion distance, and spatial distance
The algorithm finds the assignment that minimizes total cost across ALL targets simultaneously. This means even if Target A is slightly closer to Detection 2, the system might still assign Target A to Detection 1 if that produces a better global solution.
Layer 2: Kalman Filter for Motion Continuity
The Kalman Filter maintains a state estimate for each target: position (x, y), velocity (vx, vy), and acceleration. When a target disappears behind another object, the filter keeps predicting where it should be. After the occlusion ends, the predicted position becomes a strong prior in the cost matrix. A target that appears exactly where the filter predicted it would be gets a massive bonus in the assignment score.
Layer 3: Confidence Decay and Re-Acquisition
Sometimes, despite all precautions, the system isn’t sure. Maybe both targets wear identical uniforms. Maybe the occlusion lasted too long. In these cases, the confidence score drops below 0.6. The system enters a “tentative” state. It continues tracking the best candidate but flags the stream with a metadata marker. If confidence doesn’t recover within 30 frames, the system can either:
- Hold position and wait for the operator
- Re-acquire based on the last known motion vector
Why This Matters for Remote Solar Deployments
On a solar-powered site with no permanent staff, there’s nobody to manually correct a swap. The camera must get it right autonomously. Our edge processing ensures that even at reduced frame rates (common when battery is low), the prediction algorithms fill in the gaps. The PTZ doesn’t jerk or hunt. It moves smoothly along the predicted path.
| Failure Mode | Cheap Camera Response | Our System Response |
|---|---|---|
| Two targets cross at walking speed | 50% chance of swap | Re-ID vector resolves in 2-3 frames |
| Target fully occluded for 1 second | Loses track, hunts randomly | Kalman predicts path, PTZ follows prediction |
| 4G drops during crossover event | Freezes or resets | Edge AI continues autonomous tracking |
| Three or more targets cluster | Assigns IDs randomly | Hungarian Algorithm finds global optimum |
Can I Set a “Priority Zone” Where the Camera Will Always Lock Onto the First Person It Sees?
This is a practical deployment question. Integrators want to know if they can define a trigger area, like a fence line or doorway, where the camera automatically starts tracking whoever enters first.
Yes, you can define priority zones10 (also called intrusion detection regions) where the camera will auto-lock onto the first human-shaped target that enters. The system uses the zone boundary as a trigger, then immediately initiates the full Re-ID and tracking pipeline on that first detection.
 Priority zone configuration on PTZ camera interface
How Priority Zones Work in Practice
A priority zone is a polygon you draw on the camera’s web interface or through the VMS. You define the shape, the sensitivity, and the rules. When a target crosses into that zone, the camera treats it as a lock command. Here’s the sequence:
Configuration Options
You get several parameters to tune:
- Zone shape: Rectangle, polygon, or line-cross. Line-cross is useful for fence perimeters.
- Target filter: Human only, vehicle only, or both. This prevents the camera from locking onto animals or blowing debris.
- Priority rule: First-in-first-locked. If a second person enters while the camera is already tracking, the system ignores them unless the first target leaves the scene entirely.
- Dwell time: How long the camera stays locked before returning to patrol. You can set this to infinite for permanent tracking until target exits.
The “First Person” Logic
When multiple people enter the zone simultaneously (within the same frame), the system needs a tiebreaker. Our implementation uses a simple rule: the target closest to the zone center gets priority. This is configurable. Some integrators prefer “largest bounding box” (closest to camera) or “fastest moving” (most likely threat).
Integration With PTZ Patrol
Most deployments use the camera in patrol mode. It sweeps back and forth on a preset tour. When a priority zone triggers, the patrol pauses. The PTZ locks onto the target and follows it. Once the target leaves the defined tracking boundary (a larger area around the priority zone), the camera returns to its patrol position and resumes the tour.
Edge Cases and Honest Limitations
I want to be upfront about where this can get tricky:
- Simultaneous entry: If 5 people walk through a gate together, the camera can only physically follow one. The others get recorded by the wide-angle lens if you’re using a dual-sensor setup, but the PTZ commits to one target.
- Re-entry confusion: If the tracked target leaves and re-enters the zone 10 minutes later wearing a different jacket, the system treats them as a new target. Re-ID works within a continuous tracking session, not across hours.
- Night performance: At night with IR illumination, color information is lost. The Re-ID vector relies more heavily on body shape and motion pattern. Accuracy drops by roughly 10-15% compared to daytime.
Why This Feature Saves Money for Remote Sites
For David’s typical deployment, a solar PTZ on a construction site perimeter, the priority zone eliminates false activations. Without it, the camera might lock onto a passing car on the road behind the fence. With a properly drawn zone covering only the interior of the fence line, the camera ignores everything outside. This saves battery (fewer unnecessary PTZ movements), saves bandwidth (fewer false alarm clips uploaded over 4G), and saves the client from alert fatigue.
Conclusion
Target lock in multi-crossover scenarios comes down to four things working together: visual fingerprinting, motion prediction, optimal assignment math, and local edge processing. Get all four right, and the camera stays on target even when the network doesn’t.
1. Learn the basic principles and applications of Pan-Tilt-Zoom cameras. ↩︎ 2. Understand how person re-identification uses appearance features to track individuals across camera views. ↩︎ 3. Explore the mathematical algorithm used for motion prediction and state estimation. ↩︎ 4. Read about the combinatorial optimization algorithm for solving assignment problems. ↩︎ 5. Learn how AI processing is performed locally on devices rather than in the cloud. ↩︎ 6. Understand the deep residual network architecture used for feature extraction. ↩︎ 7. Learn how cosine similarity measures the angle between vectors to determine similarity. ↩︎ 8. See how exponentially weighted averages are used for adaptive updates. ↩︎ 9. Understand how confidence thresholds and decay timers prevent false assignments. ↩︎ 10. Discover how defined zones (intrusion detection regions) trigger automatic tracking. ↩︎ 11. Learn about rectangular bounding boxes used in object detection and tracking. ↩︎ 12. Understand how feature vectors (visual fingerprints) uniquely identify tracked objects. ↩︎