
You spent thousands on a PTZ camera and dozens of sensors. But they don’t talk to each other. Each device lives on its own island, and your client is asking why the system can’t react automatically.
MQTT is the lightweight messaging protocol that connects your PTZ camera to IoT sensors like gate contacts, PIR detectors, and temperature probes. It uses a publish/subscribe model through a central broker, so when one device sends a signal, every subscribed device reacts in milliseconds — even over 4G solar-powered networks.
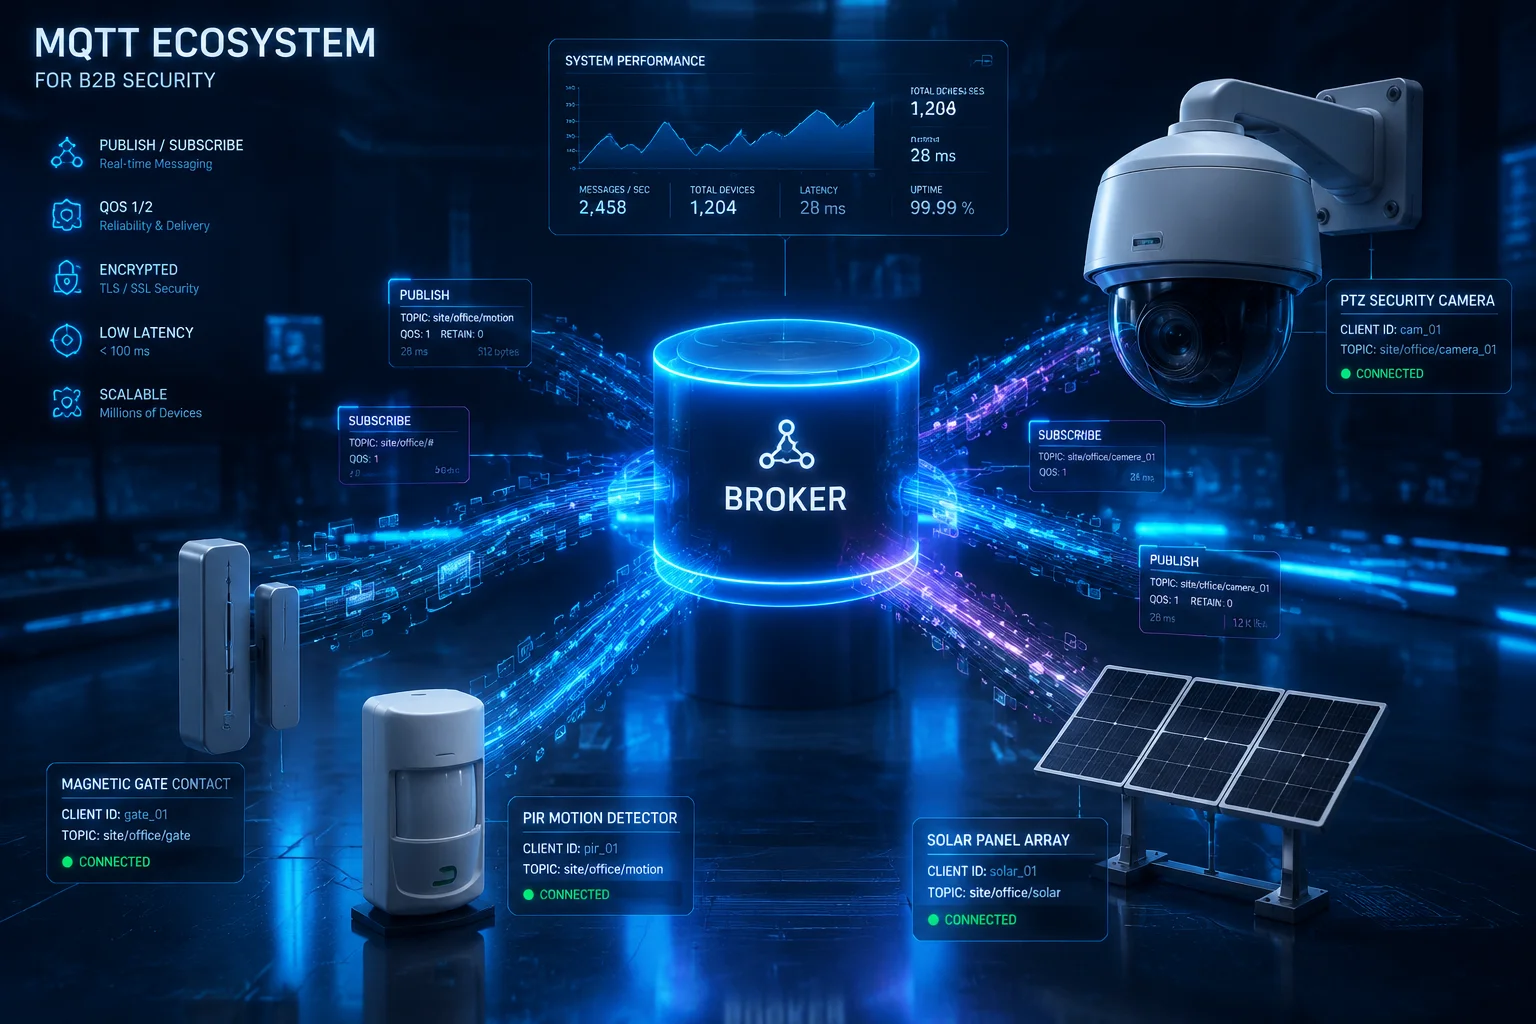 MQTT cross-device linkage with IoT PTZ camera and sensors
In this article, I will walk you through exactly how MQTT makes cross-device linkage work in real B2B security projects. I will cover camera-triggered alarms, AI metadata publishing, Home Assistant integration, and battery impact. Let’s get into it.
Table of Contents
Can My Camera Trigger a Remote Alarm if an IoT Gate Sensor Is Opened?
I have seen too many projects where the gate sensor detects an intruder, but the camera just keeps doing its slow patrol. The two devices have no connection. The alarm never fires. The client loses trust.
Yes. With MQTT, your gate sensor publishes an “open” event to a topic on the broker. Your PTZ camera subscribes to that same topic. The moment the gate opens, the camera jumps to a preset position, zooms in with 40X optics, and triggers a remote alarm — all within milliseconds.
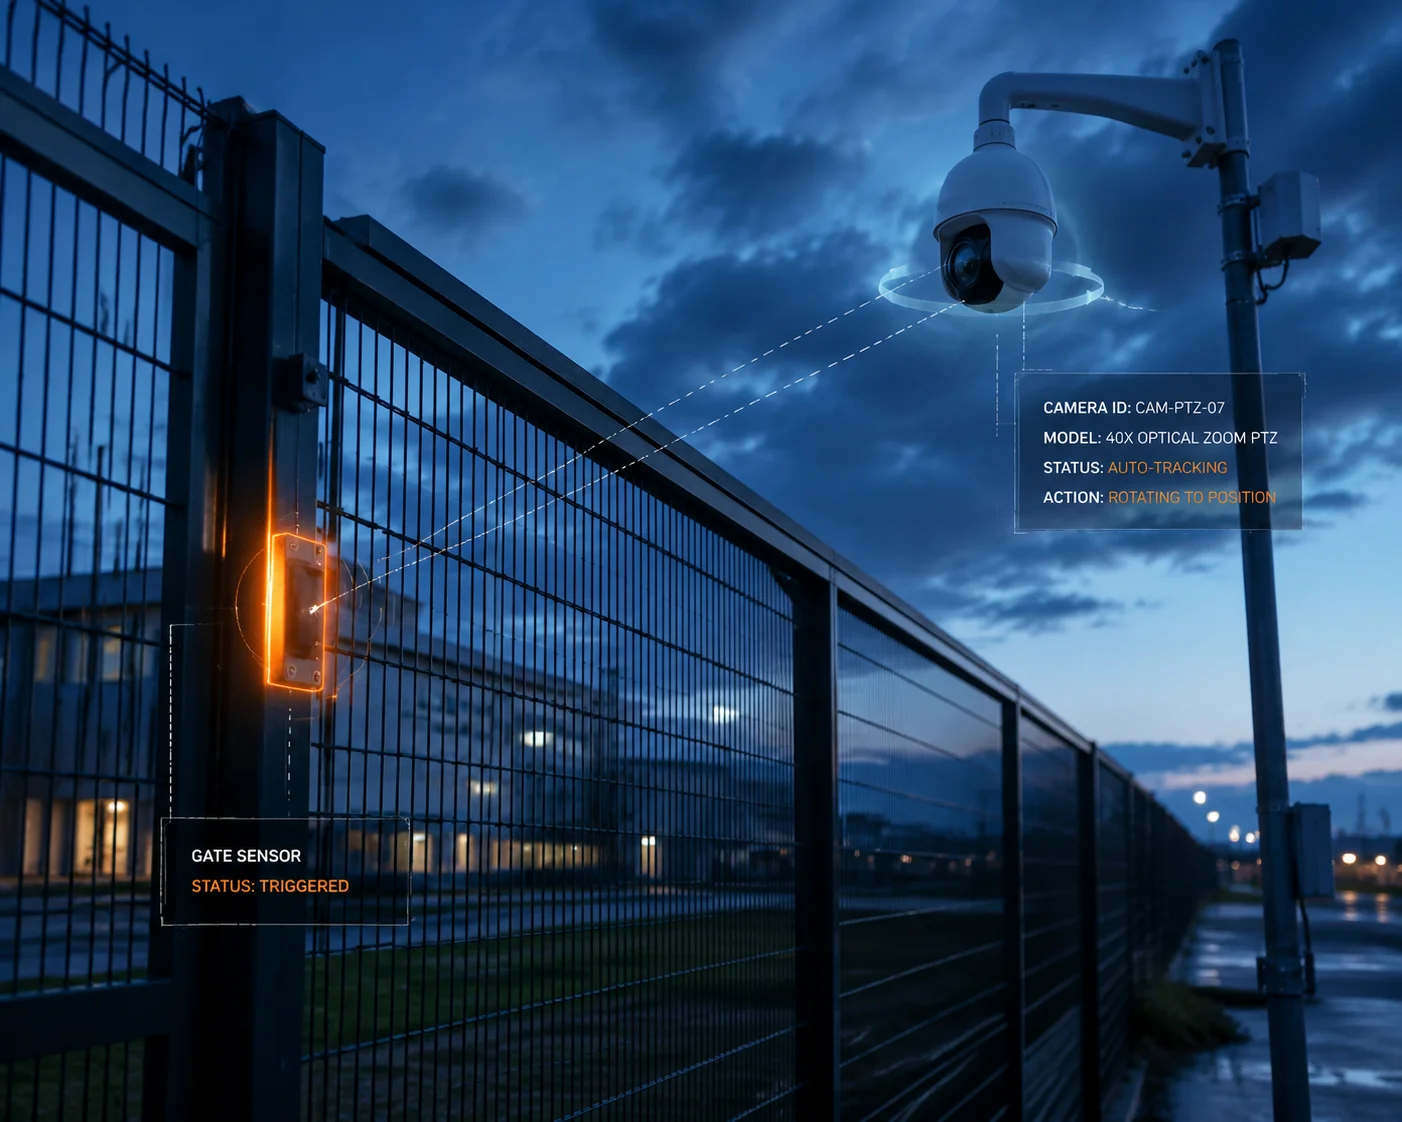 PTZ camera reacting to gate sensor via MQTT broker
How the Publish/Subscribe Model Works in This Scenario
The key to understanding this is the publish/subscribe (Pub/Sub) model1. It is very different from the old way of doing things, where Device A sends a direct HTTP request to Device B. That old method is slow. It requires both devices to be online at the exact same time. And it does not scale.
With MQTT, there is a middleman called a broker2. Think of the broker as a post office. The gate sensor drops off a message. The camera picks it up. They never need to know each other’s IP address. They only need to know the topic — like a mailing address.
Here is the step-by-step flow:
- The magnetic contact sensor on your fence detects the gate opening.
- The sensor publishes a message to the MQTT topic
site/perimeter/gate-01with the payload{"status": "open", "timestamp": "2025-01-15T08:30:00Z"}. - The MQTT broker (running on your n8n server, or a cloud instance like Mosquitto or EMQX) receives this message.
- Your PTZ camera is subscribed to
site/perimeter/gate-01. It receives the message instantly. - The camera firmware parses the payload and executes a preset action: move to Preset 1 (Gate View), engage 40X zoom, activate laser IR, and start recording.
- At the same time, the broker forwards the message to your alarm panel, which triggers a siren and sends a push notification to the site manager.
Why This Matters for Remote and Off-Grid Sites
For David Miller and integrators like him, this is not just a nice feature. It is a project requirement. Many of the sites they deploy to — farms, construction zones, solar fields — have no wired network. They run on 4G LTE and solar power.
In these environments, you cannot afford to run heavy polling-based protocols. MQTT’s overhead is tiny. The packet header is just 2 bytes. A single gate-open message might be 50 bytes total. Compare that to an HTTP POST request, which can easily be 500+ bytes with headers.
| Communication Method | Typical Overhead | Connection Type | Suitability for 4G Solar |
|---|---|---|---|
| HTTP REST API | 500–2000 bytes per request | Short-lived, synchronous | Poor — high data use, high latency |
| WebSocket | 200–500 bytes initial handshake | Persistent, bidirectional | Moderate — better but still heavy |
| MQTT (QoS 0) | 2–50 bytes per message | Persistent, asynchronous | Excellent — minimal data, minimal power |
Offline Fault Tolerance With QoS Levels
One thing I always recommend to integrators: set your critical alarm topics to QoS 1 (at least once delivery)3. This means if the 4G signal drops for a few seconds, the broker holds the message and delivers it as soon as the connection comes back. Your alarm command will not get lost.
For non-critical data like routine temperature readings, QoS 0 (fire and forget) is fine. This saves bandwidth and battery.
Does the Firmware Support Publishing AI Metadata (Human Detected) to an MQTT Broker?
Most cameras can detect a person. But the detection result stays trapped inside the camera’s own app. You cannot use it anywhere else. Your NVR does not know. Your automation platform does not know. The data is wasted.
Yes. Our PTZ camera firmware can publish AI detection results — such as ‘human detected’ or ‘vehicle detected’ — directly to an MQTT broker. This turns raw video intelligence into structured data that any subscribed system can act on immediately, from triggering alarms to logging events in a database.
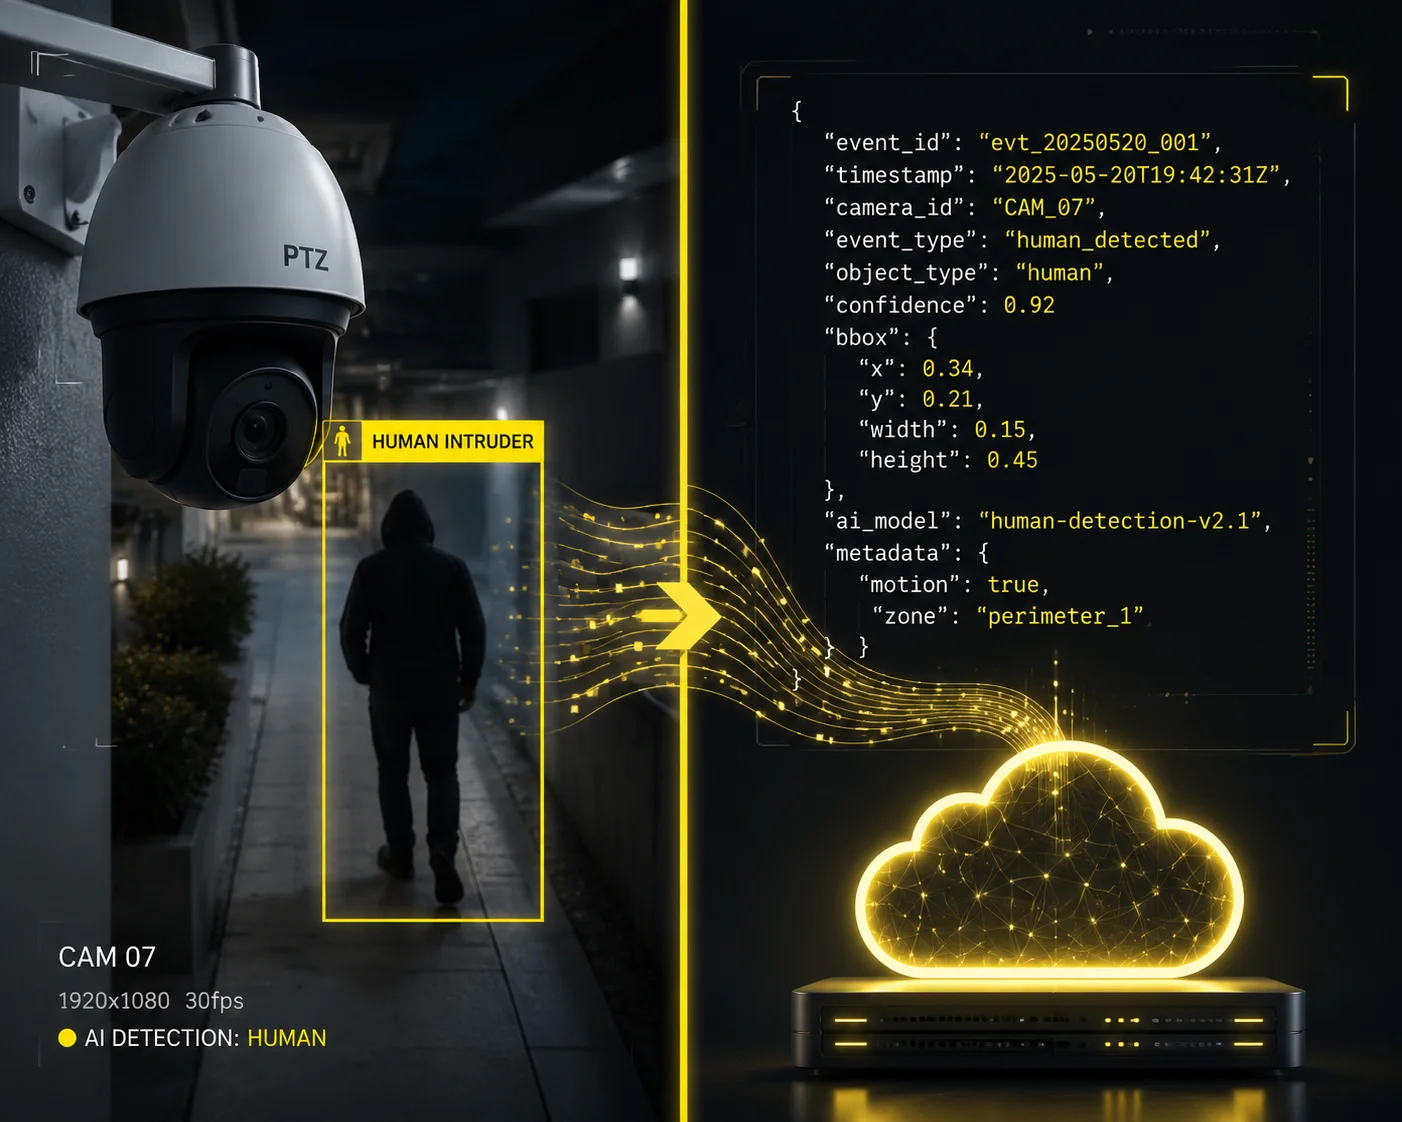 AI metadata human detected published to MQTT broker
What AI Metadata Actually Looks Like
When our camera’s onboard AI engine detects a human, it does not just flash a red box on the video feed. It generates a structured data packet. This packet can be published to an MQTT topic like camera/ptz-01/ai/events.
Here is an example of what that payload looks like:
{
"event": "human_detected",
"confidence": 0.92,
"bounding_box": {"x": 320, "y": 180, "w": 120, "h": 280},
"preset": "Gate-North",
"zoom_level": "28X",
"timestamp": "2025-01-15T08:31:05Z"
}
This is not just a simple alert. It includes the confidence score, the location of the person in the frame, the current PTZ preset, and the zoom level. This data is gold for system integrators.
How Integrators Use This Data
Once this metadata hits the MQTT broker, any subscribed system can use it. Here are three real use cases:
Use Case 1: Smart Filtering in n8n or Node-RED. Your automation platform subscribes to the AI event topic. It checks the confidence score. If it is above 0.85, it triggers a full alarm sequence. If it is below 0.5, it logs the event but does not bother the client. This reduces false alarms dramatically.
Use Case 2: Database Logging for Compliance. A subscriber writes every AI event to a PostgreSQL or InfluxDB database. At the end of the month, the site owner gets a report: “247 human detections, 89 vehicle detections, 12 confirmed intrusions.” This kind of reporting wins contracts.
Use Case 3: Cross-Camera Coordination. Camera A detects a person at the east fence. It publishes the event. Camera B, 200 meters away at the south gate, subscribes to Camera A’s topic. Camera B immediately pans to cover the likely path of movement. This is relay detection — and it is only possible with MQTT.
Bidirectional Communication: The Camera Talks Back
This is a point many people miss. MQTT is not one-way. The camera is both a subscriber (it listens for commands) and a publisher (it sends out AI results). This bidirectional flow is what makes true IoT integration possible.
| Direction | Example Topic | Payload | Purpose |
|---|---|---|---|
| Sensor → Camera | site/fence/gate-01 | {"status": "open"} | Trigger PTZ preset move |
| Camera → Platform | camera/ptz-01/ai/events | {"event": "human_detected"} | Report AI detection result |
| Platform → Camera | camera/ptz-01/commands | {"action": "goto_preset", "id": 3} | Remote PTZ control |
| Camera → Platform | camera/ptz-01/status | {"battery": "78%", "signal": "-72dBm"} | Health monitoring |
This table shows the full picture. The camera is not a passive viewer. It is an active node in your IoT network.
How Do I Integrate the PTZ Camera With My Existing Home Assistant or Node-RED Setup?
You already have a working Home Assistant or Node-RED dashboard. You have spent months building automations. Now a client wants to add a PTZ camera. But you are worried it will not fit into your existing setup. You do not want to start over.
Integration is straightforward. Our PTZ camera connects to the same MQTT broker your Home Assistant or Node-RED instance already uses. You add the camera’s topics to your configuration, and it appears as a controllable device — you can send PTZ commands, receive AI alerts, and build automations using the tools you already know.
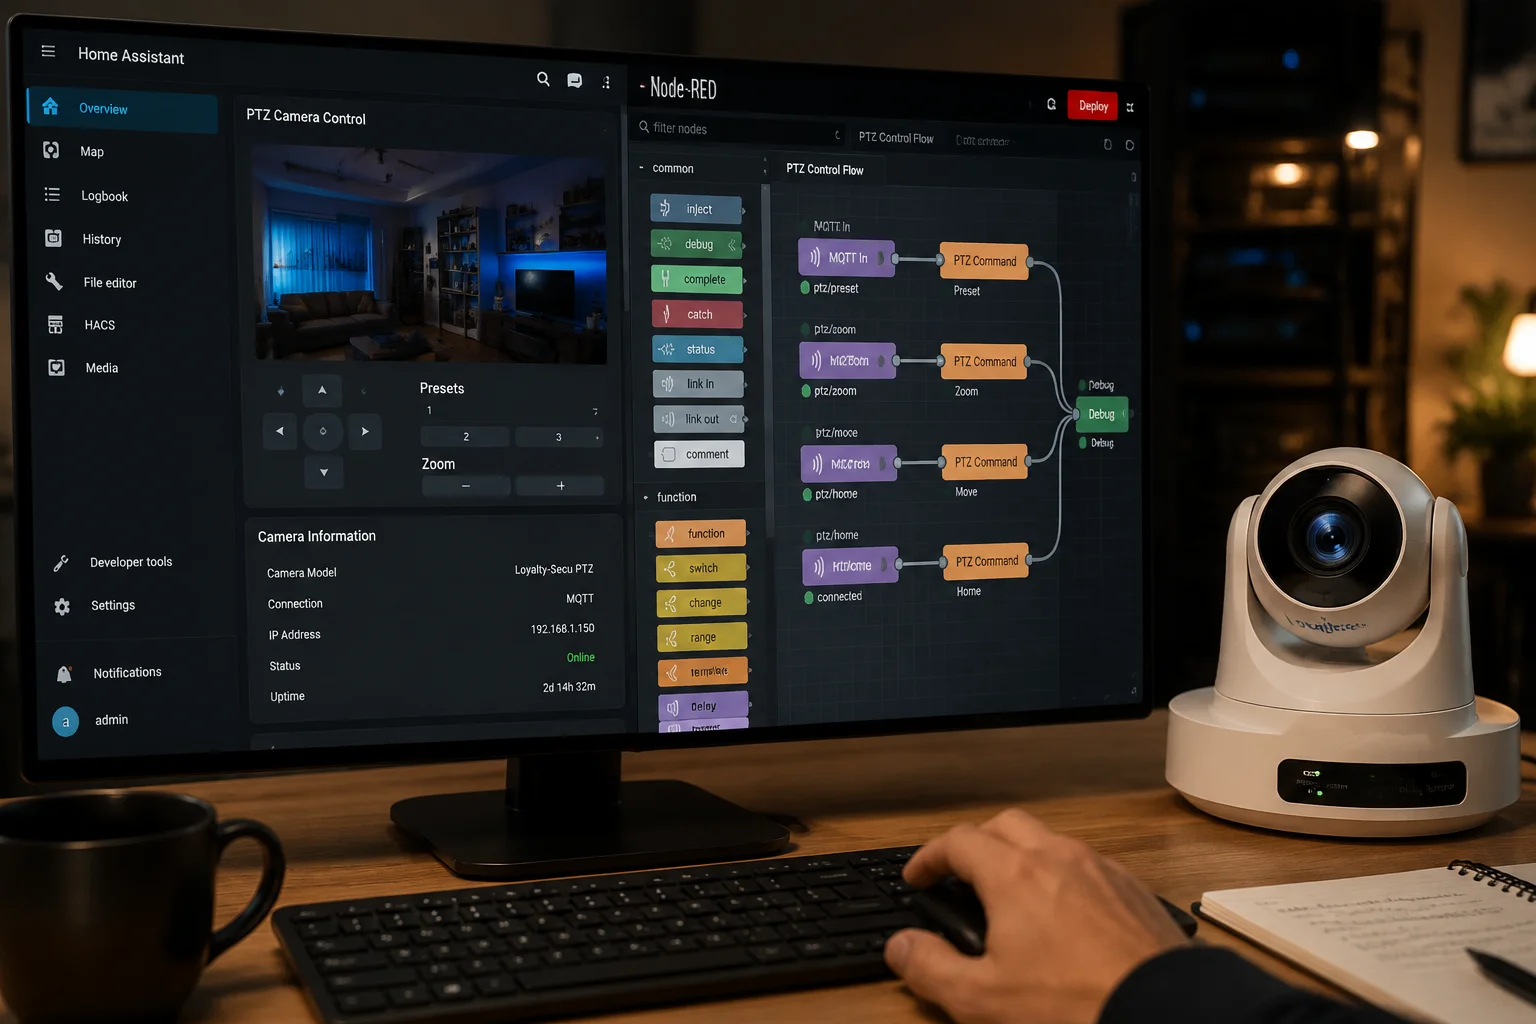 PTZ camera integrated with Home Assistant and Node-RED via MQTT
Home Assistant Integration Step by Step
Home Assistant4 has native MQTT support through its built-in integration. If you are already running a Mosquitto broker as an add-on, you are halfway there.
Here is the basic process:
- Connect the camera to your broker. In the camera’s network settings, enter your Mosquitto broker’s IP address, port (usually 1883 or 8883 for TLS), username, and password.
- Define the camera’s topics. The camera will publish to topics like
camera/ptz-01/ai/eventsand subscribe to topics likecamera/ptz-01/commands. - Add MQTT sensors in Home Assistant. In your
configuration.yaml, create MQTT sensor entities that listen to the camera’s topics. For example, you can create a binary sensor that turns “on” when a human is detected. - Build automations. Use Home Assistant’s automation editor to create rules. Example: “When the human_detected sensor turns on AND it is after 10 PM, turn on the floodlight and send a notification to my phone.”
Node-RED Integration
Node-RED is even more flexible. You drag an MQTT In node5 onto your flow, point it at your broker, and subscribe to the camera’s topic. The message arrives as a JSON object. You parse it, add logic, and route it wherever you want.
For example, a simple Node-RED flow might look like this:
- MQTT In (subscribed to
camera/ptz-01/ai/events) → - JSON Parse →
- Switch Node (if confidence > 0.85) →
- MQTT Out (publish to
alarm/siren/activate) + Email Node (send alert to site manager)
n8n as the B2B Orchestration Layer
For B2B integrators who manage dozens of sites, I recommend n8n as the central orchestration platform. n8n6 has a built-in MQTT Trigger node that listens for messages from any topic. When a message arrives, n8n can:
- Send an HTTP API call to the camera to move to a specific preset.
- Log the event in a CRM or ticketing system.
- Send a WhatsApp or Telegram alert to the site owner.
- Generate a daily summary report and email it to the project manager.
The beauty of this approach is that you do not need to write custom firmware or build a proprietary app. You use standard, open tools. The camera speaks MQTT. Your platform speaks MQTT. They understand each other.
Security Considerations for Integration
Since MQTT messages can include commands to move your PTZ camera, security is critical. I always tell integrators: do not skip these steps.
- Enable TLS encryption7 on your MQTT broker. This prevents anyone from sniffing your messages over the network.
- Use strong username/password authentication. Do not leave the broker open.
- Use Access Control Lists (ACLs).8 Restrict which clients can publish to command topics. Your temperature sensor should not be able to send PTZ commands.
- Isolate your IoT VLAN. Keep your MQTT traffic on a separate network segment from your office or public Wi-Fi.
Is the MQTT Client Lightweight Enough to Run Without Draining the Solar Battery?
This is the question that keeps integrators up at night. You have a solar-powered site. The battery is 60Ah or maybe 100Ah. The camera already draws significant power for the motor, the heater, the IR illuminator. If the MQTT client adds even 5% more power consumption, your system might not survive a cloudy week.
Yes. The MQTT client running on our PTZ camera firmware consumes negligible power — typically less than 0.1W of additional processing load. MQTT was designed from the ground up for constrained devices on unreliable networks, making it the ideal protocol for solar-powered, 4G-connected deployments where every milliamp matters.
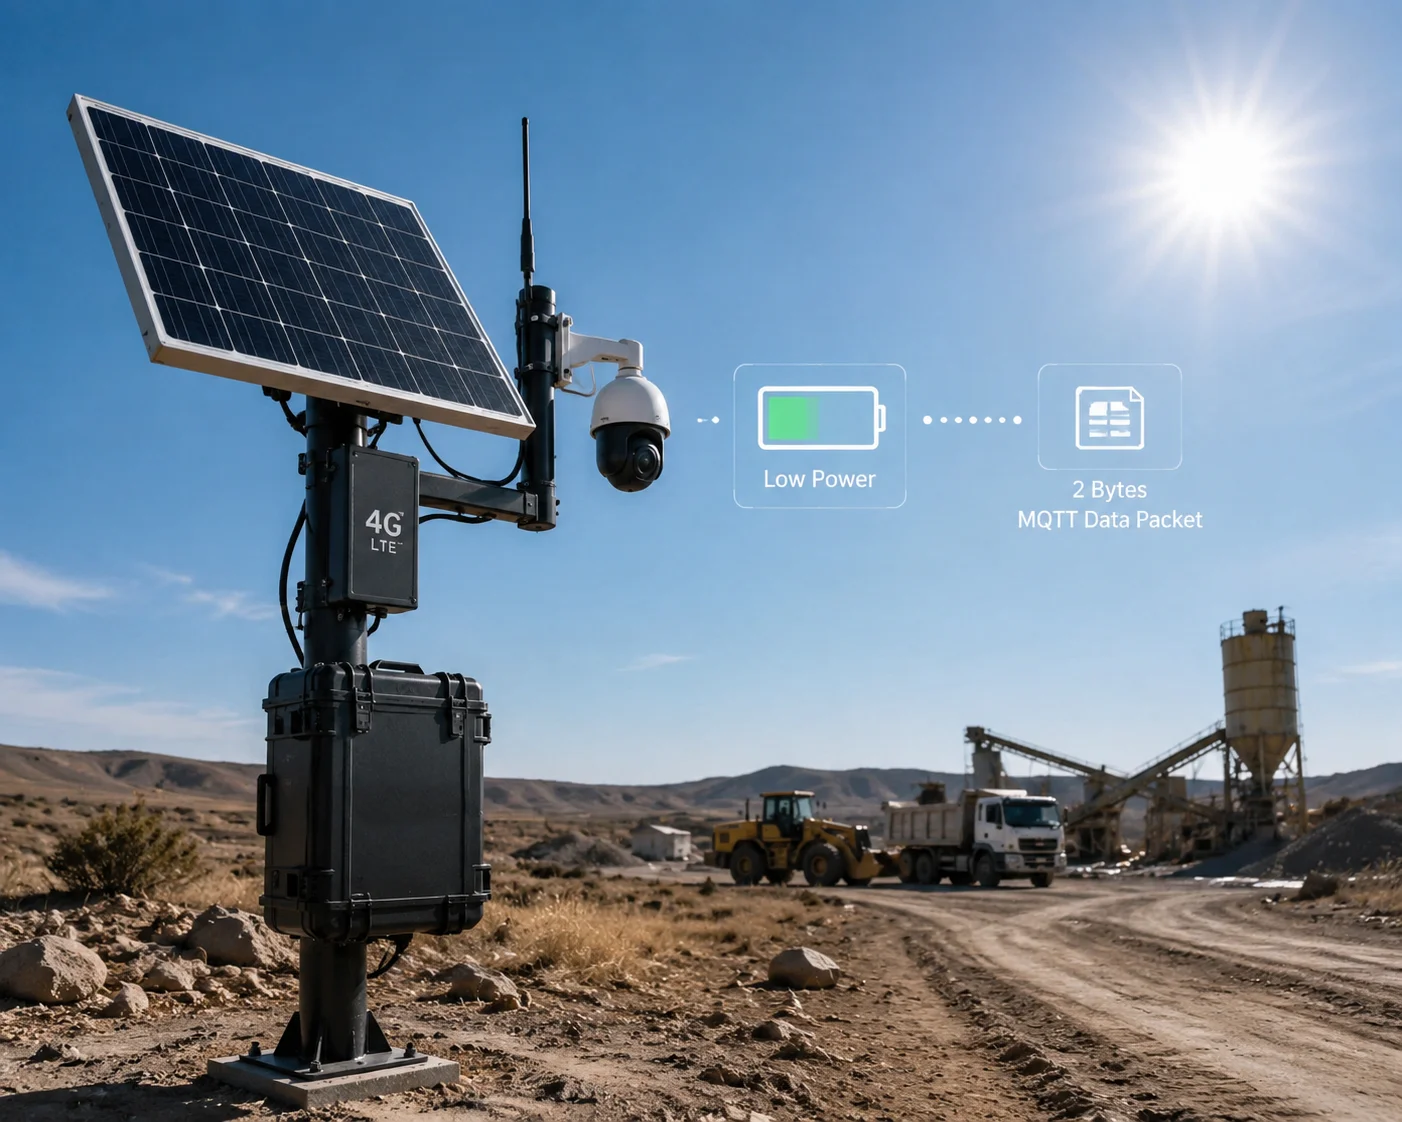 Solar-powered PTZ camera with MQTT running on low power
Why MQTT Is So Light on Resources
MQTT was invented in 1999 by Andy Stanford-Clark of IBM and Arlen Nipper. They designed it for oil pipeline sensors in the desert — devices connected by expensive satellite links with very limited bandwidth and power. This origin story tells you everything you need to know about the protocol’s DNA.
Here is why it is so efficient:
- Tiny packet size. The minimum MQTT packet is just 2 bytes. A typical sensor message is 20–100 bytes. Compare this to HTTP, where the headers alone can be 300–800 bytes before you even send any data.
- Persistent TCP connection. MQTT opens one TCP connection and keeps it alive with small “ping” packets (called PINGREQ/PINGRESP). Each ping is only 2 bytes. There is no repeated handshake overhead like HTTP.
- No polling. The camera does not need to constantly ask “any new messages?” The broker pushes messages to the camera only when there is something to deliver. Between messages, the connection is idle and consumes almost zero CPU cycles.
Real-World Power Budget Analysis
Let me put this in concrete numbers for a typical solar PTZ deployment:
| Component | Power Draw | Daily Consumption (24h) | Notes |
|---|---|---|---|
| PTZ Camera (active) | 25W average | 600Wh | Includes motor, sensor, IR |
| 4G LTE Modem | 3W average | 72Wh | Continuous connection |
| MQTT Client Process | 0.05–0.1W | 1.2–2.4Wh | Negligible impact |
| Solar Panel (100W) | — | 400–500Wh generated | Depends on sunlight hours |
| Battery (100Ah, 12V) | — | 1200Wh stored | Buffer for cloudy days |
Look at the MQTT row. It adds roughly 2Wh per day. That is less than 0.3% of your total daily power budget. You will not even notice it.
Optimizing MQTT for Solar Deployments
Even though MQTT is already lightweight, there are a few tricks to squeeze out even more efficiency:
Keep-Alive Interval. Set the MQTT keep-alive9 to 120 seconds or even 300 seconds instead of the default 60. This reduces the number of ping packets. On a 4G connection, fewer pings also means fewer radio wake-ups, which saves modem power.
QoS Selection. Use QoS 0 for routine status updates (battery level, signal strength). Reserve QoS 1 for critical alarms only. QoS 2 (exactly once delivery) is almost never needed in security applications and adds extra round-trip overhead.
Payload Compression. Keep your JSON payloads short. Use abbreviations for keys. Instead of {"human_detected": true, "confidence_score": 0.92}, use {"hd": 1, "cs": 92}. Every byte saved is a byte that does not need to travel over 4G.
Sleep-Aware Publishing. If your camera has a low-power sleep mode during off-hours, configure the MQTT client to disconnect cleanly with a Last Will and Testament (LWT) message10. This tells the broker “I am going offline intentionally.” When the camera wakes up, it reconnects and picks up any queued QoS 1 messages.
These are not theoretical optimizations. These are the settings I recommend to every integrator who deploys our cameras on solar power in remote locations. They work.
Conclusion
MQTT turns your PTZ camera from an isolated viewer into a connected IoT node. It links sensors, cameras, and platforms with minimal bandwidth, minimal power, and maximum speed — exactly what off-grid B2B projects demand.
1. Detailed explanation of the Pub/Sub pattern in MQTT. ↩︎ 2. Learn how an MQTT broker works and why it’s central to the communication. ↩︎ 3. Explanation of MQTT Quality of Service levels and when to use each. ↩︎ 4. Official Home Assistant documentation for MQTT integration. ↩︎ 5. How to use MQTT nodes in Node-RED flows. ↩︎ 6. n8n documentation for the MQTT Trigger node. ↩︎ 7. Guide to securing MQTT with TLS encryption. ↩︎ 8. How to restrict MQTT client permissions using ACLs in Mosquitto. ↩︎ 9. How keep-alive works in MQTT to maintain persistent connections. ↩︎ 10. Explanation of LWT messages and how they signal client disconnection. ↩︎