
I have seen too many cameras fail when the sun hits the lens. The footage turns into a white mess, and faces become dark silhouettes. That is a problem I take personally.
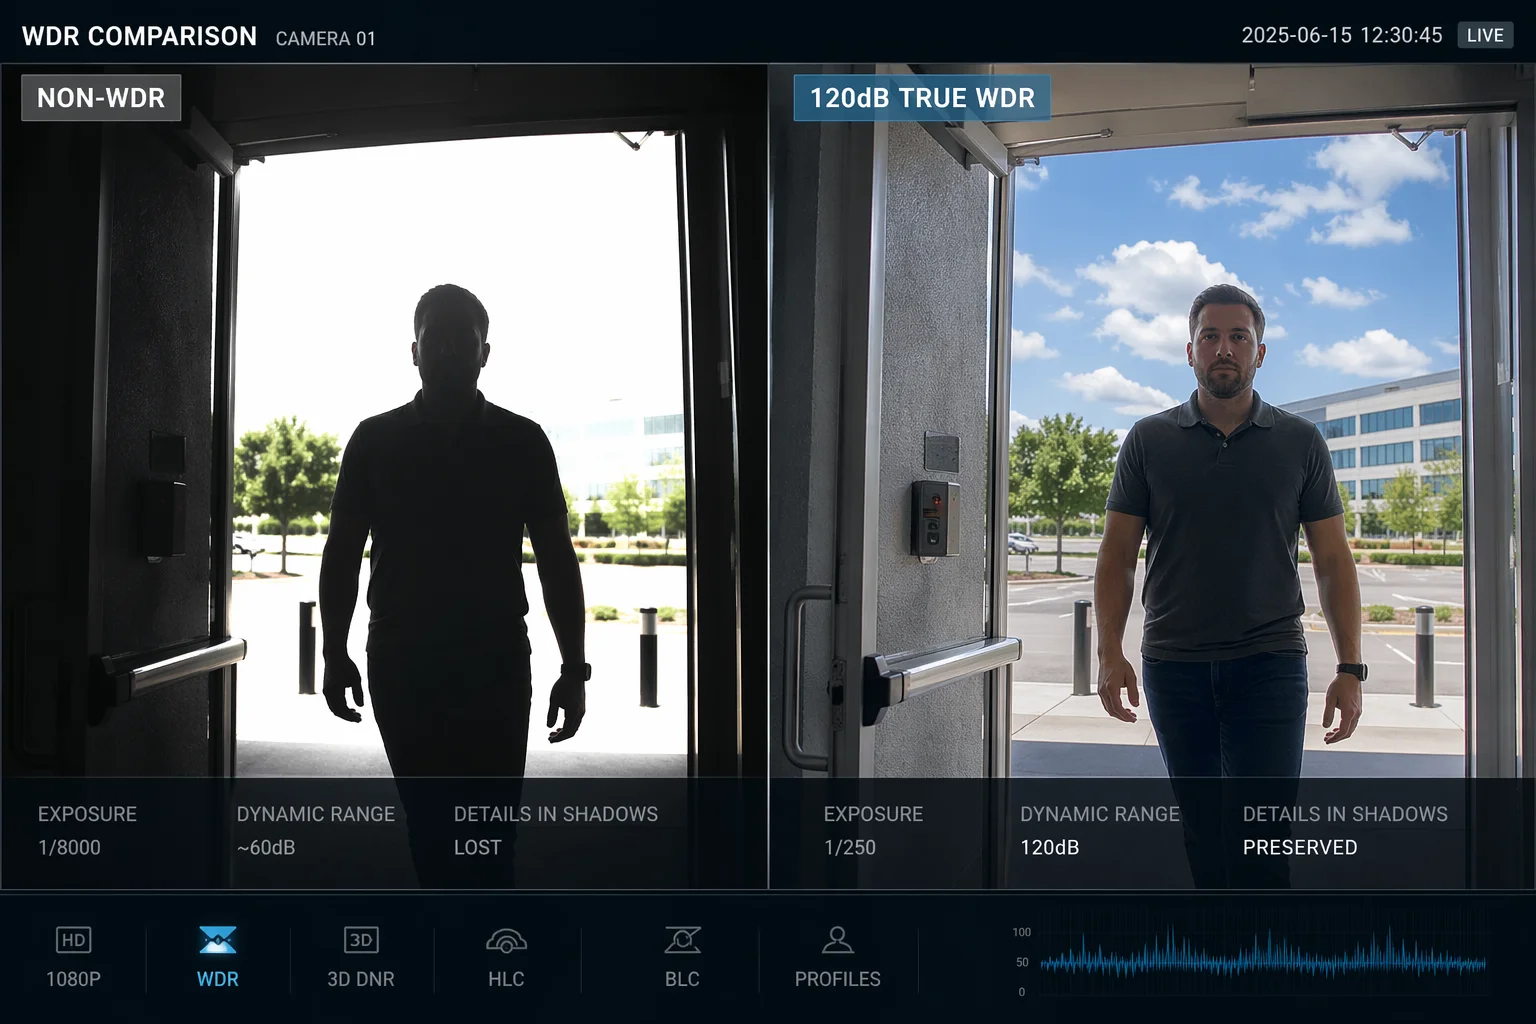
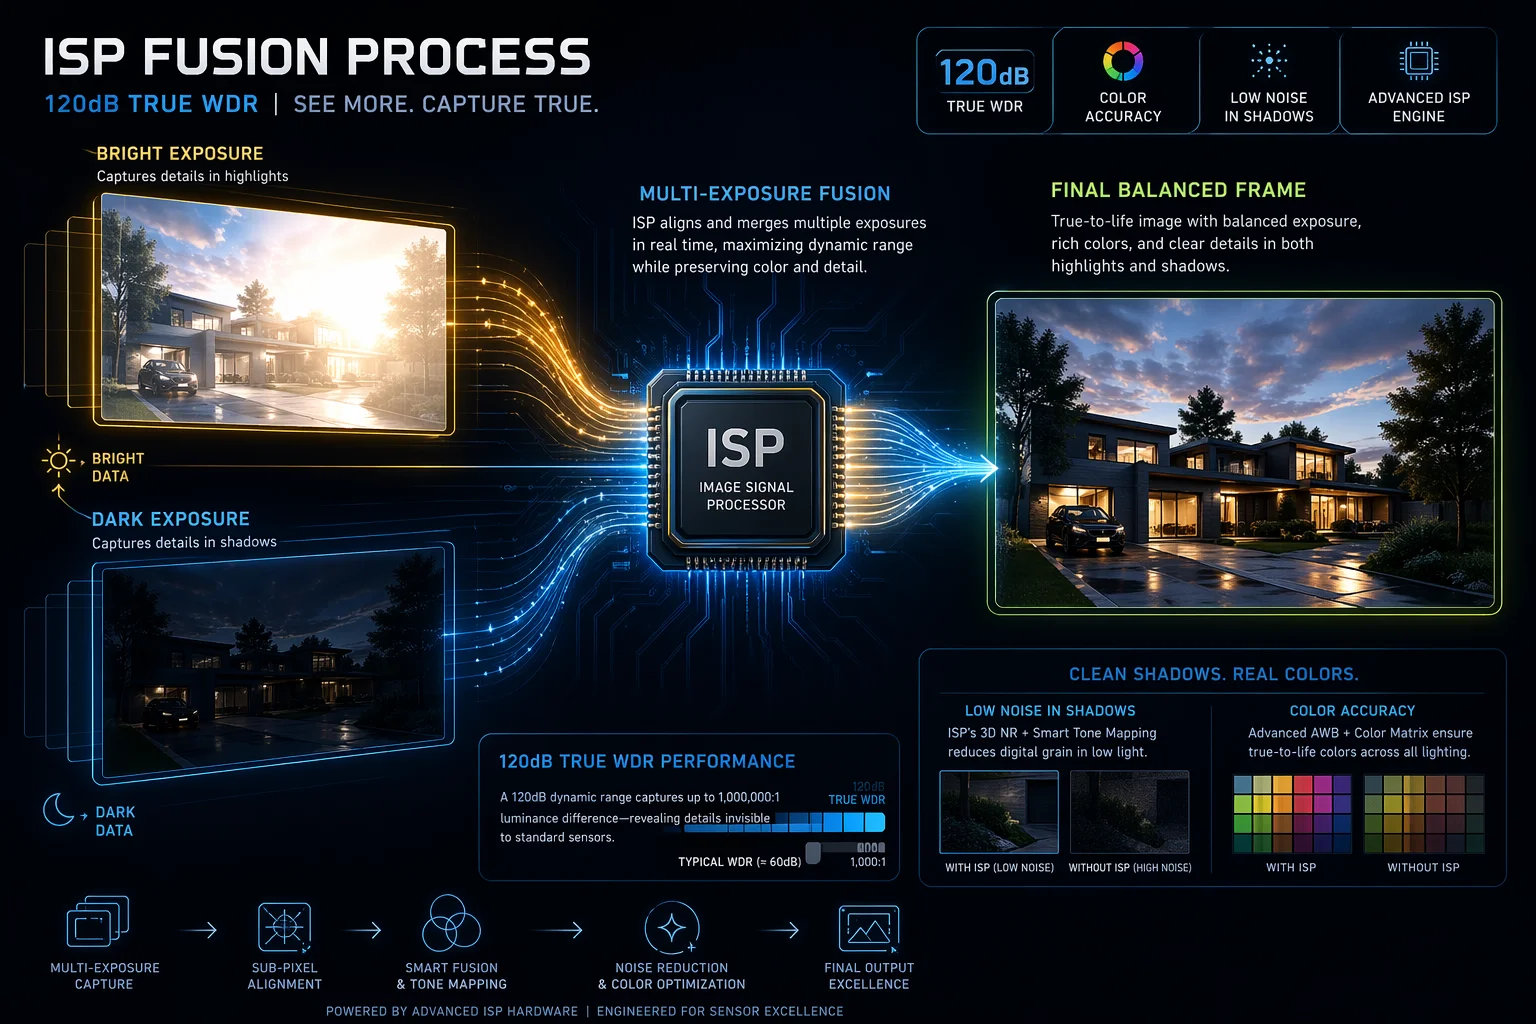
120dB True WDR technology1 performs very well under direct strong sunlight. It combines a short exposure for bright areas and a long exposure for dark areas into one frame. This gives you clear faces in shadows and visible details in sunlit zones. It handles a contrast ratio up to 1,000,000:12, which makes it the go-to standard for entrances, parking lots, and open-field surveillance.
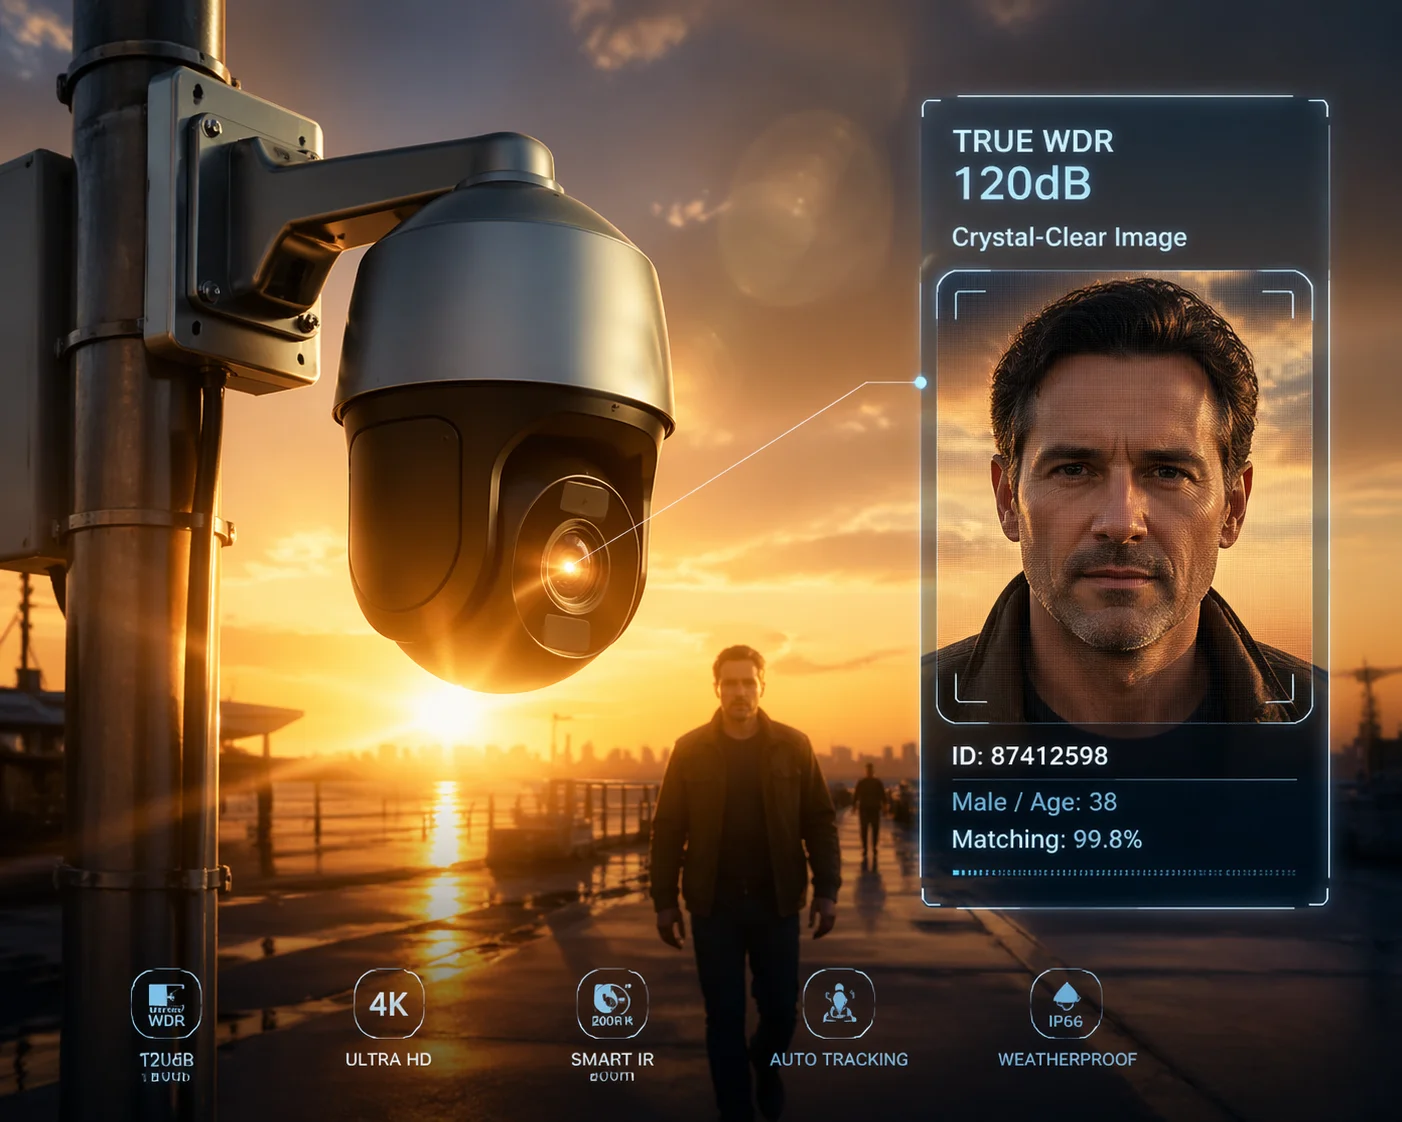
 120dB WDR PTZ camera under direct sunlight
But how does it actually hold up in real-world scenarios — like a PTZ camera rotating into a sunset, or a building entrance with deep shadows? Let me break it down for you, section by section.
Table of Contents
How Can My PTZ Camera Maintain Facial Clarity When Facing a Sunset or Headlights?
I have been on job sites where a PTZ camera faces west. Every evening, the sunset turns every face into a black shape. That is not surveillance — that is a liability.
A PTZ camera with 120dB True WDR maintains facial clarity3 by capturing two exposures at once. A fast shutter (as quick as 1/10,000s) handles the bright sunset or headlights. A slow shutter (around 1/30s) pulls detail from the dark foreground. The camera’s ISP fuses both frames into one balanced image, keeping faces readable even against direct light.
 PTZ camera WDR facial clarity sunset headlights
True WDR vs. Digital WDR: The Difference That Matters
This is where many projects go wrong. A lot of budget PTZ cameras claim 120dB WDR on the spec sheet. But when you dig deeper, they use Digital WDR (DWDR)4. DWDR does not capture multiple exposures. It just takes a single frame and uses software to push up the brightness in dark areas. The result? Heavy noise in the shadows and washed-out highlights. You get a grainy mess instead of a clear face.
True WDR is hardware-based5. The sensor physically captures a short-exposure frame and a long-exposure frame. Then the ISP chip merges them. This is why True WDR can actually recover detail in both the bright sky and the dark doorway at the same time.
| Feature | True WDR (Hardware) | Digital WDR (Software) |
|---|---|---|
| Exposure Method | Dual-exposure (long + short) | Single-exposure with software boost |
| Dynamic Range | Up to 120dB real | 60–70dB effective |
| Shadow Noise | Low | High (grainy) |
| Highlight Recovery | Yes — preserves sky and light details | Poor — highlights blow out |
| Face Clarity in Backlight | Clear and usable | Dark or noisy |
| Cost | Higher (better sensor + ISP) | Lower (software only) |
Why PTZ Rotation Makes WDR Even More Critical
A fixed camera deals with one lighting condition at a time. A PTZ camera is different. When it pans from a shaded wall to an open sky in one second, the light level changes dramatically. If the WDR algorithm is slow, the image goes full white for a moment before it adjusts. That brief “white flash” can mean a missed face or a lost license plate.
At Loyalty-Secu, our 120dB WDR system uses a fast-converging ISP6. The exposure adjustment happens in milliseconds. So when the PTZ swings into a sunset, the image stabilizes almost instantly. There is no 2-second white-out like you see on cheaper units. For someone like David who installs cameras at highway intersections or building perimeters, this speed is the difference between a passed and a failed acceptance test.
Headlights at Night: A Special Case
Sunset is tough. But headlights at night are a different beast. A car’s headlight can put out a concentrated beam that is far brighter than the surrounding darkness. Without WDR, the headlight blooms into a white ball, and everything around it disappears. With 120dB True WDR, the short-exposure frame captures the headlight without bloom, and the long-exposure frame reveals the driver’s face, the license plate, and the road surface. This is why parking garages and toll stations almost always require True WDR cameras.
Will I Lose Detail in the Dark Shadows of a Building While the Sky Is Overexposed?
I have reviewed footage where the sky looks like a white sheet of paper and the building’s shadow side is just black. That kind of footage is useless for any investigation.
With 120dB True WDR, you will not lose shadow detail7 while the sky blows out. The camera’s dual-exposure process captures shadow information with a longer exposure and sky detail with a shorter one. The ISP merges them so both stay visible. You can see the color of a person’s shirt in the shade and still read the cloud texture in the sky.
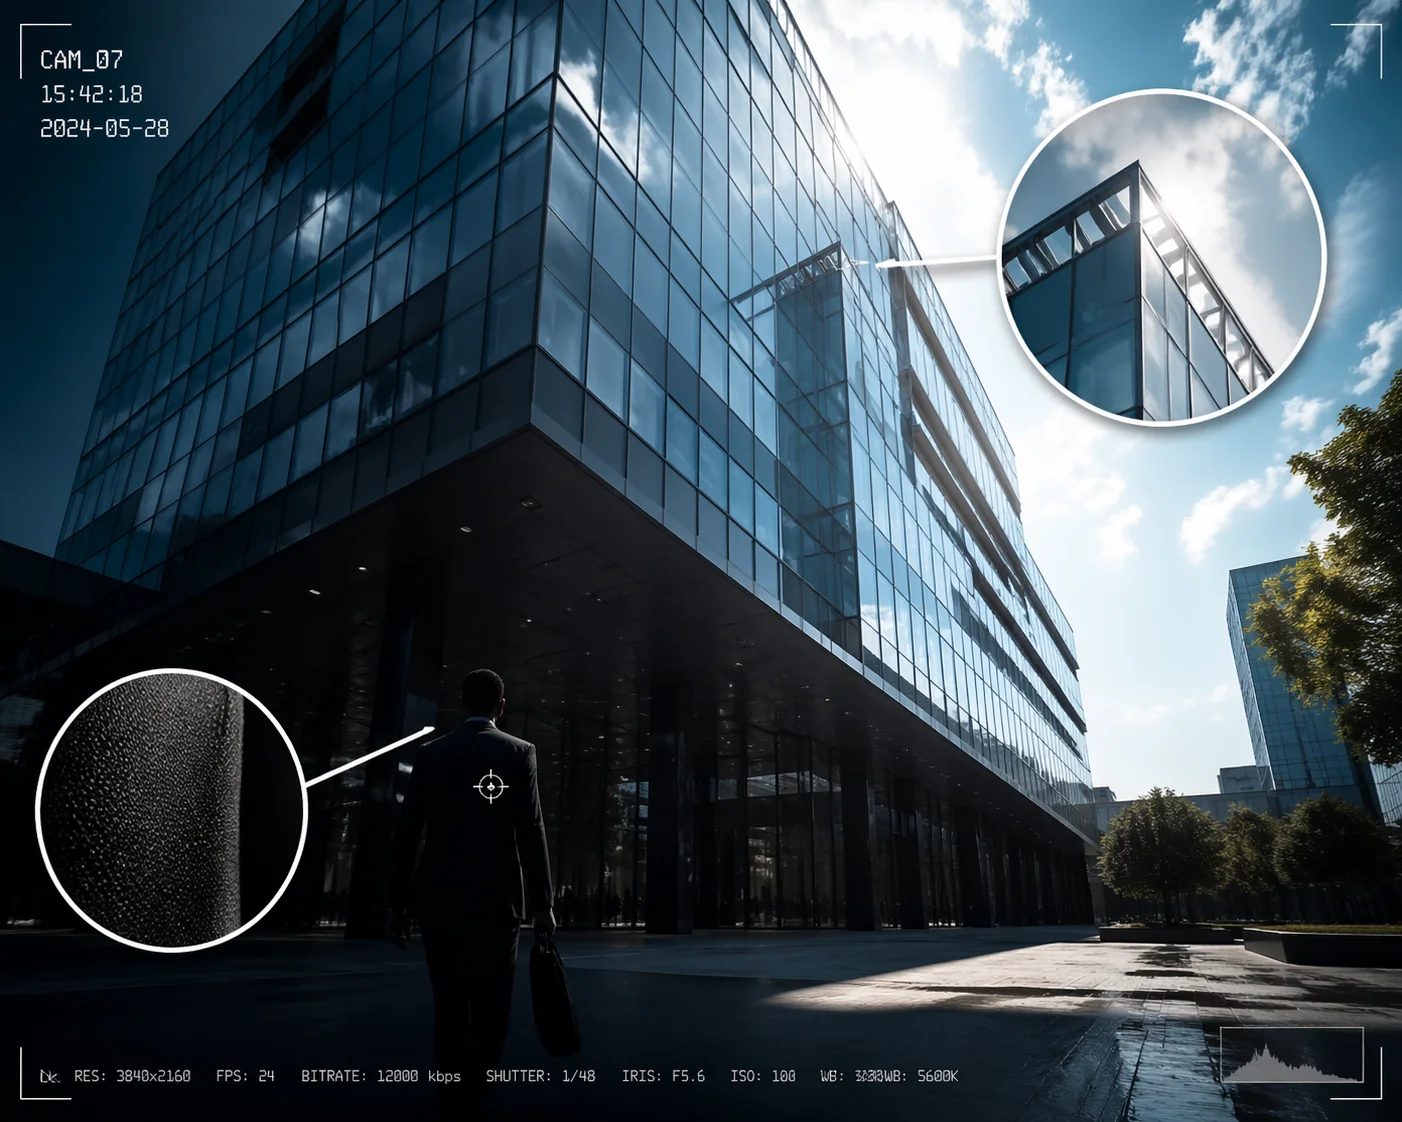 WDR shadow detail building sky overexposure
The “Silhouette Problem” Explained
This is one of the most common complaints I hear from integrators. A camera is mounted on a building looking outward. The sky is bright. The ground-floor entrance is in shadow. Without WDR, the camera picks one: expose for the sky (and the entrance goes black) or expose for the entrance (and the sky goes white). Either way, you lose half the scene.
120dB True WDR solves this by not choosing. It captures both. The short-exposure frame grabs the sky detail. The long-exposure frame grabs the shadow detail. The ISP blends them into a single frame where both areas have usable information.
How to Check If Your WDR Is Really Working
Here is a quick field test I use. Point the camera at a scene with bright sky and dark ground. Then look at two things:
- Shadow color: Can you see the actual color of objects in the shade? If a tree is in the shadow, its leaves should still look green — not gray or black. If they look gray, the WDR is not doing its job.
- Sky texture: Can you see clouds or the gradient of the sky? If the sky is a flat white rectangle, the highlight recovery is failing.
If both checks pass, your 120dB WDR is working properly.
What Happens at the Edges of WDR Capability
No camera is perfect. Even with 120dB True WDR, there are physical limits. If the sun is directly centered in the frame, some pixel areas around it will still clip to pure white. This is not a WDR failure — it is a physics limitation. The sensor’s pixels are physically saturated, and no algorithm can recover data that was never captured.
Also, strong sunlight hitting the front lens element can cause internal reflections, known as lens flare or ghosting. WDR cannot fix optical artifacts because it works on pixel data, not on light paths inside the lens. This is why Loyalty-Secu pairs its 120dB WDR sensor with multi-layer AR-coated lenses8. The AR coating reduces internal reflections, so the WDR algorithm gets cleaner raw data to work with. The combination of good optics and good processing is what separates a professional-grade PTZ from a consumer product.
Can I Adjust the WDR Intensity Levels Through My Web Interface to Suit My Site?
I once worked on a site where the default WDR setting made indoor footage look flat and lifeless. The client was not happy. I needed a way to tune it without swapping hardware.
Yes, you can adjust WDR intensity levels9 through the camera’s web interface on most professional PTZ cameras. Loyalty-Secu cameras offer multiple WDR strength levels — typically Low, Medium, and High — plus a manual mode. This lets you match the WDR behavior to your specific lighting conditions without changing any hardware.
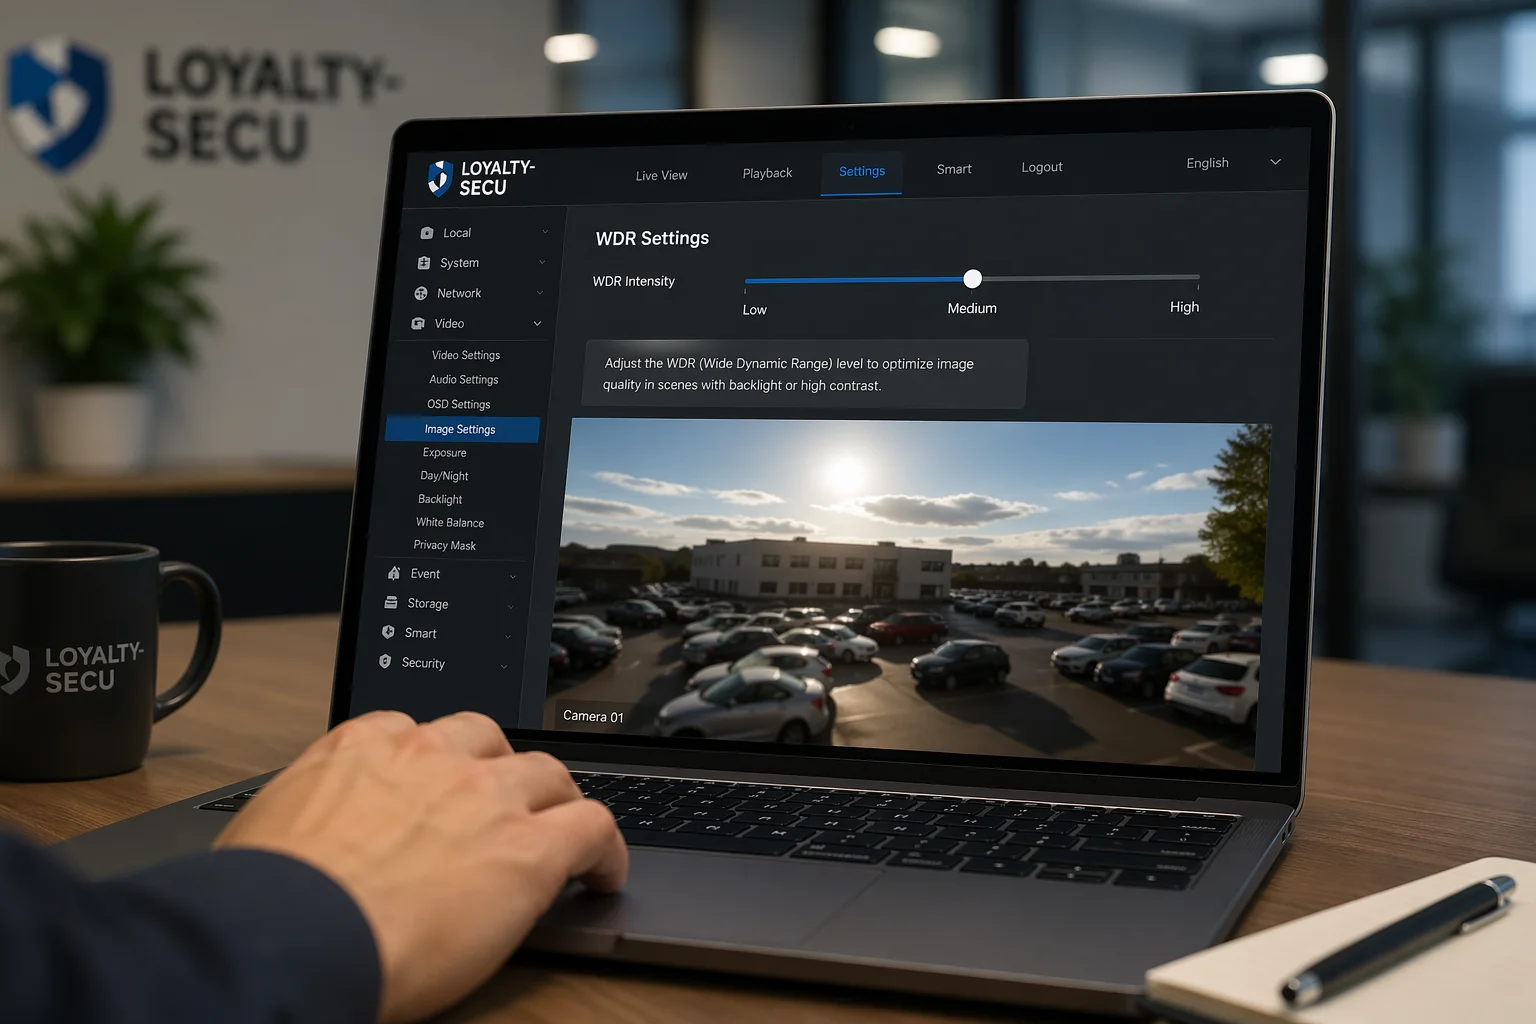 WDR intensity adjustment web interface PTZ camera
Why One WDR Setting Does Not Fit Every Site
Every installation site is different. A parking garage entrance with direct western sun needs aggressive WDR. But an indoor hallway with even LED lighting needs very little WDR — or even none at all. If you run high WDR10 in a low-contrast scene, the image can look “flat.” Colors may seem muted. Local contrast drops. The picture looks like it has a gray filter over it.
This is why adjustable WDR levels matter. You want to dial in just enough WDR to balance the highlights and shadows, but not so much that you kill the natural contrast of the scene.
Typical WDR Settings and When to Use Them
| WDR Level | Best For | What It Does | Risk If Overused |
|---|---|---|---|
| Off | Even lighting, indoor hallways | No multi-exposure blending | Backlit scenes will silhouette |
| Low | Mild backlight, overcast outdoor | Light blending, preserves color pop | Not enough for strong sun |
| Medium | Entrances, windows, mixed light | Balanced blending for most scenes | Slight color muting |
| High | Direct sun, sunset, headlights | Aggressive blending, max shadow lift | Flat image, possible noise boost |
| Manual / Custom | Specialized or unusual sites | Fine control over exposure ratios11 | Requires technical knowledge |
How to Access and Adjust WDR on Loyalty-Secu Cameras
On our cameras, the WDR settings are under the Image or Exposure tab in the web interface. You log in via your browser, navigate to the image settings page, and find the WDR toggle. From there, you can switch between Off, Low, Medium, High, or Manual. In Manual mode, you can set the exposure ratio directly — for example, choosing how much weight to give the short-exposure frame versus the long-exposure frame.
I recommend starting at Medium for most outdoor sites. Then review the footage during peak sunlight hours. If faces in shadow are still too dark, bump it to High. If the image looks flat or noisy, drop it to Low. This kind of on-site tuning is normal. It is part of a professional commissioning process, and it is something David and his team should expect to do during acceptance testing12.
For remote sites — like solar-powered cameras on a farm — you can adjust WDR through the web interface over 4G LTE. No truck roll needed. That saves real money on sites that are hours away from the nearest technician.
Why Does My 120dB WDR Footage Look “Flat” or Noisy During High-Contrast Conditions?
I got a call from a client once. He said, “Han, the WDR is on, but the image looks washed out and there is grain everywhere.” He was not wrong. But the problem was not the WDR — it was how the camera was using it.
120dB WDR footage can look flat or noisy for two main reasons. First, aggressive WDR compresses the tonal range, which reduces local contrast and makes colors look muted. Second, the long-exposure frame boosts shadow areas, and boosting shadows always increases visible noise. A well-tuned ISP minimizes both effects, but cheap implementations make them worse.
 WDR flat image noise high contrast conditions
The Trade-Off Between Dynamic Range and Image “Pop”
This is something most spec sheets do not explain. WDR is fundamentally a compression process. It takes a scene with huge brightness differences and squeezes it into a range that a monitor can display. That squeezing reduces contrast. Bright areas get darker. Dark areas get brighter. The result is that the image can feel “flat” — like a cloudy-day photo even when the sun is blazing.
This is not a defect. It is a trade-off. You are trading visual punch for information. A flat-looking frame with visible faces in both sun and shadow is far more useful for security than a dramatic, high-contrast frame where half the scene is invisible.
But there is a line. If the image looks so flat that you cannot tell a white car from a silver one, the WDR is too aggressive for that scene. That is when you dial it back.
Where Does the Noise Come From?
Noise in WDR footage almost always comes from the long-exposure (shadow) frame. Here is why:
The short-exposure frame captures bright areas with plenty of light hitting the sensor. Lots of light means a strong signal and low noise. The long-exposure frame captures dark areas where very little light reaches the sensor. Low light means a weak signal. When the ISP amplifies that weak signal to make shadows visible, it also amplifies the noise that rides on top of it.
Cheap sensors with small pixels are worse at this. They have a lower signal-to-noise ratio13 to begin with. So when the ISP boosts shadows, the noise is even more visible. This is why sensor quality matters just as much as the WDR algorithm.
| Noise Source | Cause | Solution |
|---|---|---|
| Shadow amplification | Long-exposure frame has weak signal | Use a camera with larger sensor pixels |
| High ISO equivalent | ISP boosts gain to brighten dark areas | Choose a sensor with high base sensitivity |
| Poor ISP noise reduction | Cheap NR smears detail or leaves grain | Use a camera with a good 3D NR engine |
| Excessive WDR level | WDR set too high for the scene | Lower WDR level to Medium or Low |
| DWDR instead of True WDR | Software-only processing adds artifacts | Confirm camera uses hardware True WDR |
The 120dB vs. 150dB14 Question
Some clients ask me about 150dB WDR cameras. They assume higher numbers are always better. But here is what I tell them: 120dB is the sweet spot for most real-world projects.
Going beyond 120dB means the camera has to merge an even wider range of exposures. This increases the chance of two problems:
- Color tint: The tone-mapping algorithm has to work harder, and colors can shift — blues might turn slightly purple, or skin tones might look unnatural.
- Motion ghosting: If the scene has moving objects (people, cars), the two exposure frames may not align perfectly. The result is a faint “ghost” or double-edge around moving objects. At 120dB, this effect is minimal. At 150dB, it can become visible.
Unless your camera is facing a glass curtain wall with the sun reflecting directly into the lens, 120dB True WDR is enough. I always tell integrators: save the budget, reduce the complexity, and deliver a stable system. A stable 120dB camera with good ISP tuning15 will outperform a poorly tuned 150dB camera every time.
Conclusion
120dB True WDR is the practical standard for handling strong sunlight. It balances highlights and shadows, keeps faces clear, and works reliably across most outdoor scenes when paired with quality optics and a well-tuned ISP.
-
Explore this resource to understand how 120dB True WDR technology enhances image clarity in challenging lighting conditions. ↩
-
Learn about the significance of high contrast ratios in surveillance cameras and their impact on image quality. ↩
-
Find out techniques and technologies that ensure facial clarity in various lighting conditions for security purposes. ↩
-
Understand the differences between Digital WDR and True WDR to make informed decisions about camera technology. ↩
-
Explore the benefits of hardware-based WDR systems for superior image quality in surveillance applications. ↩
-
Discover how fast-converging ISPs enhance image processing speed and quality in surveillance cameras. ↩
-
Explore methods and technologies that help cameras retain shadow detail in high-contrast scenes. ↩
-
Learn how AR-coated lenses reduce reflections and enhance image quality in surveillance cameras. ↩
-
Find out how to customize WDR settings for optimal performance in different lighting conditions. ↩
-
Find out the best scenarios for using high WDR settings to optimize image quality in challenging lighting. ↩
-
Learn about exposure ratios and their role in balancing highlights and shadows in photography. ↩
-
Understand the importance of acceptance testing in ensuring camera systems meet performance standards. ↩
-
Learn about the significance of signal-to-noise ratio in determining image quality in surveillance systems. ↩
-
Learn about the practical differences between 120dB and 150dB WDR cameras to make informed purchasing decisions. ↩
-
Explore the role of ISP tuning in enhancing image quality and performance in surveillance cameras. ↩