
I have seen too many night-vision clips where a person’s face is just a white blob — totally useless for identification.
Anti-flare algorithms use a closed-loop system called Smart IR. The camera’s image processor reads pixel brightness in real time, then sends feedback to the laser driver through PWM signals. This dims or boosts the laser within milliseconds, keeping facial details visible instead of washed out.
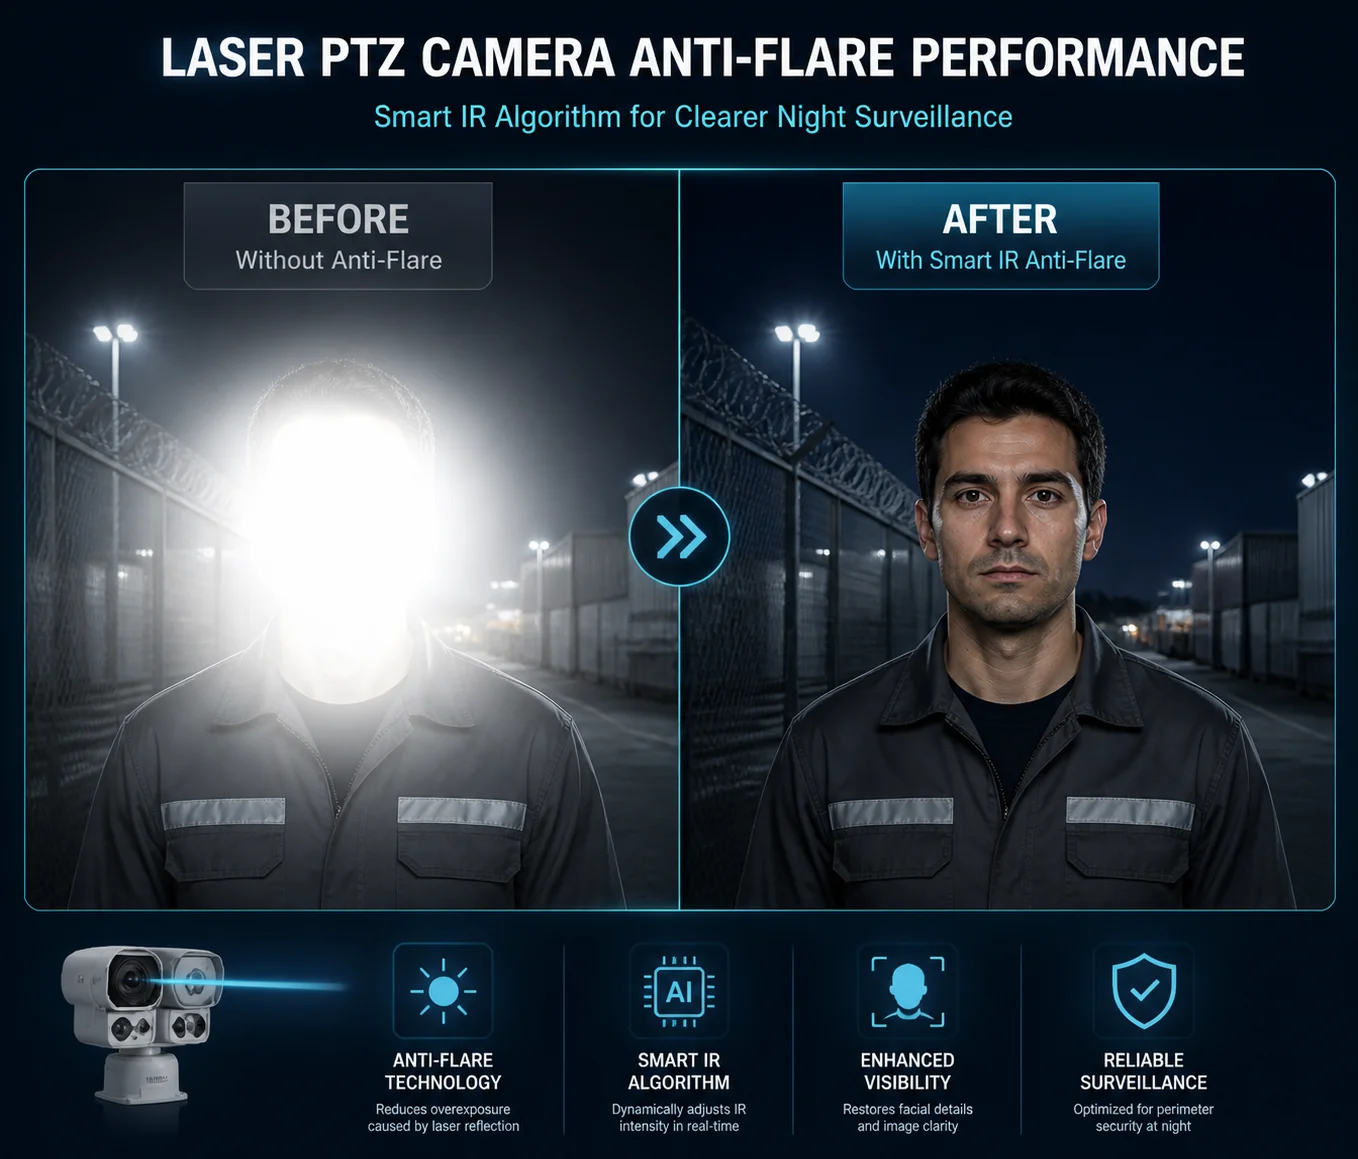 laser PTZ camera anti-flare algorithm prevents face overexposure
Below, I break down exactly how this works — from real-time brightness tracking to VMS compatibility and exposure priority zones. If you buy or specify laser PTZ cameras, this will save you from costly mistakes.
Table of Contents
Does the AI Track the Target’s Brightness to Dim the Laser in Real-Time?
I once watched a demo where a guard walked toward a laser PTZ at night — his face turned into a white disk the moment he got within five meters.
Yes. The AI continuously scans pixel brightness inside the image frame. When it detects that a target region — especially a face — is approaching saturation (pixel values near 255), it sends a command to reduce the laser’s PWM duty cycle within milliseconds, restoring visible detail.
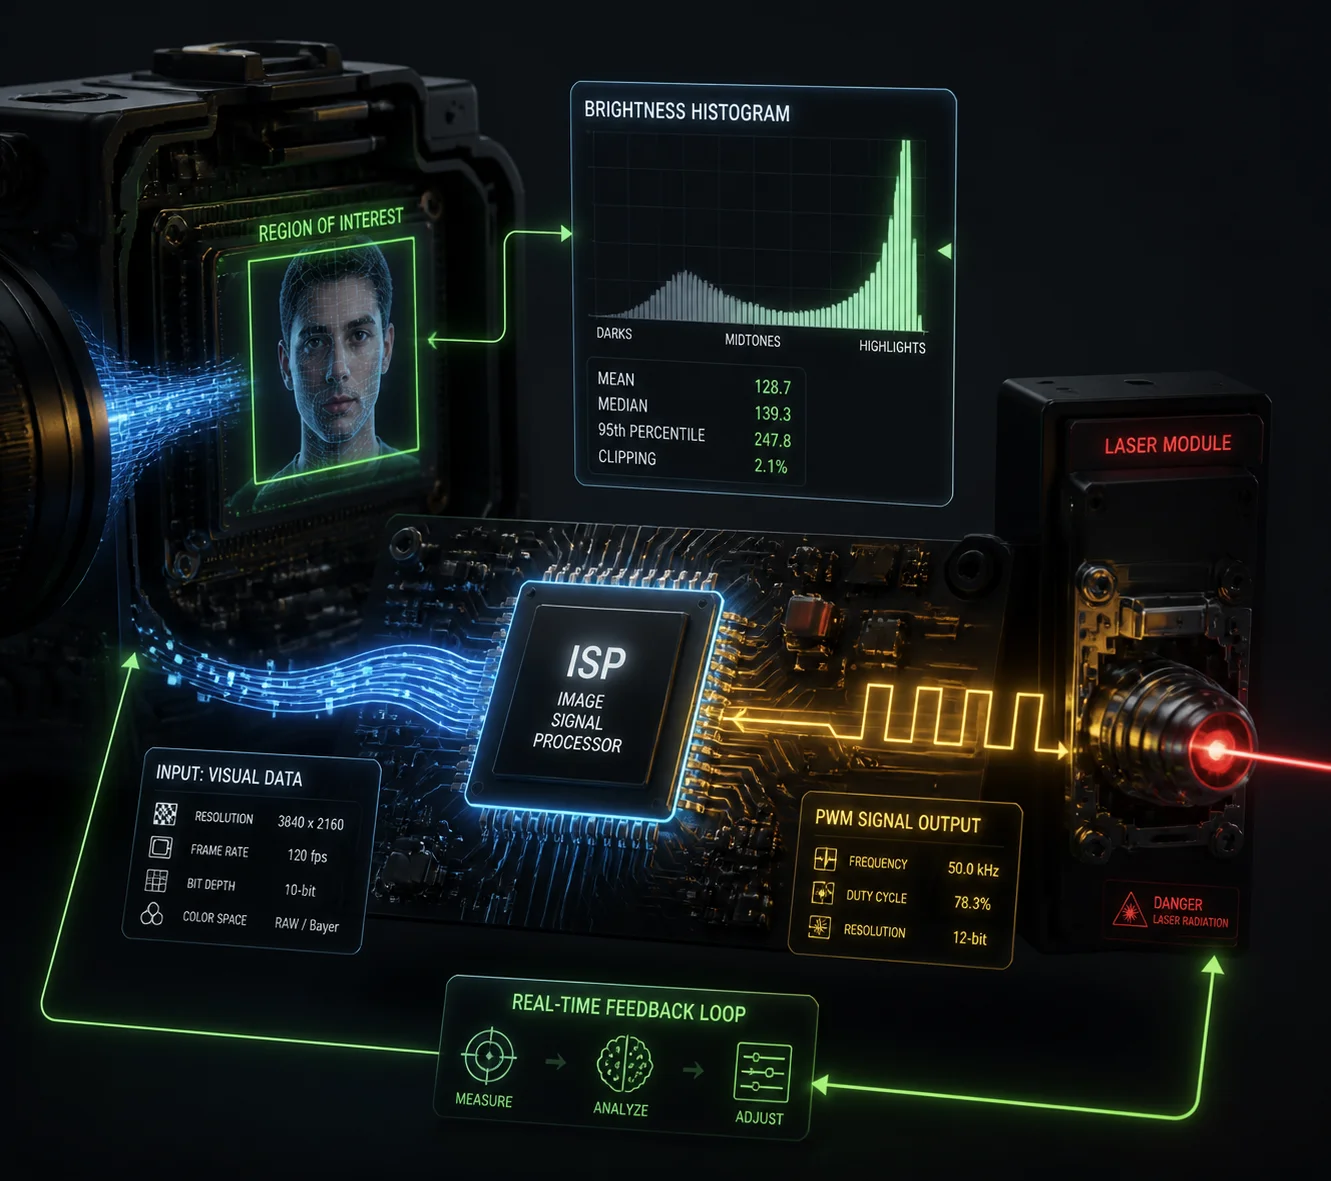 AI tracking target brightness to dim laser in real-time
How the Feedback Loop Actually Works
The core of this system is a feedback loop. Think of it like a thermostat for light. The ISP (Image Signal Processor) inside the camera acts as the “sensor.” It reads the brightness histogram of every frame — usually 25 or 30 times per second. When the histogram shows a spike at the high end (near 255), the ISP flags an overexposure risk.
The ISP then tells the laser driver to lower its output. It does this through PWM — Pulse Width Modulation 1. PWM controls how long the laser stays “on” during each tiny cycle. A shorter on-time means less average power, which means less light hitting the target.
Why PWM Instead of Just Turning the Laser Off?
Turning the laser off creates a different problem — the whole scene goes dark. PWM lets the system make fine adjustments. I can reduce laser power by 5%, 10%, or 50% — whatever the scene needs. This is smooth and fast. The viewer never sees a flicker.
The Role of the Brightness Histogram
Here is a simple way to understand the histogram approach:
| Histogram Zone | Pixel Value Range | What It Means | Algorithm Action |
|---|---|---|---|
| Shadow | 0–50 | Very dark areas | Increase laser or gain |
| Midtone | 51–200 | Good detail range | No change needed |
| Highlight | 201–254 | Getting bright | Monitor closely |
| Saturated | 255 | Pure white — no detail | Reduce laser power immediately |
The algorithm watches the “Saturated” zone. If more than a set percentage of pixels in the target area hit 255, the system reacts. Most modern cameras set this threshold around 5–10% of the region of interest (ROI) 7.
AI vs. Basic Smart IR
Basic Smart IR just looks at the whole frame’s average brightness. AI-driven Smart IR goes further. It uses a neural network for face detection 8 to find human shapes or faces first, then builds a small ROI around each detection. The brightness check happens only inside that ROI. This matters a lot. A person standing in front of a dark wall will fool a basic system — the average brightness looks fine, but the face is blown out. AI-based systems catch this because they only care about the face box.
I always tell my clients: if your project needs forensic-grade face capture at night, make sure the camera has AI-based exposure control — not just basic Smart IR.
How Do You Prevent “White-Out” When a Person Walks Close to the Laser PTZ at Night?
I have tested dozens of laser PTZ units. The worst ones turn a person’s face into a featureless white oval at three meters.
You prevent white-out by combining three things: PWM laser dimming, zoom-synced beam angle adjustment, and electronic shutter speed coordination 9. When a person approaches the camera, the algorithm detects rising brightness and reduces laser power while widening the beam to spread energy over a larger area.
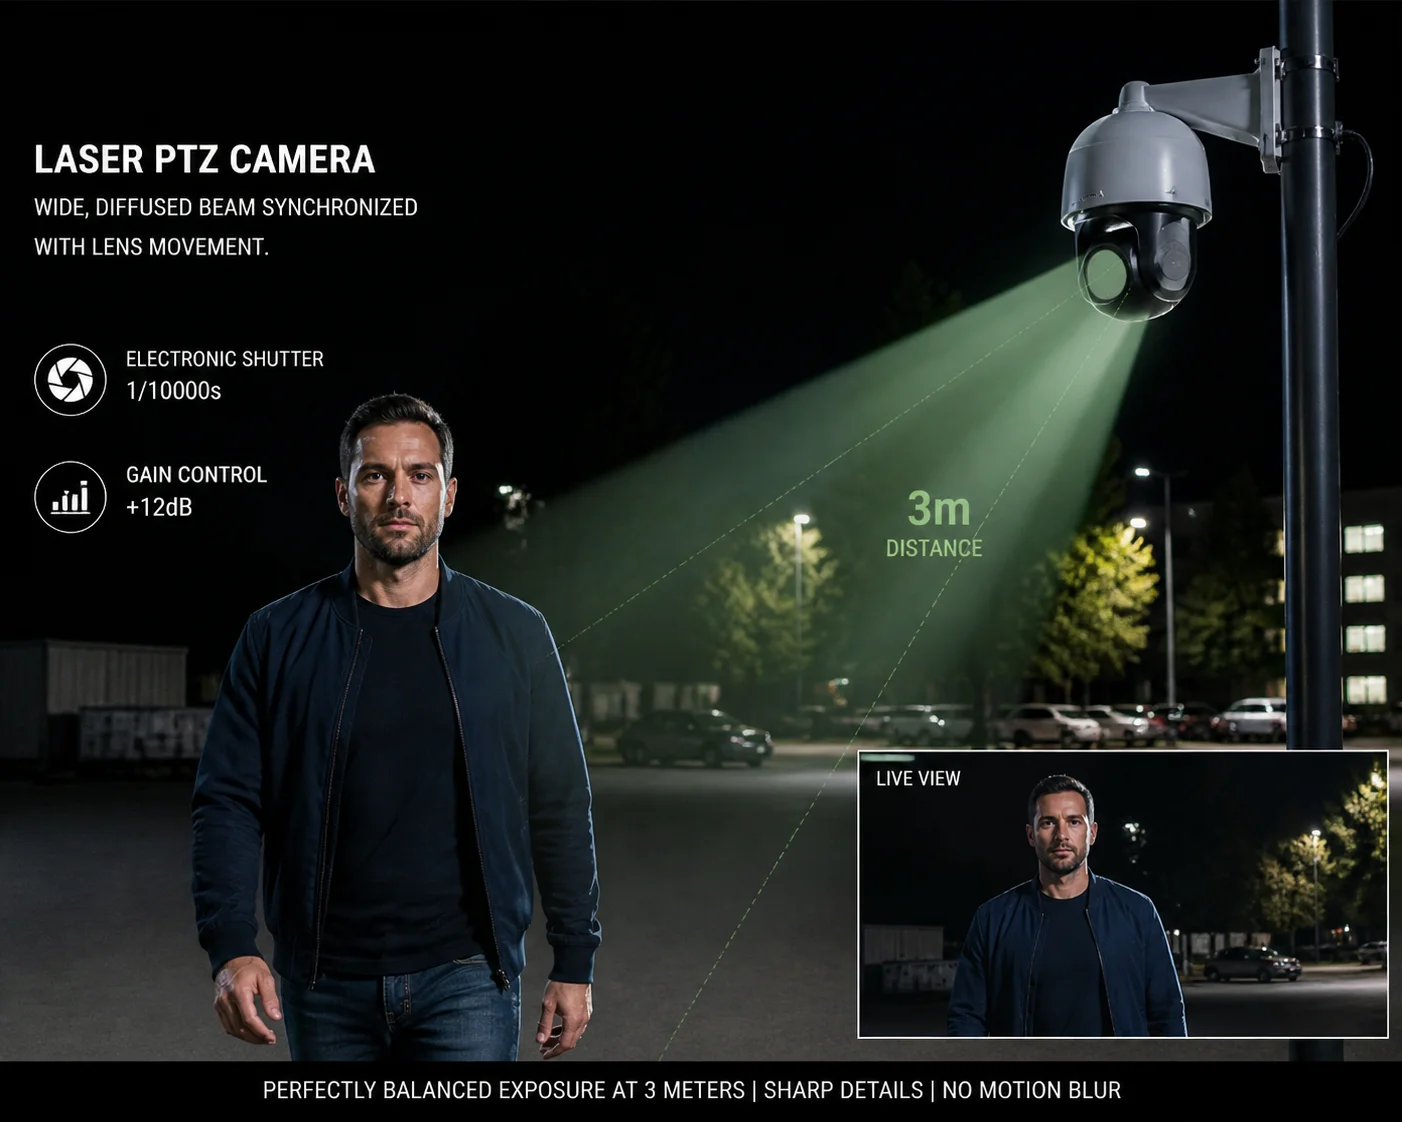 preventing white-out on laser PTZ camera at close range
The Close-Range Problem Explained
Laser energy follows the inverse square law 2 — sort of. As a target gets closer, the reflected light hitting the sensor increases very fast. At 100 meters, the laser might deliver just the right amount of fill light. At 5 meters, the same laser power can overload the sensor by 10x or more. This is why close-range white-out is so common with cheap laser cameras.
Zoom-Sync Linkage: The First Line of Defense
A good laser PTZ does not just have one fixed laser beam. It has an adjustable collimator or multiple laser groups (near, mid, far). The algorithm links the laser’s beam angle to the current zoom level of the lens.
| Zoom Position | Beam Angle | Laser Power Level | Use Case |
|---|---|---|---|
| Wide (1x) | Wide spread (~60°) | Low to Medium | General area coverage |
| Mid (10x–20x) | Medium (~15°–30°) | Medium | Perimeter monitoring |
| Tele (30x–40x) | Narrow (~3°–8°) | High | Long-range identification |
| Tele + Close target | Forced wide or off | Minimum | Override to prevent flare |
The last row is key. When the camera is zoomed in tight but detects that the target is actually very close, it recognizes this “conflict state.” A far-zoom setting with a near target is a recipe for white-out. So the algorithm forces the laser into low-power mode or switches to the near-range laser group.
Shutter and Gain: The Software Safety Net
Sometimes the laser cannot dim fast enough. In that case, the ISP adjusts the electronic shutter speed. A faster shutter — say 1/200s instead of 1/50s — reduces the total light the sensor collects per frame. The algorithm can also lower the analog gain 10, which cuts the sensor’s sensitivity.
I think of it this way: the laser is the coarse knob, and the shutter/gain is the fine knob. Together, they keep the image in a usable brightness range.
Hysteresis and Smooth Transitions
One thing I always check during testing is flicker. A poorly tuned system will bounce the laser power up and down as a person walks — the video looks like a strobe light. Good algorithms use hysteresis 3. This means the “dim threshold” and the “brighten threshold” are set at slightly different levels. The system will not start raising power again until brightness drops well below the point where it started dimming. This prevents rapid cycling and produces smooth, flicker-free video.
My Testing Recommendation
When I evaluate a laser PTZ, I ask someone to walk slowly from 50 meters down to 2 meters in front of the camera. I record the entire walk. Then I play it back frame by frame and check: can I see eyebrows, nose shape, and mouth at every distance? If the face turns into a white blob at any point, the anti-flare system is not working well enough.
Is the Smart IR/Laser Algorithm Compatible with Third-Party VMS Platforms?
I get this question from every system integrator I work with. They already run Milestone or Blue Iris. They do not want a camera that only works with its own software.
Yes — the Smart IR anti-flare algorithm runs inside the camera’s own processor, not on the VMS. So it works with any VMS that supports ONVIF 4 or RTSP. The VMS simply receives the already-optimized video stream. No special plugin or integration is needed.
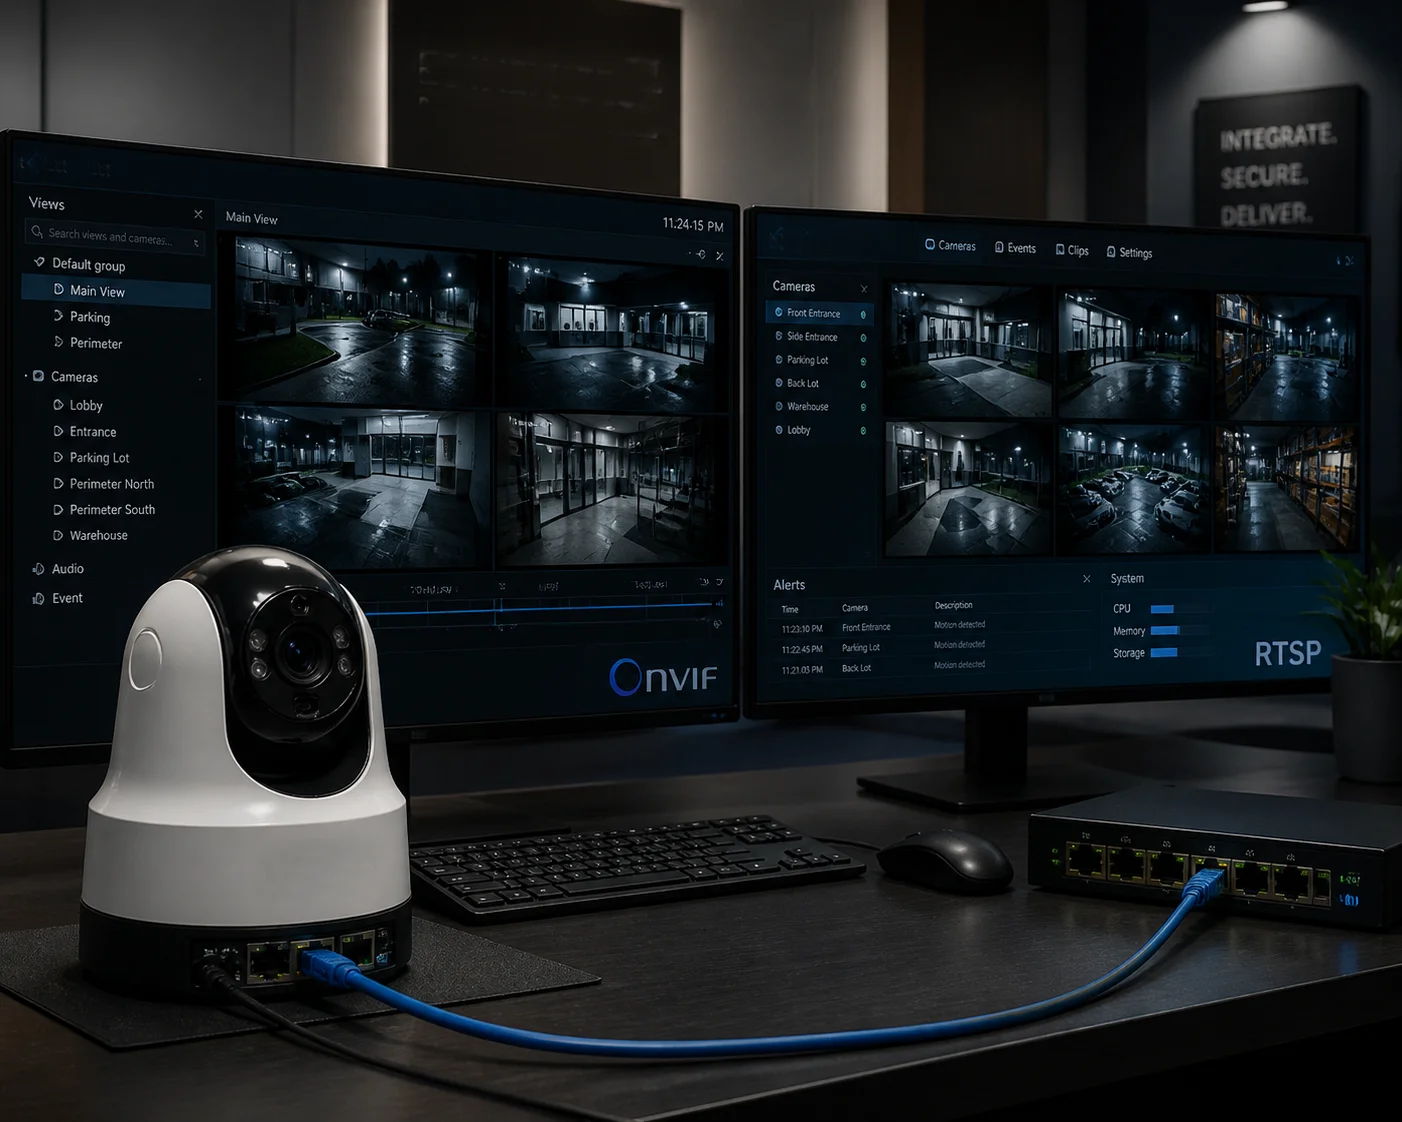 Smart IR algorithm compatibility with third-party VMS platforms
Where the Processing Happens
This is a point many buyers miss. The anti-flare algorithm is firmware-level. It runs on the camera’s SoC (System on Chip) — typically a HiSilicon or similar processor. The laser power adjustment, the face detection, the histogram analysis — all of this happens before the video stream leaves the camera. By the time the stream reaches your VMS, the image is already properly exposed.
This means the VMS does not need to “know” anything about Smart IR. It just receives an H.264 or H.265 stream through ONVIF or RTSP. I have personally tested this with Milestone XProtect 5, Blue Iris 6, Genetec, and several open-source NVR platforms. The anti-flare performance is identical across all of them.
What About Remote Configuration?
Most cameras let you adjust Smart IR settings through their own web interface. You can usually set the anti-flare sensitivity level, choose between “auto” and “manual” laser power, and enable or disable face-priority exposure. Some cameras expose these settings through ONVIF’s imaging service, so you can adjust them from within the VMS. But even if your VMS does not support those extended commands, you can always configure them through the camera’s web UI and leave them running.
What to Ask Your Supplier
Here are the questions I recommend asking before you order:
- Does the camera support ONVIF Profile S and Profile T?
- Can I adjust Smart IR / anti-flare settings through the web interface?
- Is the face-priority exposure feature included in the standard firmware, or is it a paid add-on?
- Does the camera output a clean RTSP stream at full resolution with anti-flare active?
If the supplier says you need their proprietary VMS for the anti-flare to work, that is a red flag. Walk away. A well-designed camera handles all of this internally.
Can I Set Exposure Priority Zones to Protect Critical Identification Areas from Flare?
I have had projects where the client needed to capture license plates and faces at the same checkpoint — two very different brightness zones in one frame.
Yes. Most advanced laser PTZ cameras allow you to define weighted metering zones or ROIs (Regions of Interest). The algorithm gives higher priority to these zones when calculating exposure. If a face appears inside a priority zone, the system will sacrifice background brightness to keep that zone properly exposed.
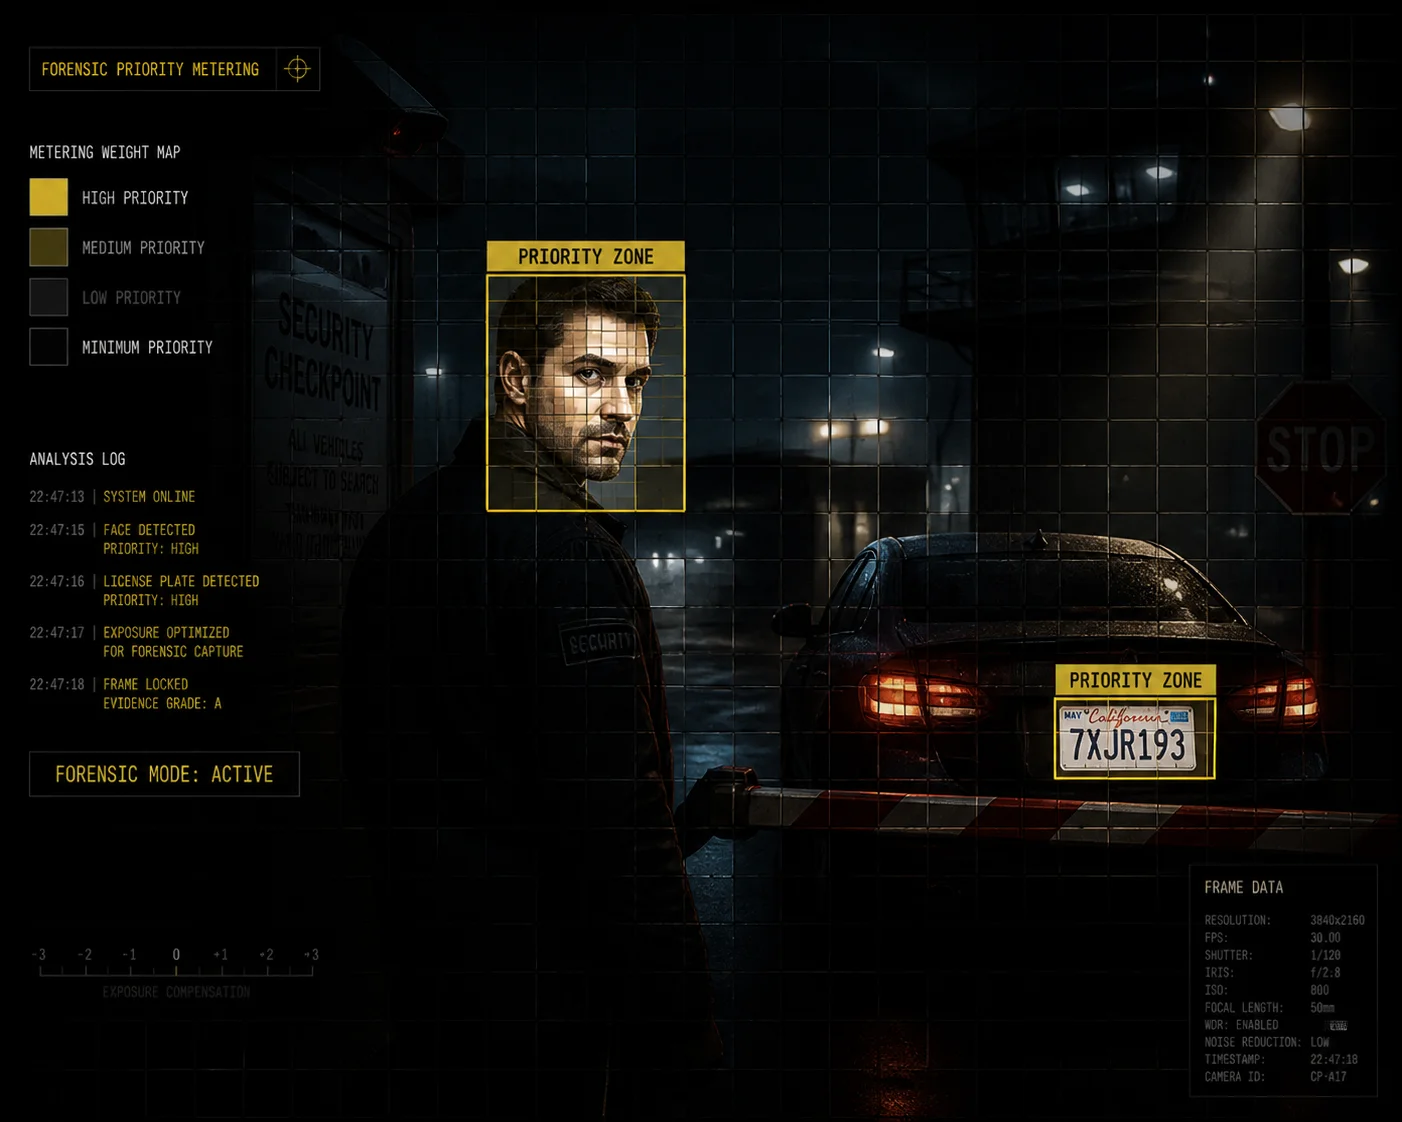 exposure priority zones protecting identification areas from laser flare
How Weighted Metering Works
The camera divides the image into a grid — sometimes hundreds of small blocks. Each block gets a “weight” value. Blocks in the center or in your custom ROI get higher weight. Blocks at the edges get lower weight. When the algorithm calculates the target brightness for exposure control, it uses these weights. A bright face in a high-weight zone will trigger laser dimming, even if the rest of the frame is quite dark. This is called ROI weighted metering 7.
The “Sacrifice Background” Logic
This is one of the most important concepts in forensic video. In court, a clear face matters more than a pretty background. So the algorithm follows a simple rule: if protecting the face means making the background darker, do it. I call this the “forensic priority” approach.
Here is how this plays out in practice:
| Scenario | Background | Face Zone | Algorithm Decision | Result |
|---|---|---|---|---|
| Person far away | Dark | Slightly bright | Maintain current laser | Balanced image |
| Person at mid-range | Dark | Bright | Reduce laser 20–30% | Face clear, background dimmer |
| Person close-up | Very dark | Near saturation | Reduce laser 50%+ or shutter up | Face detailed, background very dark |
| Person leaves frame | Very dark | No detection | Raise laser to normal | Full area coverage restored |
AI Face Detection as the Ultimate ROI
In the past, you had to manually draw ROI boxes in the camera’s web interface. Now, AI does it automatically. The face detection model 8 finds every face in the frame and creates a dynamic ROI around each one. This ROI moves with the person. So even on a PTZ that is panning and tilting, the exposure priority follows the target.
I find this especially useful in scenarios like entry gates, perimeter fences, and access corridors — places where people appear at unpredictable positions.
Setting It Up: What to Look For
When I configure a camera for a client, I always check these settings:
- Metering mode: Switch from “average” to “center-weighted” or “spot” if no AI is available.
- Face exposure toggle: Enable it. This tells the camera to use face coordinates for metering.
- Flare suppression level: Some cameras offer Low / Medium / High. I start with Medium and adjust based on test footage.
- Manual ROI drawing: For fixed scenes (like a gate), I draw a permanent ROI over the area where faces will appear. This gives the algorithm a head start before AI detection even kicks in.
The combination of a fixed ROI plus AI face detection gives you two layers of protection. The fixed ROI handles the first few frames before the AI model locks onto the face. Then the AI takes over with pixel-level tracking.
Real-World Advice
I always remind my clients: anti-flare is not magic. It is an engineering tradeoff. If your laser is wildly overpowered for the deployment distance, no algorithm will fully save you. Match the laser’s rated range to your actual scene first. Then let the Smart IR algorithm handle the fine-tuning. That is how you get clean, forensic-quality face captures at night — every time.
Conclusion
Anti-flare works best when you combine hardware (matched laser power, zoom-sync optics) with smart firmware (AI metering, PWM control). Always test with a real walk-up scenario before you approve any laser PTZ for your project.
1. PWM duty cycle control for laser power dimming. ↩︎ 2. Inverse square law for reflected IR energy at close range. ↩︎ 3. Hysteresis threshold for flicker-free laser adjustment. ↩︎ 4. ONVIF standard for third-party VMS integration. ↩︎ 5. Milestone XProtect ONVIF camera support. ↩︎ 6. Blue Iris RTSP stream compatibility. ↩︎ 7. Region of Interest (ROI) weighted metering for exposure. ↩︎ 8. Neural network face detection for dynamic ROI tracking. ↩︎ 9. Electronic shutter speed adjustment for overexposure. ↩︎ 10. Analog gain reduction for sensor sensitivity control. ↩︎</span