
I have seen too many spec sheets that claim “0.001 Lux full-color.” Most of them fail the moment you test them in a truly dark field. If you buy based on paper specs alone, you risk project failure and costly rework.
To evaluate full-color imaging at 0.001 Lux, you must verify three things: the hardware foundation (sensor size, lens aperture, ISP capability), objective lab metrics (SNR, color fidelity, IRE level under controlled lighting), and real-world dynamic scene performance (motion ghosting, AI detection accuracy, and noise suppression balance). A spec sheet number alone means nothing without confirmed test conditions.
 PTZ camera full-color imaging at 0.001 Lux ultra-low light evaluation
0.001 Lux is roughly equal to a clear, moonless night with only faint starlight. This is the absolute edge of what commercial security cameras can do. Below, I break down each critical question you should ask — and how to get honest answers — before you commit your budget.
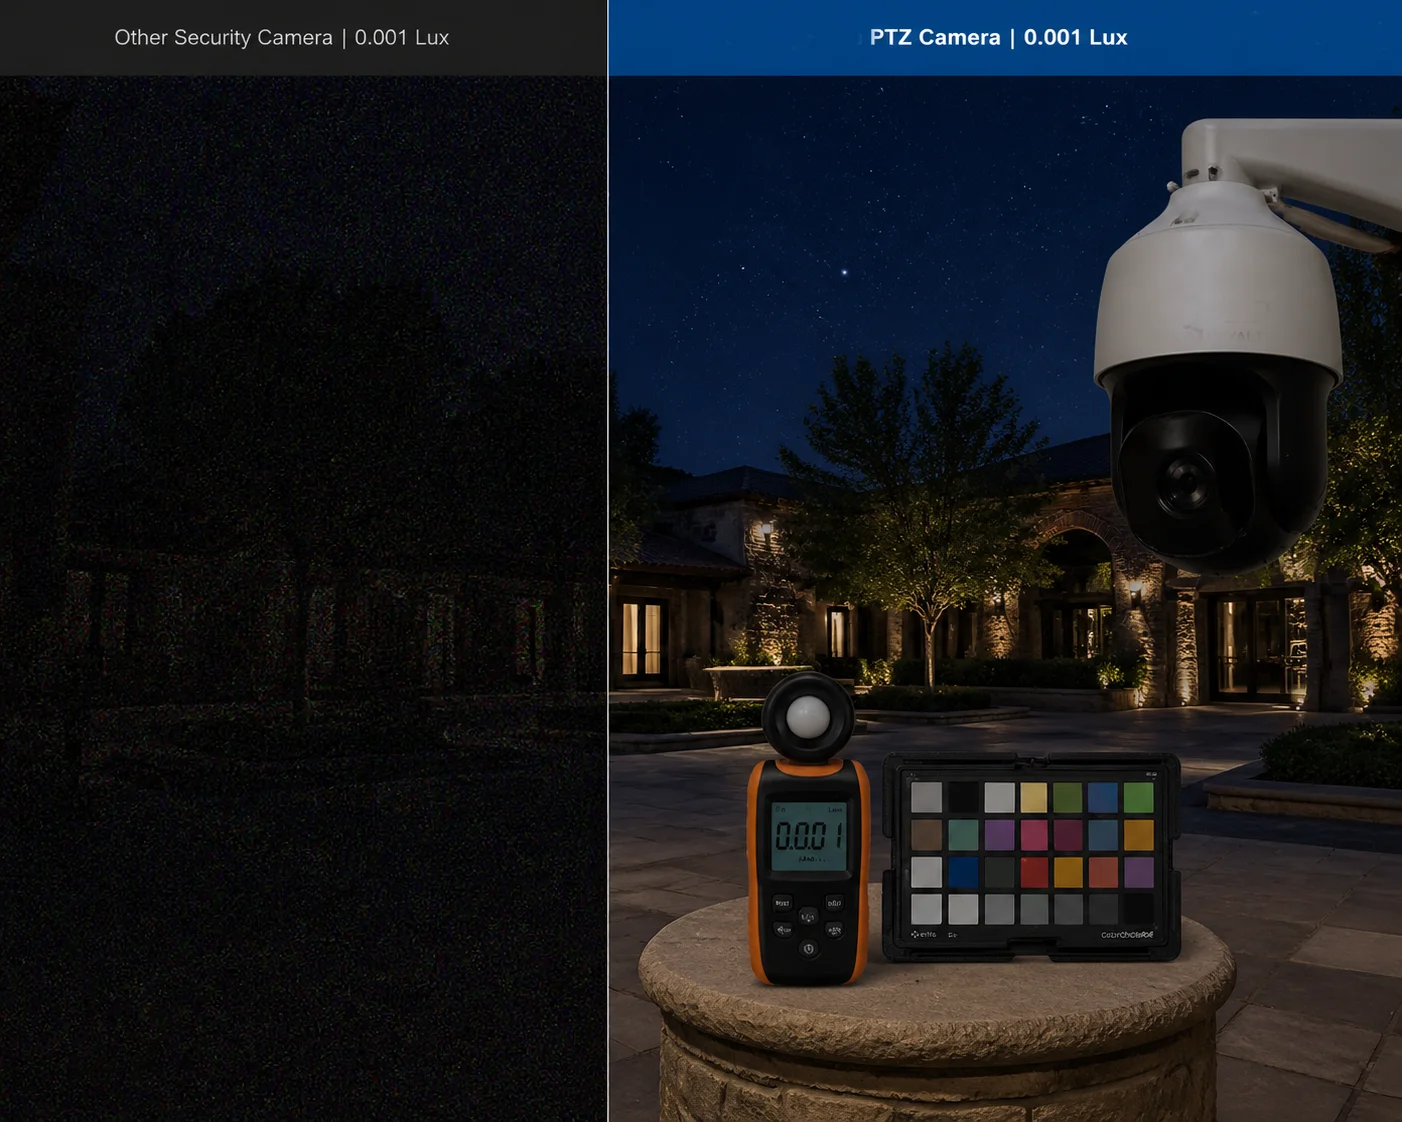
Can My PTZ Camera Stay in Color Mode All Night Without Switching to Black and White?
This is the first question every integrator asks me. You deploy a PTZ at a remote solar site. The sun goes down. And within minutes, the camera flips to black and white. You lose the one thing your client paid extra for: color detail for identification.
Most PTZ cameras cannot stay in color mode all night at 0.001 Lux. They automatically switch to black-and-white (B/W) when light drops below their true color threshold — often around 0.01–0.05 Lux. Only cameras with large sensors (1/1.8″ or bigger), fast lenses (F1.0–F1.2), and advanced ISP processing can hold genuine color at 0.001 Lux without forced IR cut filter removal.
 PTZ camera color mode vs black and white mode at night
Why Most Cameras Fail to Hold Color
The root cause is simple physics. Color imaging needs more light than black-and-white imaging. A color sensor uses a Bayer filter 1 on top of each pixel. This filter blocks roughly two-thirds of incoming light — red pixels only see red, green pixels only see green, blue pixels only see blue. In black-and-white mode, the camera removes the IR cut filter and lets all wavelengths hit every pixel. That is why B/W mode is always brighter.
Here is a comparison of real-world color thresholds from known brands:
| Brand / Model | Color Minimum Lux | B/W Minimum Lux | Gap Factor |
|---|---|---|---|
| Hikvision DarkFighterX (Dual Sensor) | 0.0005 Lux | 0 Lux (IR on) | Dual-sensor fusion bridges the gap |
| Dahua Starlight PTZ | 0.005 Lux @ F1.6 | 0 Lux (IR on) | 5,000× difference |
| Axis Q6355-LE | 0.06 Lux @ F1.36 | 0.001 Lux @ F1.36 | 60× difference |
| Hanwha (Wisenet) | 0.01 Lux @ F1.4 | 0.001 Lux @ F1.4 | 10× difference |
Notice the pattern. The color threshold is always 10× to 100× higher than the B/W threshold. When a lesser-known manufacturer claims “0.001 Lux color” with a standard single-sensor design, you should ask: what specific hardware makes this possible?
What to Check in the Spec Sheet
Look for these items. If any are missing, treat the 0.001 Lux color claim with suspicion:
- Sensor size: Must be 1/1.8″ or larger. A 1/3″ sensor cannot collect enough photons at 0.001 Lux to produce usable color.
- Lens aperture: F1.0 or F1.2. An F1.0 lens gathers about 2.5× more light than an F1.6 lens.
- Day/Night switching mode: Ask if the camera supports a “forced color” mode or an “intelligent” mode that uses AI to decide. Some cameras let you lock color mode, but the image quality may be terrible.
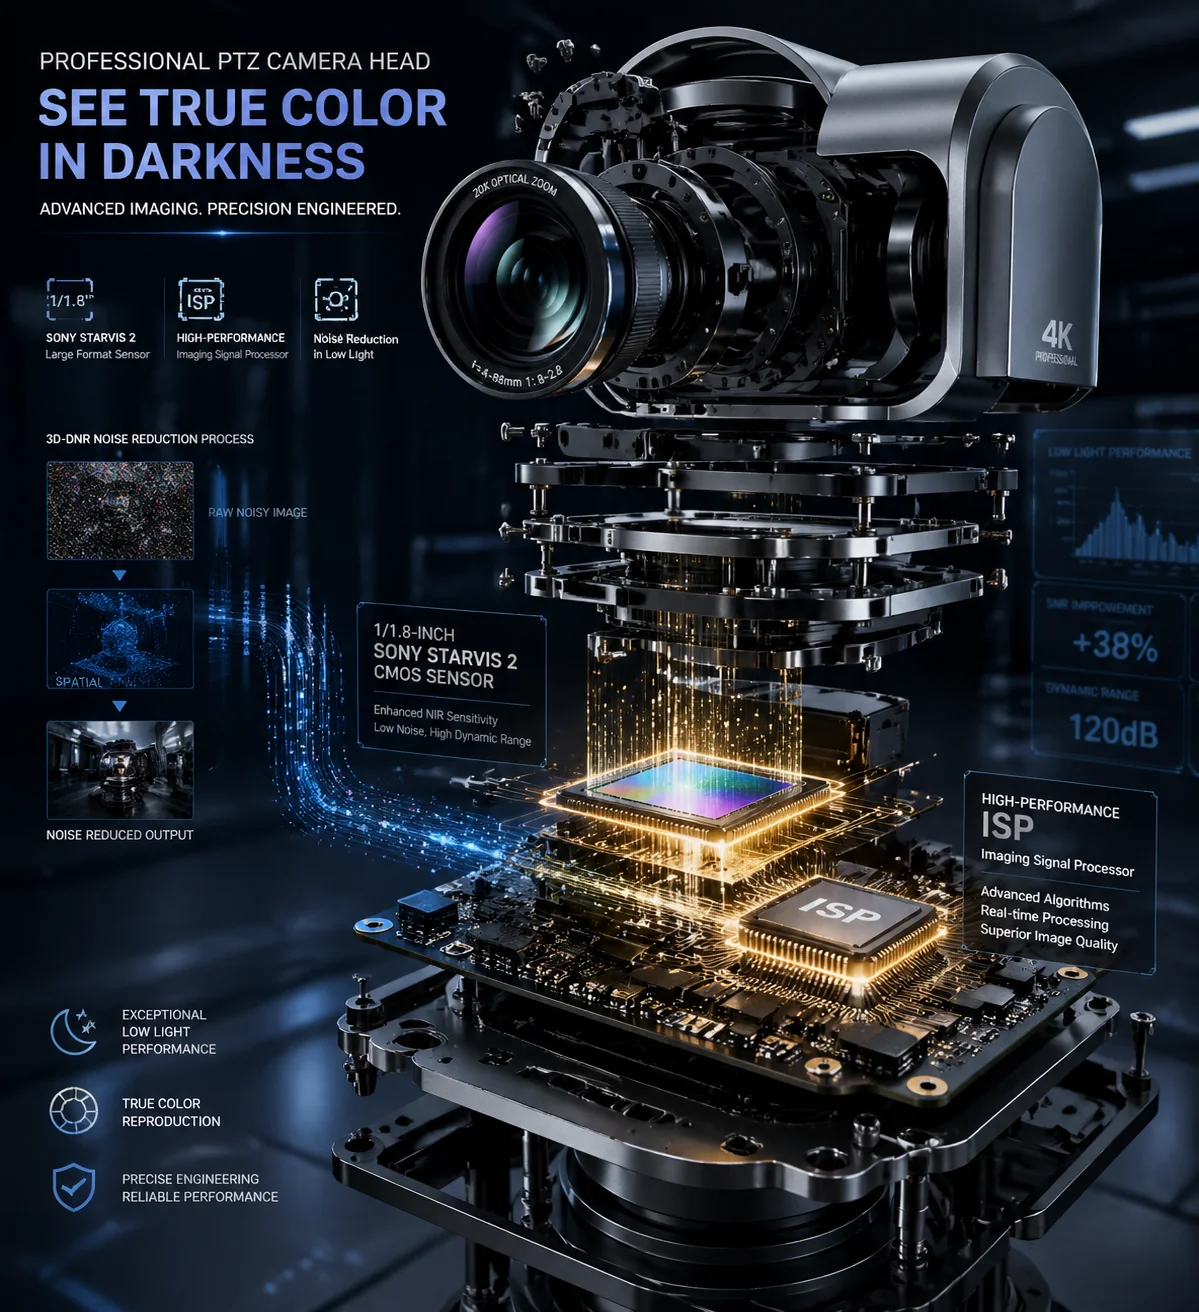
- ISP chipset: A strong 3D-DNR (3D Digital Noise Reduction) engine is essential. Without it, the amplified signal at 0.001 Lux will be full of color noise — random red, green, and blue dots across the image.
A Practical Test You Can Run
Set up the camera in a sealed dark room. Use a calibrated, dimmable light source. Lower the light to 0.001 Lux (measured with a lux meter at the scene). Place a standard 24-patch color chart (X-Rite ColorChecker) 2 in front of the camera. Now check: Is the camera still in color mode? Can you tell red from blue? Can you tell green from yellow? If the camera has silently switched to B/W or if the colors are just random noise, the spec is not real.
At Loyalty-Secu, we run this exact test on every PTZ model before we ship samples. We document the results with screenshots at each lux level. If a customer asks, we share the raw footage. That is the only way to build trust with integrators who have zero tolerance for spec inflation.
What Is the Maximum Shutter Speed I Can Use While Maintaining 0.001 Lux Color Clarity?
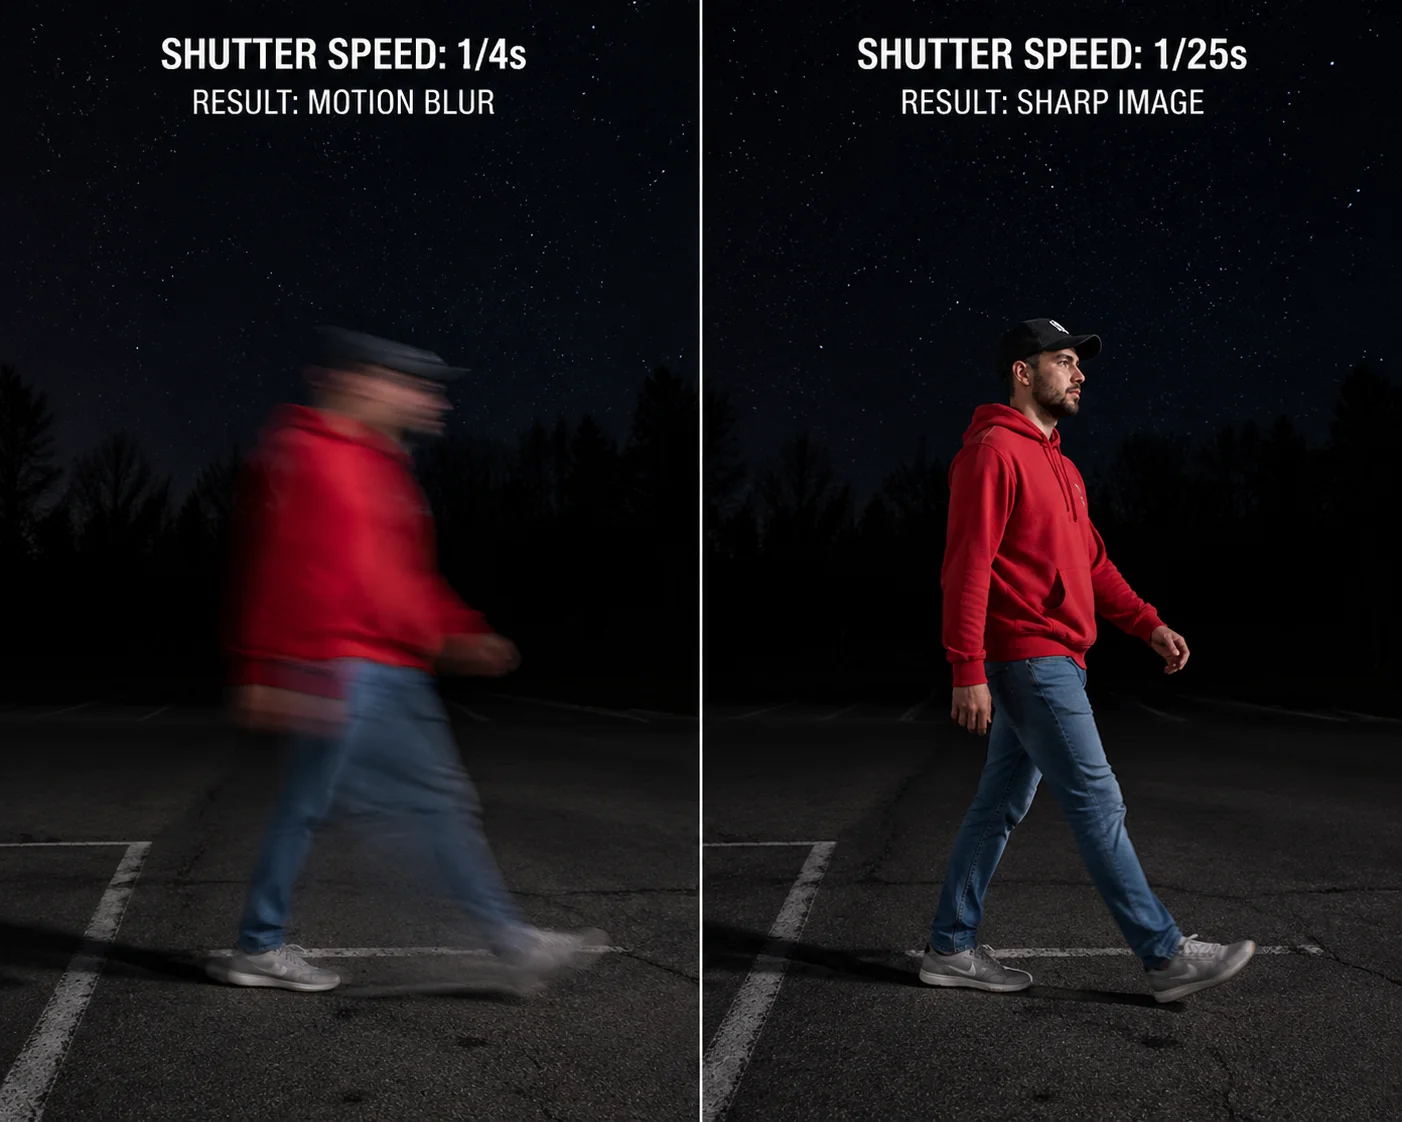
I once watched a demo where a camera showed a beautiful, bright, full-color image at near-zero light. Then a person walked through the frame. The person turned into a colorful smear. The camera was using a 1/2-second shutter. That image was useless for identification.
At 0.001 Lux, a credible full-color PTZ camera should maintain a shutter speed of at least 1/15s to 1/25s. Slower shutter speeds (like 1/4s or 1/2s) will brighten the image but create severe motion blur on any moving subject. The true test of low-light performance is not how bright the static scene looks — it is how clear a walking person appears.
 PTZ camera shutter speed motion blur test at ultra-low light
The Shutter Speed Trade-Off
Every camera faces the same physics problem in low light. To get a brighter image, you can do three things: open the aperture wider, increase the sensor gain (ISO/AGC), or slow down the shutter. The first two are limited by hardware. The third — slow shutter — is the easiest trick, and it is the one most often abused.
Here is what happens at different shutter speeds when a person walks at normal pace (~1.4 m/s) through the frame:
| Shutter Speed | Image Brightness at 0.001 Lux | Motion Blur on Walking Person | Usable for Identification? |
|---|---|---|---|
| 1/30s | Low | Minimal | ✅ Yes, if sensor and lens are strong |
| 1/15s | Medium | Slight | ✅ Yes, acceptable for most projects |
| 1/8s | High | Noticeable | ⚠️ Marginal — face may be soft |
| 1/4s | Very High | Severe | ❌ No — person becomes a streak |
| 1/2s | Extremely High | Extreme | ❌ No — completely unusable |
How to Expose This Trick
When a supplier sends you a demo video or screenshot at 0.001 Lux, ask one question: “What was the shutter speed?” If they cannot answer, or if the answer is 1/4s or slower, the demo is misleading.
A better approach is to request a live demo or a recorded video clip — not a still image. In the video, have someone walk through the scene at normal speed. Watch for:
- Ghosting: The person leaves a transparent trail behind them.
- Jelly effect: The person’s body appears to wobble or stretch.
- Face clarity: Can you see facial features, or is the face a blur?
Why This Matters for Your Project
If you are deploying PTZ cameras for perimeter security, construction site monitoring, or farm surveillance, the subjects you care about are almost always moving — people, vehicles, animals. A camera that only produces clear images of static scenes is not a security camera. It is a landscape camera.
At Loyalty-Secu, we test our PTZ cameras at 0.001 Lux with the shutter locked at 1/25s. We show the real image quality at that setting. If the image is too dark or too noisy at 1/25s, we do not claim 0.001 Lux. We state the actual lux level where the camera produces a usable color image at a practical shutter speed. That honest approach saves our integrator partners from failed site acceptance tests.
How Does the “Large Aperture” Lens on My Camera Assist in Extreme Low-Light Conditions?
I get asked about lenses more than any other component. And for good reason. You can have the best sensor in the world, but if the lens cannot deliver enough light to it, the sensor starves. The lens is the front door. If the door is too small, nothing else matters.
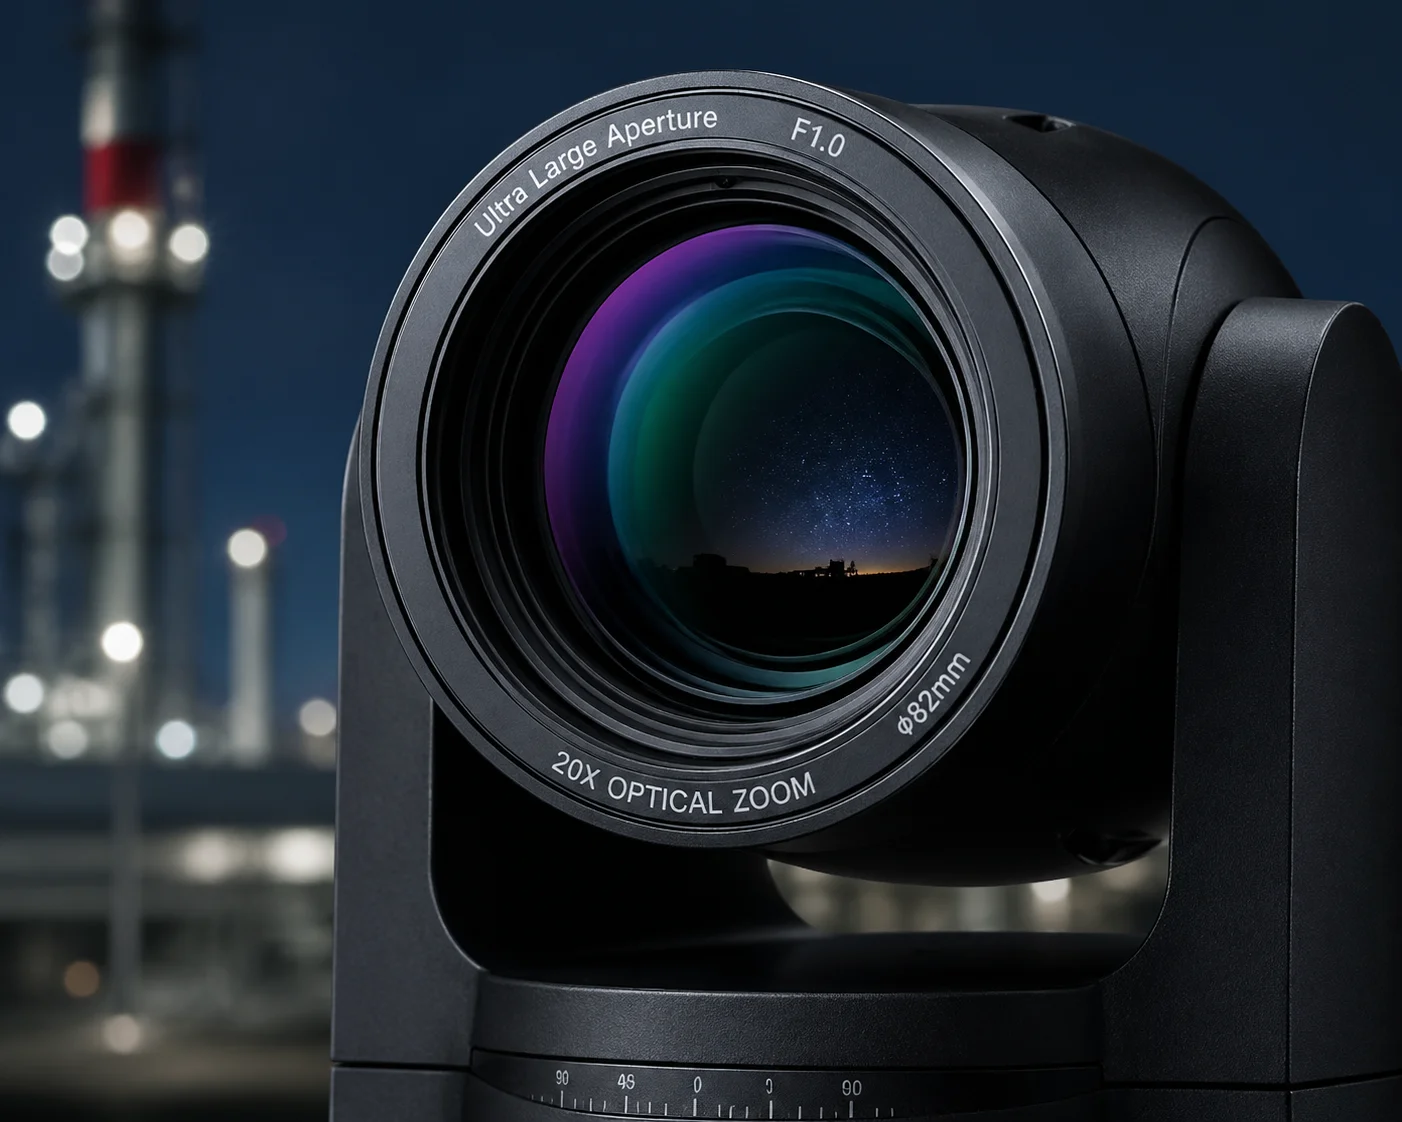
A large-aperture lens (F1.0 or F1.2) is the single most important hardware factor for extreme low-light color imaging. An F1.0 lens collects approximately 2.56× more light than an F1.6 lens and about 1.78× more than an F1.2 lens. This extra light directly reduces the need for high gain (which adds noise) and slow shutter (which adds motion blur), resulting in cleaner, sharper full-color images at 0.001 Lux.
 Large aperture F1.0 lens for PTZ camera low light performance
Understanding F-Numbers in Plain Terms
The F-number (also called f-stop) describes how wide the lens opening is relative to its focal length. A smaller F-number means a bigger opening. A bigger opening means more light reaches the sensor.
The relationship is not linear. The amount of light doubles every time the F-number decreases by a factor of √2 (about 1.41). Here is a practical comparison:
| Lens Aperture | Relative Light Intake (vs F1.6) | Impact on 0.001 Lux Performance |
|---|---|---|
| F2.0 | 0.64× (less light) | ❌ Cannot hold color at 0.001 Lux |
| F1.6 | 1.0× (baseline) | ⚠️ Color possible at ~0.005 Lux, not 0.001 |
| F1.4 | 1.31× | ⚠️ Marginal improvement, still struggles |
| F1.2 | 1.78× | ✅ Realistic for 0.001 Lux with top-tier sensor |
| F1.0 | 2.56× | ✅ Best chance for true 0.001 Lux full-color |
The Cost and Engineering Challenge of F1.0
There is a reason most PTZ cameras ship with F1.6 or F1.4 lenses. An F1.0 lens is significantly more expensive to manufacture. It requires larger, more precisely ground glass elements. The optical design must control aberrations (color fringing, edge softness) that get worse as the aperture opens wider. For a PTZ camera with 30× or 40× optical zoom, maintaining F1.0 across the entire zoom range is nearly impossible. Most large-aperture PTZ lenses achieve F1.0 only at the wide end and drop to F1.6 or F2.0 at the telephoto end.
What to Ask Your Supplier
When a supplier says their PTZ has a “large aperture” lens, ask these specific questions:
- What is the F-number at the wide end and at the telephoto end? If they only quote the wide-end number, the telephoto performance may be much worse.
- Is the aperture fixed or variable? A fixed F1.0 across all zoom levels would be extraordinary (and very expensive). Most are variable.
- Who manufactures the lens module? Top-tier PTZ lens makers include Fujifilm, Kowa, and Tamron. Some Chinese manufacturers use in-house lens designs that may not match the optical quality of these brands.
How the Lens Works Together with the Sensor
The lens and sensor must be matched. A large-aperture lens paired with a small 1/3″ sensor wastes most of its light-gathering advantage because the sensor’s small area cannot use the full image circle. The ideal combination for 0.001 Lux full-color is:
- F1.0 lens + 1/1.8″ or 1/1.2″ Sony STARVIS 2 sensor: This is the current gold standard.
- F1.2 lens + 1/1.8″ sensor: A realistic and more affordable option that can achieve credible 0.001 Lux performance with strong ISP support.
At Loyalty-Secu, our engineering team selects lens and sensor combinations as a matched pair. We do not just pick the cheapest lens and the most expensive sensor. We test the combination together under controlled lighting to verify that the system — not just the individual parts — meets the claimed specification.
Do I Need Supplemental White Light to Achieve a Clear Full-Color Image at 0.001 Lux?
This question comes up in almost every project discussion. The client wants full-color images at night. The site has no street lights. The camera spec says 0.001 Lux. So, do you still need to add white light? The honest answer is: it depends on what “clear” means to you.
In most real-world deployments, supplemental white light significantly improves full-color image quality at 0.001 Lux — even on cameras that technically support it without light. A small amount of white LED illumination (raising scene light to 0.01–0.1 Lux) can dramatically improve color accuracy, reduce noise, and allow faster shutter speeds. For critical identification tasks (face recognition, license plate color, clothing color), supplemental light is strongly recommended.
 Supplemental white light LED for PTZ camera full-color night imaging
The Difference Between “Possible” and “Useful”
A camera may technically hold color mode at 0.001 Lux. But the image quality at that level — even with the best hardware — is far from what you get at 0.01 or 0.1 Lux. The colors are muted. The noise is high. Fine details disappear. The 3D-DNR algorithm works overtime, and it often smears textures to remove noise. Trees and grass look like oil paintings. Faces look like smooth blobs.
Adding even a small amount of white light changes everything. Here is what happens:
With vs. Without Supplemental White Light
At 0.001 Lux (pure starlight, no supplemental light):
- Colors are faded and often inaccurate. Red may look brown. Blue may look gray.
- SNR (signal-to-noise ratio) hovers around 15–20 dB. You see visible grain and color speckles.
- The camera may use 1/8s or slower shutter to compensate, causing motion blur.
- AI detection (human/vehicle) accuracy drops significantly because the image data is noisy.
At 0.01 Lux (with minimal white LED supplement):
- Colors become distinguishable. You can tell a red jacket from a blue one.
- SNR improves to 25–30 dB. The image looks cleaner.
- The camera can use 1/25s shutter, and moving subjects are much sharper.
- AI detection accuracy returns to near-daytime levels.
Types of Supplemental Light
Not all supplemental light is the same. Here are your options:
- Built-in white LEDs: Many modern PTZ cameras include white LEDs alongside IR LEDs. These can be set to “smart mode” — they turn on only when motion is detected, saving power and reducing light pollution.
- External white light illuminators: Separate LED floodlights mounted near the camera. These offer more power and wider coverage but require additional wiring and power.
- Warm white vs. cool white: Warm white (3000K) is less intrusive to neighbors and wildlife. Cool white (5000K–6500K) provides slightly better color rendition for cameras calibrated to daylight color temperature.
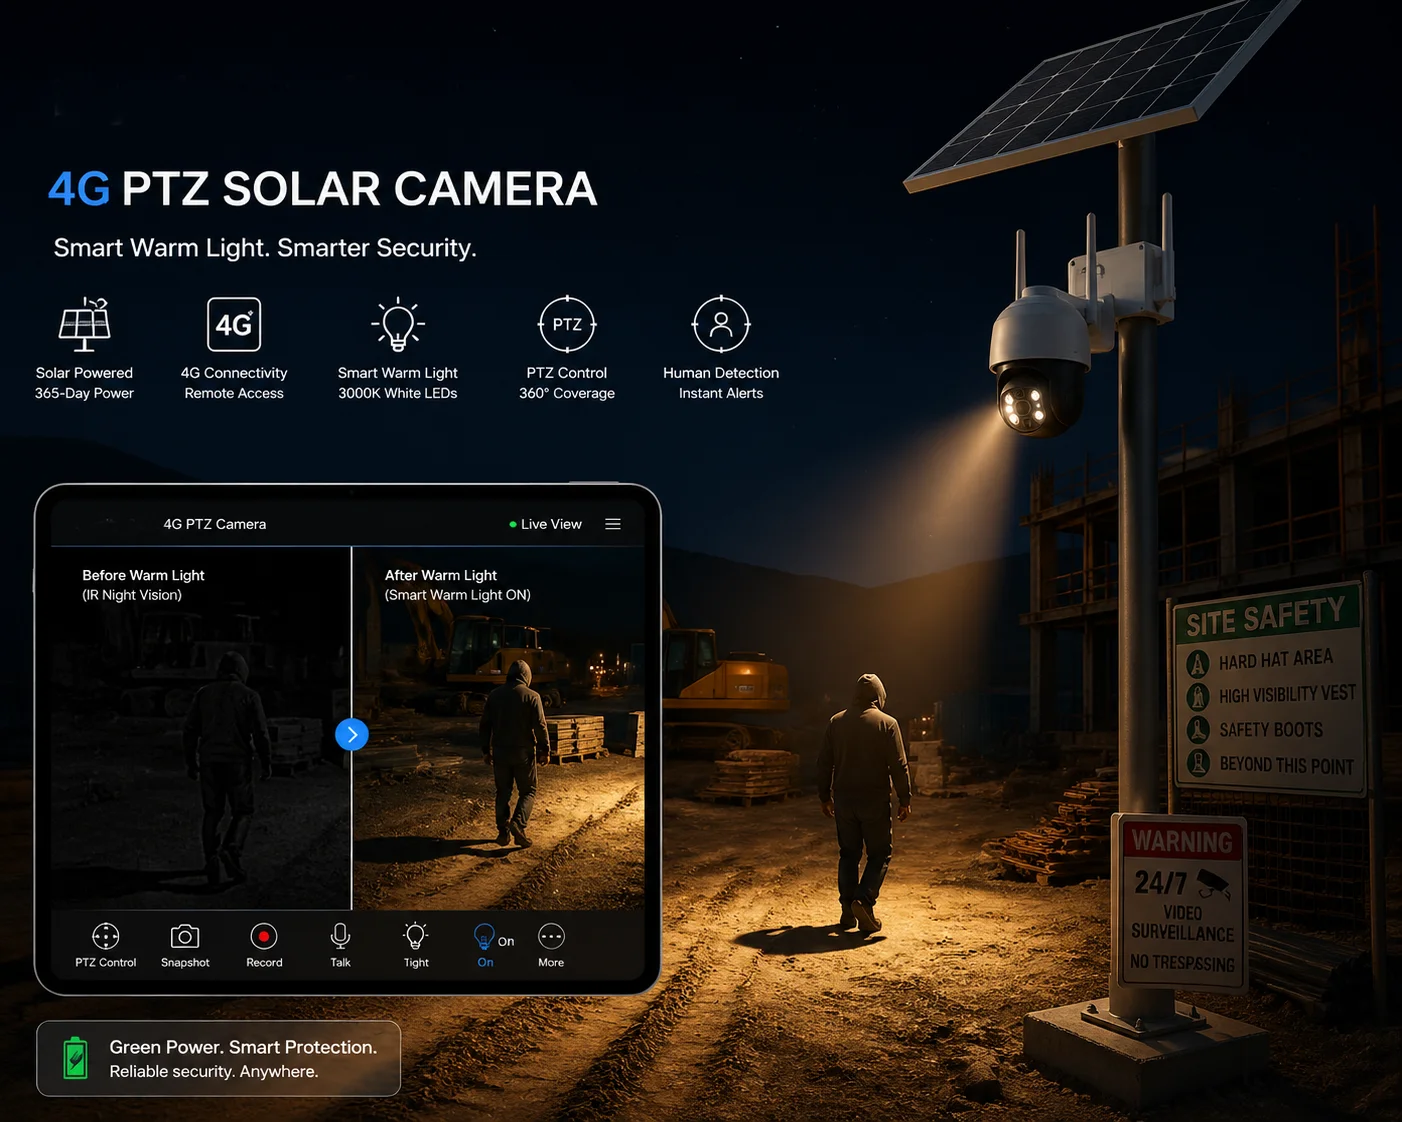
The Solar Power Consideration
For 4G solar PTZ deployments 8 — which is a core product category at Loyalty-Secu — power budget is critical. White LEDs consume significantly more power than IR LEDs. A typical white LED illuminator draws 10–30W, which can drain a solar battery quickly on cloudy days.
Our approach is to use “smart warm light” — the white LEDs activate only on motion trigger events, and they run at the minimum brightness needed to lift the scene from 0.001 Lux to about 0.01 Lux. This keeps power consumption low while giving you the color quality boost where it matters most: when something is actually happening in the scene.
My Recommendation
If your project requires reliable color identification at night — and most security projects do — plan for supplemental white light. Do not rely solely on the camera’s passive low-light capability. Use the 0.001 Lux spec as a baseline for the camera’s sensor quality, but design the system with light support. The cost of a small white LED module is trivial compared to the cost of a failed identification event.
Conclusion
Evaluating 0.001 Lux full-color performance requires you to look past the spec sheet. Test the hardware, verify the test conditions, and always check moving subjects — not just static scenes. If you need honest test data or sample units for your own evaluation, reach out to us at han.nie@loyalty-secu.com.
1. Bayer filter color array in CMOS image sensors. ↩︎ 2. X-Rite ColorChecker for standardized color accuracy testing. ↩︎ 3. IR cut filter switching mechanisms in day/night cameras. ↩︎ 4. 3D noise reduction technology for low-light video. ↩︎ 5. Lux measurement standards for security camera testing. ↩︎ 6. Motion blur calculation for moving subjects at slow shutter speeds. ↩︎ 7. Sony STARVIS 2 sensor specifications for starlight imaging. ↩︎ 8. Loyalty-Secu 4G solar PTZ camera product line. ↩︎ 9. AI human/vehicle detection accuracy in low-light conditions. ↩︎ 10. Color temperature effects on security camera white balance. ↩︎