
I’ve seen too many installers get stuck with proprietary battery packs that cost three times more than they should — and take weeks to ship from overseas.
Yes, U.S. customers can buy and replace standard cells locally. Our solar PTZ systems use industry-standard 12V LiFePO4 battery packs with universal connectors, so you can source replacements from Amazon, Renogy, or any local solar shop without factory authorization.
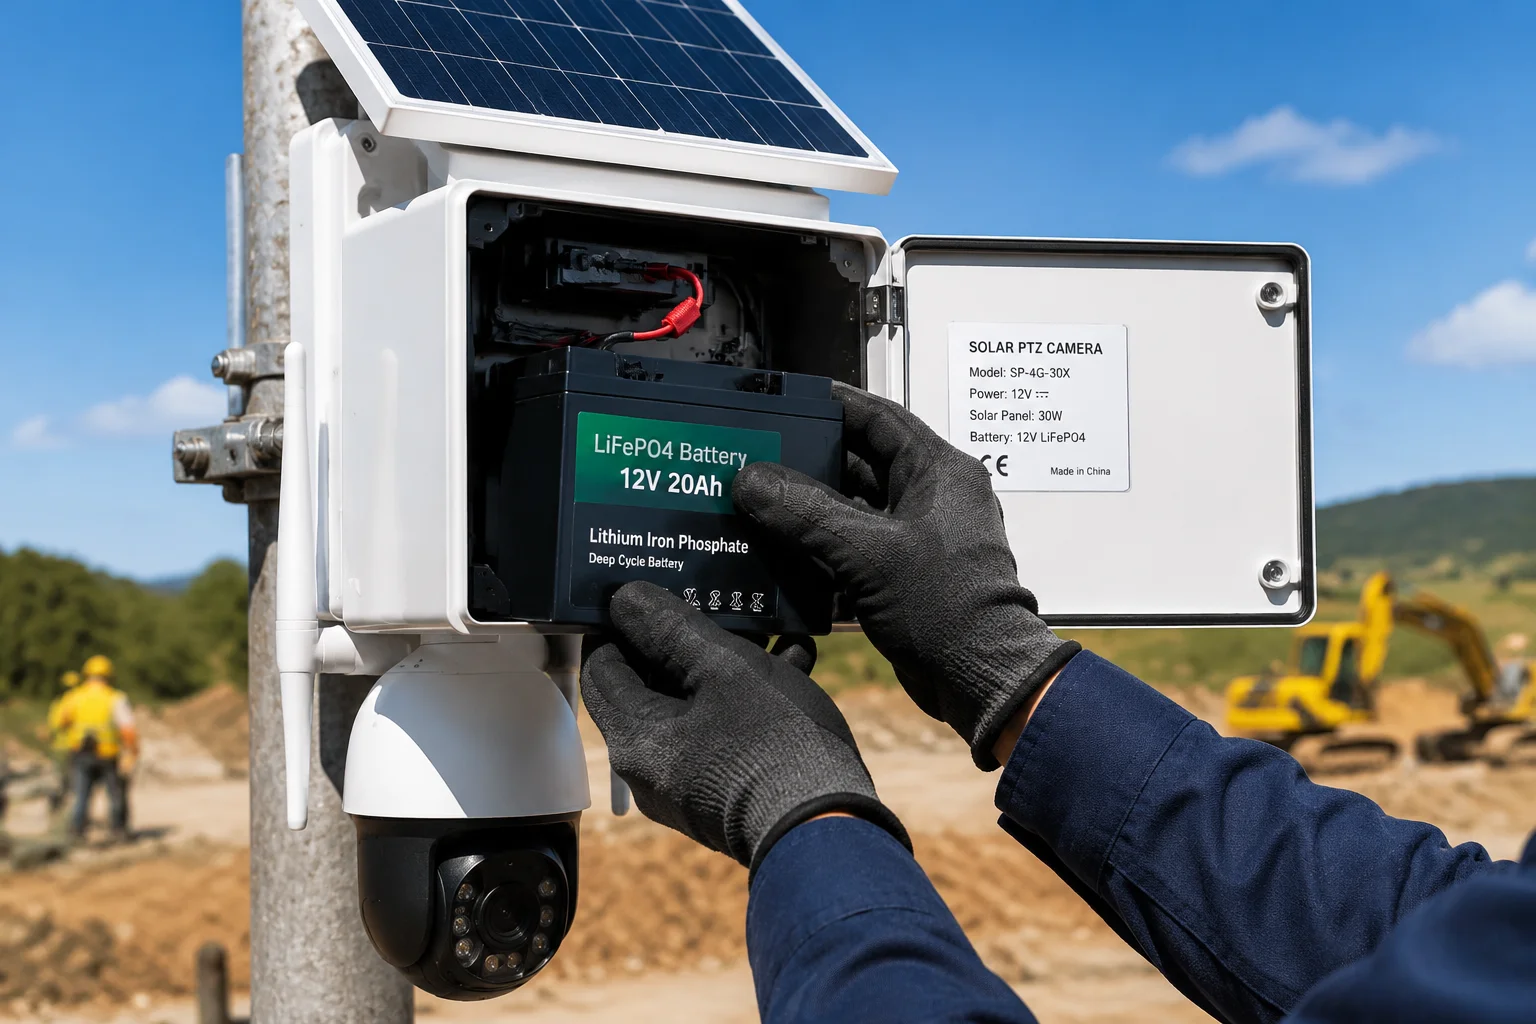 Solar PTZ camera battery replacement guide for US customers
Below, I’ll walk you through the exact specs, connector types, BMS compatibility, and replacement steps your local team needs to handle battery swaps with zero downtime.
Table of Contents
Is the Battery Pack Designed with Standard 18650 or 32700 Cells for Easy Local Sourcing?
I’ve had customers ask me this on the first call — because they’ve been burned before by vendors who lock them into expensive proprietary packs.
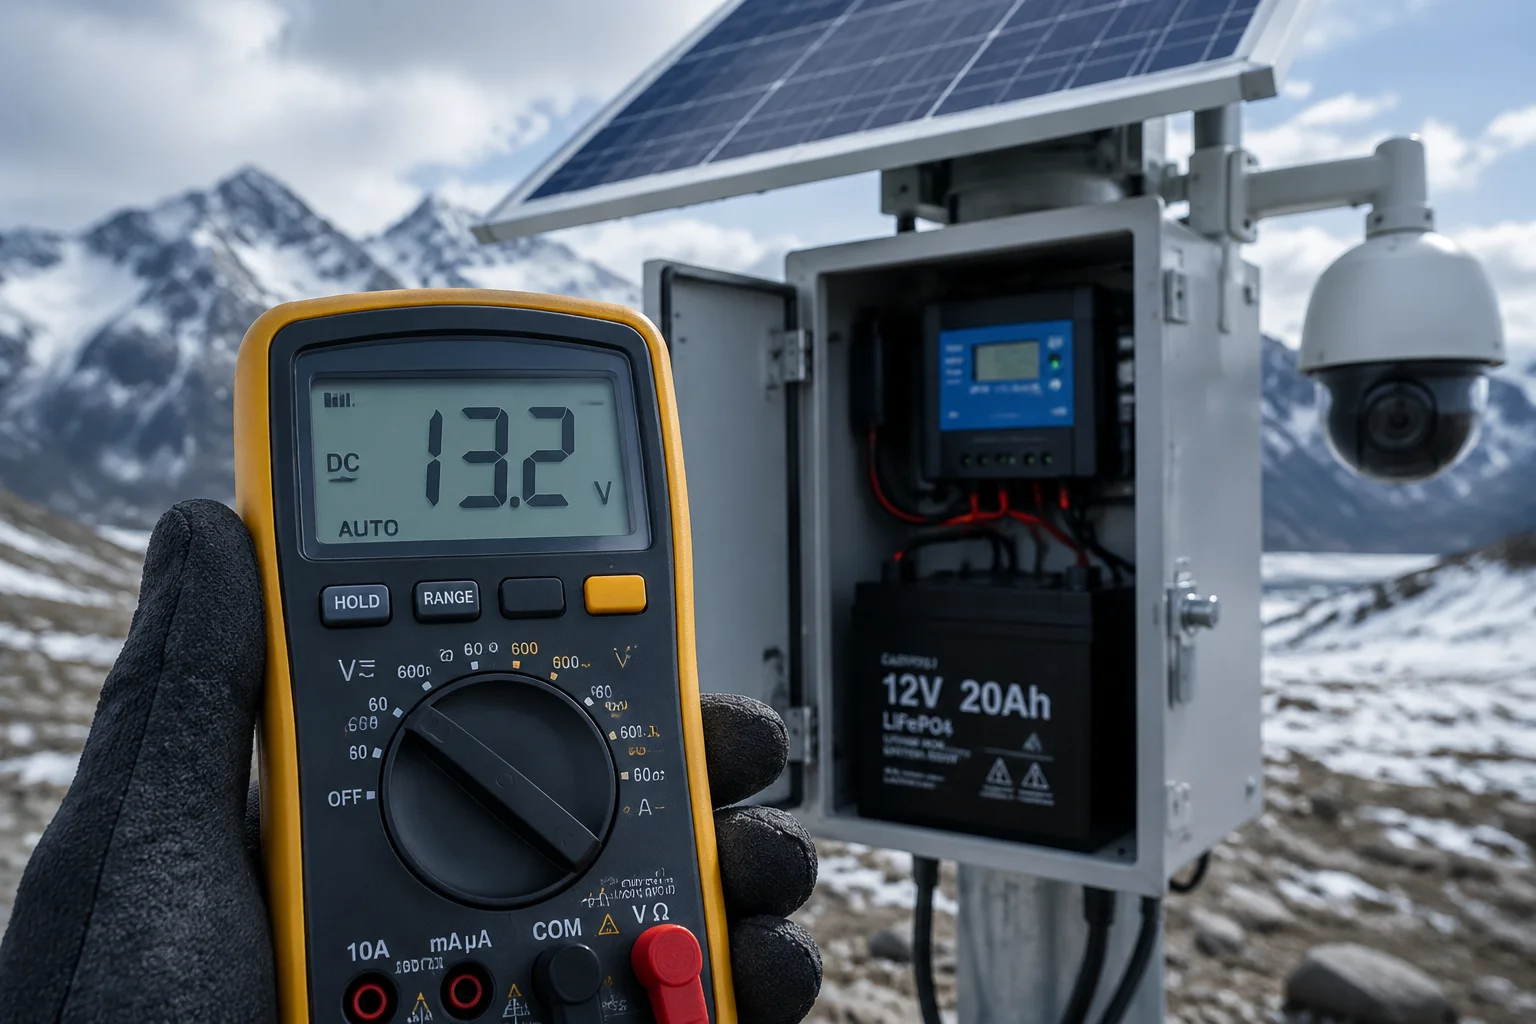
Our system does not use loose 18650 or 32700 cells. Instead, it uses complete 12V LiFePO4 battery modules in standard Group 24 or Group 27 sizes. These are the same batteries sold at every solar and marine supply store across the United States.
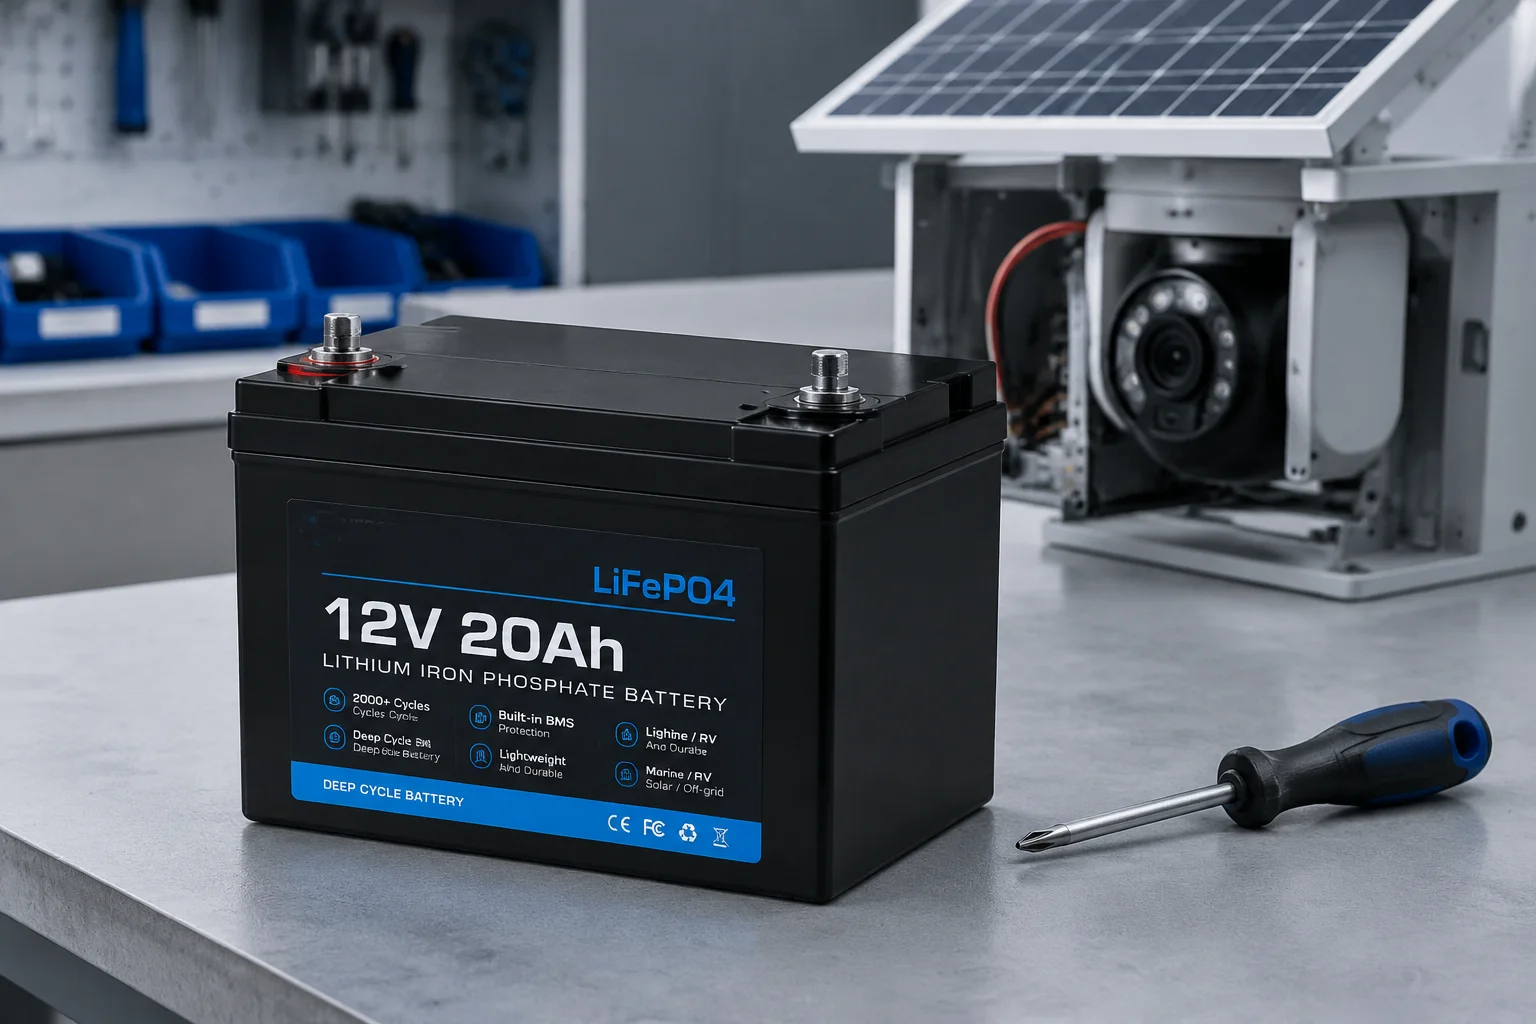 Standard LiFePO4 battery pack for solar PTZ camera system
Why We Chose Complete Modules Over Loose Cells
Let me explain the thinking behind this design choice. Loose 18650 or 32700 cells require spot welding, custom holders, and careful balancing. That’s fine in a factory. But in the field — on a ranch in Montana or a construction site in Texas — you don’t want your technician soldering battery packs together.
We chose pre-assembled 12V LiFePO4 modules because they come with a built-in BMS, standard terminals, and a hard case. Your local tech just swaps the whole unit. No tools beyond a screwdriver. No electrical training needed.
Where to Buy in the U.S.
Here’s a quick reference for your purchasing team:
| Source | Example Brands | Typical Price (40Ah) |
|---|---|---|
| Amazon | LiTime1, Ampere Time2, Redodo3 | $150 – $220 |
| Specialty Solar Stores | Renogy, Battle Born4 | $200 – $350 |
| Local Retail | Batteries Plus Bulbs5 | $180 – $280 |
Physical Size Compatibility
The battery compartment in our solar PTZ enclosure follows standard group sizes. Group 24 fits most standard deployments. Group 27 fits if your client wants to upgrade capacity for longer autonomy. The internal mounting brackets adjust to both sizes. No custom fabrication needed.
Capacity Options
For a standard PTZ camera with 4G modem, 40Ah gives you about 3–4 days of autonomy in winter. If your client runs heavy IR illumination or frequent pan-tilt movement, I recommend stepping up to 60Ah or even 100Ah. All of these are available off the shelf in the U.S.
The key point is this: you are never locked into buying from us. The battery is a commodity part. That’s intentional. We want your total cost of ownership to stay low over 10 years.
Will the BMS Accept Third-Party Cells Without Requiring a Proprietary Factory Activation?
I know this concern well. Some manufacturers program their BMS to reject any battery that doesn’t carry a specific chip or serial number. That’s a vendor lock-in tactic, and we don’t do it.
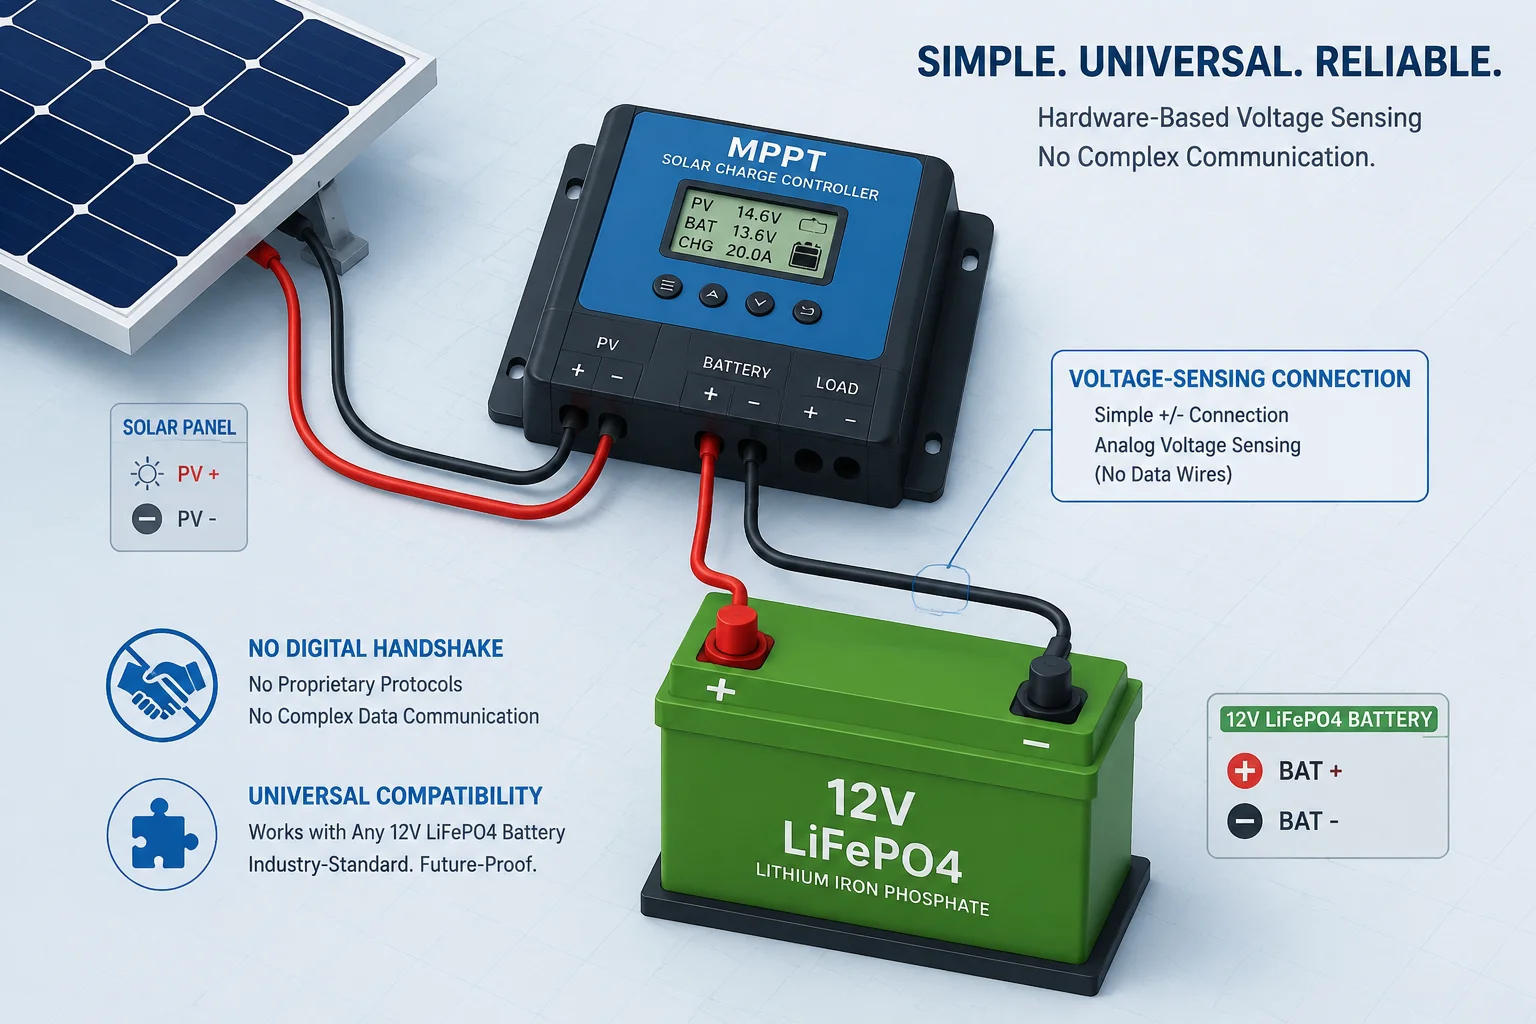
Our system has no proprietary activation requirement. The charge controller communicates with the battery through standard voltage sensing — not digital handshake. Any 12V LiFePO4 battery with a built-in BMS will work immediately after connection.
 BMS compatibility diagram for third-party LiFePO4 batteries
How Our Charge Controller Works
The MPPT charge controller6 in our system monitors battery voltage to determine charge state. It does not use CAN bus, SMBus, or any proprietary communication protocol to “talk” to the battery. This means:
- It doesn’t care who made the battery.
- It doesn’t need a firmware update when you swap brands.
- It doesn’t lock out after a certain number of charge cycles.
The controller simply reads voltage. When the battery hits 14.6V, it stops charging. When it drops to 10V, it triggers low-voltage disconnect to protect the camera. That’s it.
What to Look for in a Third-Party Battery’s BMS
Not all BMS boards are equal. Here’s what matters for our application:
| BMS Feature | Minimum Requirement | Why It Matters |
|---|---|---|
| Continuous Discharge | 1C (40A for 40Ah battery) | PTZ motor + IR + 4G can spike current |
| low-temperature cutoff7 | Charging disabled below 0°C | Prevents lithium plating damage |
| Over-Voltage Protection | 14.8V max | Matches our MPPT charge profile |
| Short Circuit Protection | Required | Field wiring mistakes happen |
A Real-World Scenario
David, imagine one of your clients in Wyoming. It’s January. The temperature drops to -20°F at night. The battery’s BMS should block charging until the cell temperature rises above freezing. If the BMS doesn’t have this feature, the MPPT controller will push current into cold cells and permanently damage them.
That’s why I always tell my partners: buy batteries with low-temperature protection built into the BMS. Brands like Battle Born and LiTime include this by default. Cheaper no-name batteries on Amazon sometimes skip it. Check the spec sheet.
No Factory Reset Needed
After you connect the new battery, the system powers up automatically. The camera, 4G modem, and MPPT controller all boot within 30 seconds. There is no pairing process. There is no activation code. You plug it in, close the enclosure, and walk away.
Does the Factory Provide a “Cell Replacement Guide” for My Local Technical Team?
I get this question from every serious integrator. You need documentation you can hand to a field tech who has never seen our product before.
Yes, we provide a step-by-step Cell Replacement Guide in PDF format with every shipment. It includes photos, wiring diagrams, torque specs, and a pre-replacement checklist. Your local tech can complete the swap in under 15 minutes.
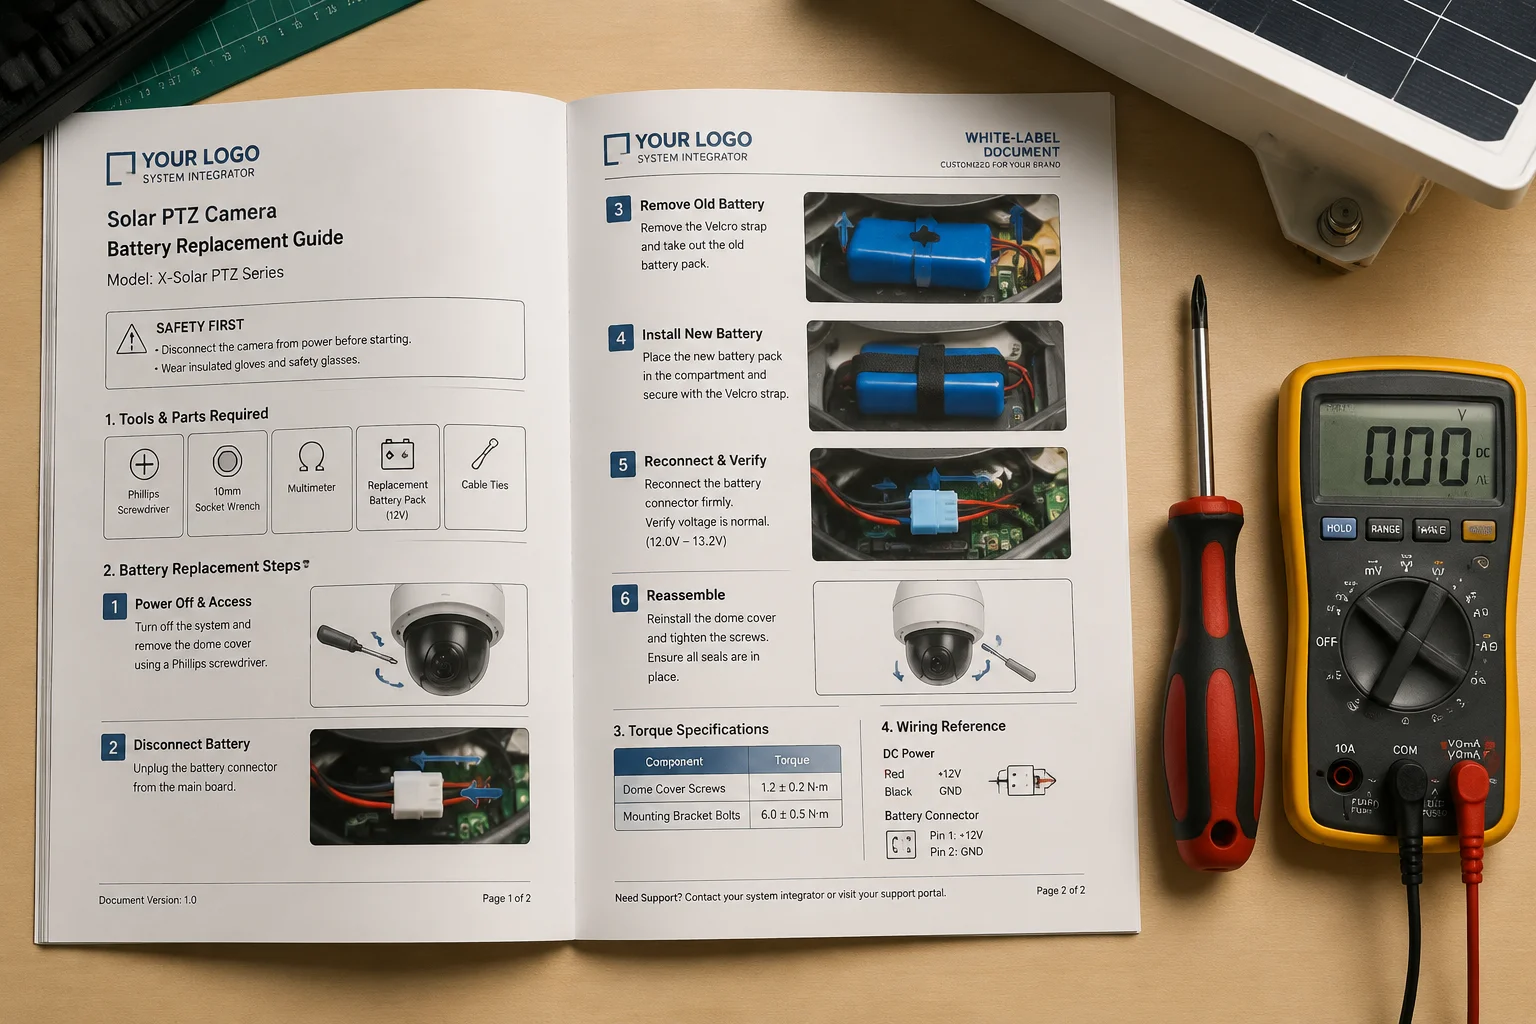 Cell replacement guide document for solar PTZ battery swap
What’s Inside the Guide
The replacement guide is written for a technician with basic electrical knowledge — someone who can use a screwdriver and a multimeter. Here’s what it covers:
Section 1: Safety Precautions
- Disconnect solar panel before opening the enclosure.
- Wear insulated gloves.
- Never short the battery terminals.
Section 2: Physical Removal
- Open the access panel (4x Phillips screws).
- Disconnect the Anderson connector or loosen M8 terminal bolts.
- Slide the old battery out.
Section 3: New Battery Installation
- Verify voltage with multimeter (should read 12.8V–13.2V for a full LiFePO4).
- Slide new battery into the bracket.
- Connect terminals: red to positive, black to negative.
- Close the access panel.
Section 4: Post-Installation Verification
- Confirm camera boots within 60 seconds.
- Check 4G signal on the remote monitoring platform.
- Verify MPPT controller shows “Charging” status when sun is present.
Custom Branding Available
If you’re a system integrator like David and you want to put your own logo on the guide, we offer white-label documentation as part of our OEM service. You can hand your client a professional-looking maintenance manual with your brand on it. This builds trust and positions you as the long-term service provider — not just a reseller.
Video Walkthrough
We also provide a private YouTube link showing the full replacement process. Your field tech can watch it on their phone while standing next to the unit. No guesswork. No calls back to the office.
How Do I Ensure the Local Replacement Cells Are Compatible with the Original MPPT Settings?
This is the most technical question in this article — and the one that separates a good installation from a great one.
Match three parameters: chemistry (LiFePO4), voltage (12V nominal / 14.6V charge), and capacity range (40Ah–100Ah). If these three match, the MPPT controller will work correctly with no setting changes required.
 MPPT charge controller settings for LiFePO4 battery compatibility
Understanding the MPPT Charge Profile
Our MPPT controller ships pre-configured for LiFePO4 chemistry. The charge profile looks like this:
- Bulk Charge Voltage: 14.4V – 14.6V
- Float Voltage: 13.6V
- Low Voltage Disconnect: 10.0V
- Reconnect Voltage: 12.0V
These values are standard across virtually all 12V LiFePO4 batteries sold in the U.S. market. Whether you buy a $150 LiTime from Amazon or a $350 Battle Born from a specialty dealer, the voltage curve is the same. LiFePO4 chemistry is LiFePO4 chemistry.
What Happens If You Use the Wrong Chemistry
If someone accidentally installs a lead-acid battery or a lithium NMC battery, the voltages won’t match. Lead-acid needs 14.4V float (which would overcharge LiFePO4 at float stage). NMC battery9 needs 16.8V for a 4S pack (which our controller won’t provide). The system won’t explode — the BMS will protect it — but it won’t charge correctly either.
Capacity Mismatch: Is It a Problem?
No. You can replace a 40Ah battery with a 100Ah battery without changing any settings. The MPPT controller charges based on voltage, not capacity. A bigger battery just takes longer to fill up. The solar panel size becomes the limiting factor, not the controller.
However, if you go from 100Ah down to 20Ah, the system’s autonomy drops. In cloudy weather, the camera might shut down sooner. So I recommend staying at 40Ah or above for any PTZ deployment.
Quick Compatibility Checklist
| Parameter | Required Value | What Happens If Wrong |
|---|---|---|
| Chemistry | LiFePO4 | Wrong charge curve, potential damage |
| Nominal Voltage | 12V (12.8V actual) | System won’t boot or overcharges |
| Capacity | 40Ah minimum | Too small = frequent shutdowns |
| Terminal Type | M8 bolt or Anderson SB50 connector8 | Need adapter cable (we can supply) |
| Low-Temp Protection | Built into BMS | Cold weather charging damage |
A Note on Self-Heating Batteries
For deployments in cold states — Wyoming, Montana, Minnesota, North Dakota — I strongly recommend batteries with built-in heating elements. These batteries use a small amount of stored energy to warm the cells before accepting a charge. Brands like LiTime and Vatrer sell “self-heating” models specifically for this purpose. They cost about $30–$50 more than standard models. That’s cheap insurance against a $500 service call to replace a cold-damaged pack.
No Firmware Updates Needed
Some customers worry that swapping batteries might require a firmware update on the MPPT controller or the camera. It doesn’t. The electrical interface is purely analog — voltage in, voltage out. The camera doesn’t know or care what brand of battery sits below it. Swap the pack, verify voltage, and you’re done.
Conclusion
U.S. customers can buy standard LiFePO4 batteries locally, swap them in 15 minutes, and keep their solar PTZ systems running for a decade — no factory involvement, no proprietary locks, no special tools.
1. LiTime offers affordable LiFePO4 batteries with built-in BMS and low-temp protection. ↩︎ 2. Ampere Time’s product line of 12V LiFePO4 batteries suitable for solar PTZ systems. ↩︎ 3. Redodo’s 12V LiFePO4 batteries available on Amazon, often with low-temp protection. ↩︎ 4. Battle Born manufactures premium LiFePO4 batteries with robust BMS and low-temp cutoff. ↩︎ 5. Local retail chain offering LiFePO4 batteries for quick walk-in replacement. ↩︎ 6. Learn how MPPT controllers optimize solar panel output for battery charging. ↩︎ 7. Explanation of low-temp charging risks and BMS protection features. ↩︎ 8. Specifications for Anderson SB50 connectors commonly used in solar battery connections. ↩︎ 9. Information on NMC lithium-ion chemistry, which has different voltage requirements than LiFePO4. ↩︎