
I’ve seen too many integrators lose deals because their cameras can’t talk to third-party systems. The camera sits there, detects an intruder, and then does nothing useful beyond recording. That’s a wasted opportunity.
Yes, our PTZ cameras fully support HTTP(S) Post (Webhook) commands1 to third-party IoT gateways. You can send structured alarm data in JSON or XML format to platforms like Node-RED, Home Assistant, n8n, or your own backend server. When the camera’s AI detects a person, a vehicle, or a boundary crossing, it instantly fires a Post request to your designated endpoint — triggering real-world actions like lights, sirens, or automated notifications.
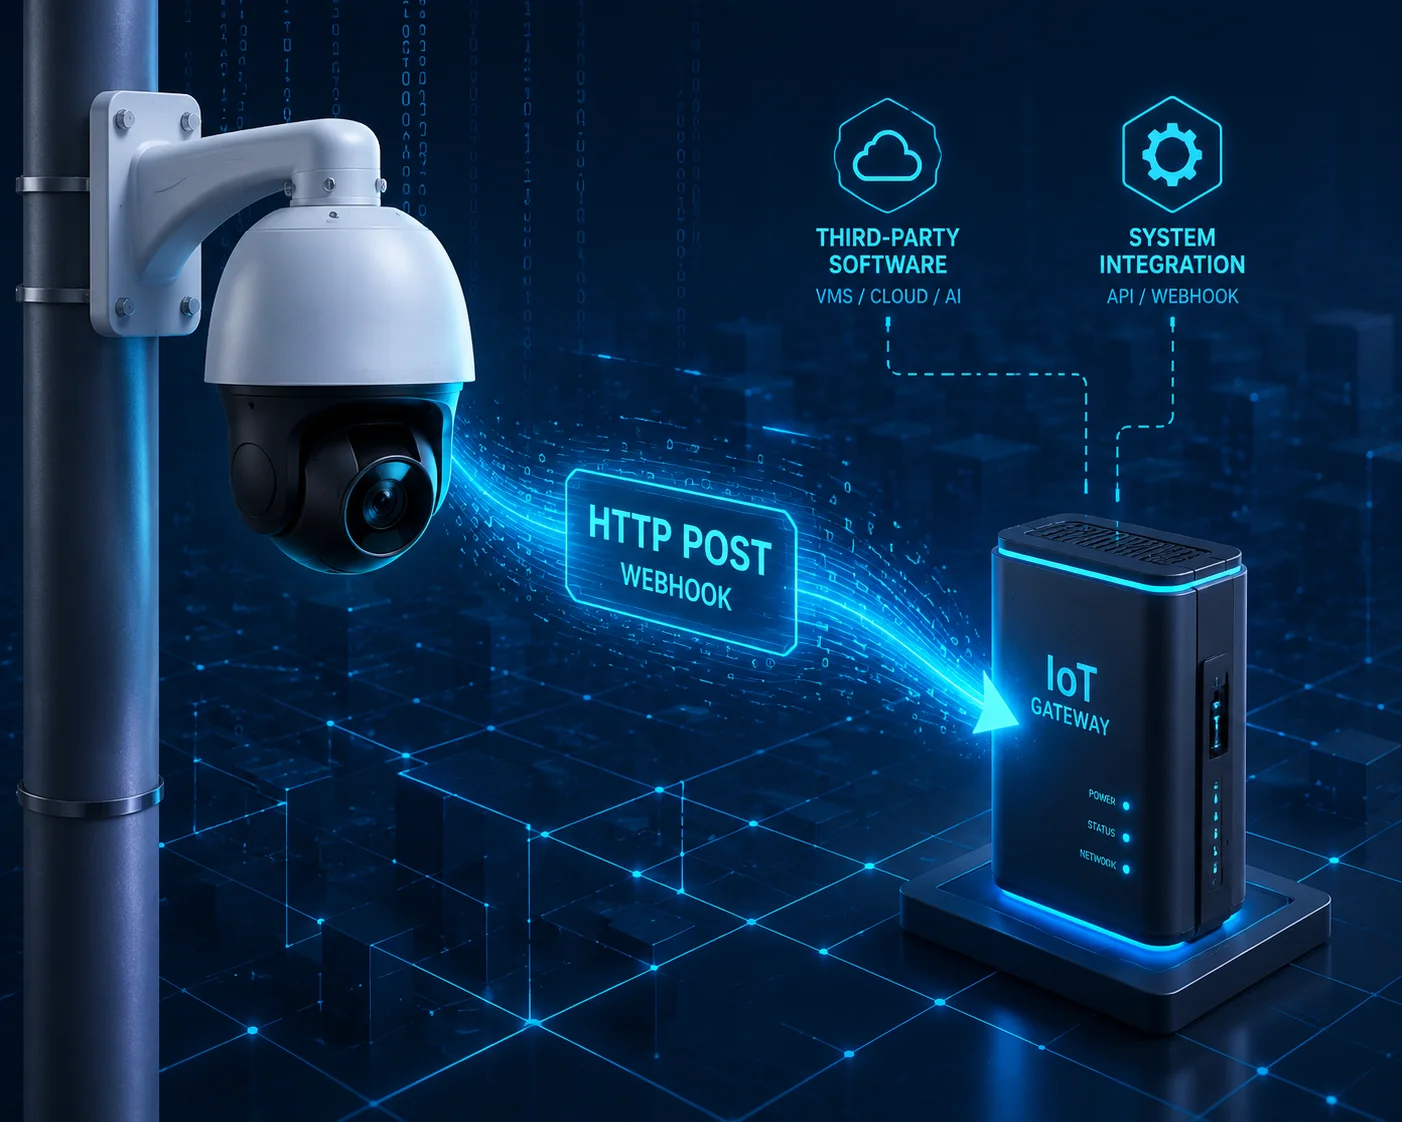 PTZ camera sending HTTP Post Webhook to IoT gateway
Below, I’ll walk you through the exact questions I hear most from system integrators and engineering managers. Each one covers a real scenario you’ll face when you wire a PTZ camera into a broader IoT ecosystem. Let’s get into it.
Table of Contents
Can I Trigger a Smart Gate or a Strobe Light Directly From the Camera’s AI Detection?
This is the first question every project manager asks me. You’ve got a camera on a pole, a gate controller on the fence, and a strobe light on the building. Running physical wires between them costs time and money. There has to be a better way.
You can trigger a smart gate, a strobe light, or any IP-connected device directly from the camera’s AI detection event. The camera sends an HTTP Post to your IoT gateway the moment it detects a person or vehicle. The gateway then commands the gate motor, the strobe, or any other actuator — no physical wiring between the camera and the device is needed.
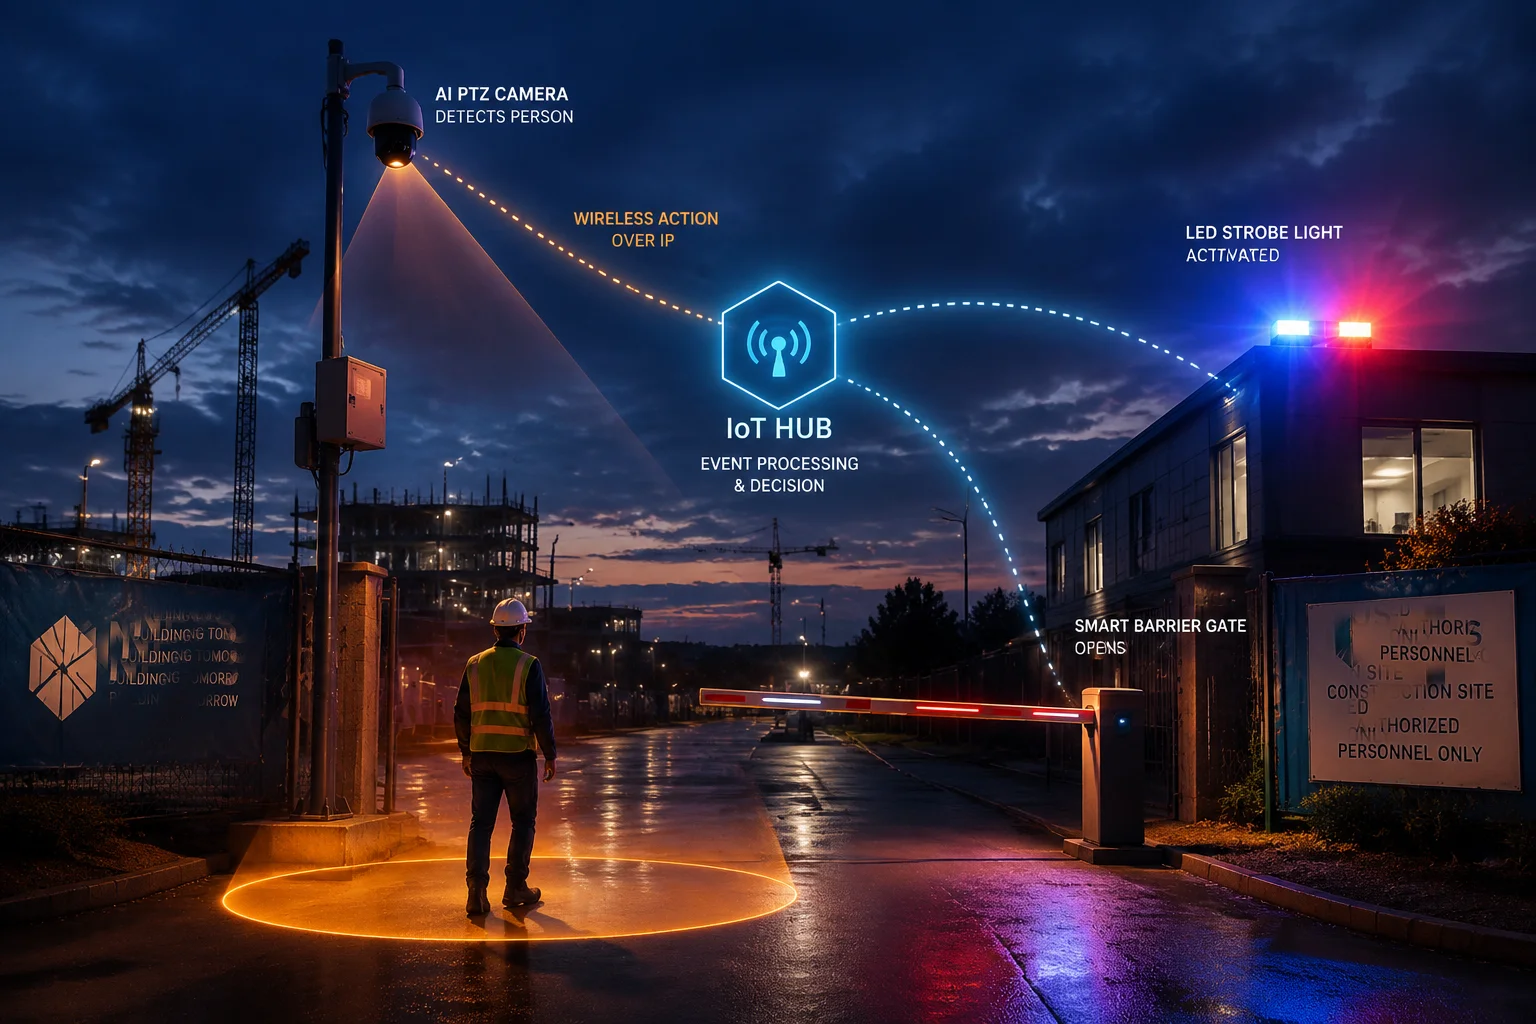 AI detection triggering smart gate and strobe light via Webhook
How the Direct Trigger Works
The key idea here is simple. The camera is the sensor. The IoT gateway is the brain. The gate or strobe is the muscle. They talk over the network, not through copper wire.
Here’s the step-by-step flow:
- The camera’s onboard AI engine detects a human shape crossing a virtual tripwire you’ve drawn in the Web UI.
- Within milliseconds, the camera packages the event into an HTTP Post request. This package includes the event type, a timestamp, the device ID, and optionally the object’s bounding box coordinates.
- The camera sends this Post request to the URL you’ve configured — for example,
http://192.168.1.50:1880/gate-trigger. - Your IoT gateway (let’s say a Node-RED2 instance running on a Raspberry Pi) receives the request, parses the JSON, and sends a relay command to the gate controller or the strobe light.
- The gateway returns a
200 OKto the camera, confirming receipt.
Why This Matters for Off-Grid Sites
In many of the projects I support — construction sites in rural Canada, solar farms in the Middle East, agricultural land in Southeast Asia — running a cable from the camera pole to the gate is simply not practical. The distance might be 200 meters. The terrain might be rough. Trenching costs more than the camera itself.
With Webhook-based triggering, you only need network connectivity. If both the camera and the gateway sit on the same local network (even a 4G router’s LAN), the Post request travels over IP. No trenching. No conduit. No extra labor.
What Devices Can You Control?
| Device Type | Connection to Gateway | Typical Use Case |
|---|---|---|
| Smart Gate Motor | Relay output or RS-485 | Auto-open for authorized vehicles, auto-close after timeout |
| Strobe Light / Siren | Relay output or Zigbee | Immediate visual/audio deterrent on intrusion |
| PA Speaker | Network audio or relay | Play pre-recorded voice warning |
| Barrier Arm | Relay output | Parking lot or checkpoint access control |
| LED Floodlight | Zigbee / LoRa / Relay | Illuminate dark zones when motion is detected |
The point is this: the camera doesn’t need to know what device it’s controlling. It just sends the Webhook. Your gateway handles the rest. This separation of duties makes the system modular and easy to maintain.
A Real Scenario With Node-RED
Let me paint a picture. David, one of our integrator partners in North America, runs a construction site monitoring project. He has our 4G solar PTZ camera on a portable mast. About 80 meters away, there’s a shipping container with a Node-RED gateway inside, powered by the same solar array.
When the camera detects a person after hours, it fires a Webhook to Node-RED. Node-RED checks the time. If it’s between 10 PM and 6 AM, it triggers two actions: it switches on a LoRa-connected floodlight 50 meters away, and it sends a Telegram alert to the site foreman’s phone. All of this happens in under two seconds. No cloud dependency. No monthly subscription fee.
Does the Webhook Support Custom JSON Payloads for Integration With Home Assistant?
I get this question a lot from integrators who use Home Assistant as their central hub. They want to know if the camera’s Webhook output is flexible enough to fit into their existing automation flows. The short answer is yes, but let me explain the details.
The Webhook supports standard JSON payloads that are fully compatible with Home Assistant’s automation engine. The camera sends structured data including event type, timestamp, device ID, and AI metadata. You can parse this JSON directly in Home Assistant using its built-in Webhook trigger or through a Node-RED intermediary for more complex logic.
 Custom JSON Webhook payload for Home Assistant integration
Understanding the JSON Payload Structure
When the camera fires a Webhook, the HTTP Post body contains a JSON object. The exact fields depend on the event type, but a typical payload looks like this:
{
"event": "human_detection",
"timestamp": "2025-01-15T03:22:11Z",
"device_id": "CAM-PTZ-4G-0032",
"channel": 1,
"region": "Zone-A",
"confidence": 0.92,
"bounding_box": {
"x": 320,
"y": 180,
"width": 85,
"height": 210
}
}
This is plain, standard JSON. Any backend that can parse JSON — Python, Node.js, PHP, Go, or Home Assistant’s built-in parser — can read it without any special SDK or library.
How Home Assistant Receives the Webhook
In Home Assistant, you create a Webhook automation trigger. Home Assistant gives you a unique URL like http://your-ha-ip:8123/api/webhook/camera-alert. You paste this URL into the camera’s HTTP Post configuration page. That’s it.
When the camera detects an event, it Posts to that URL. Home Assistant receives the JSON, and your automation kicks in. You can turn on lights, lock doors, send push notifications, or log the event to a database.
What If You Need to Transform the Payload?
Some integrators need to reshape the JSON before it reaches Home Assistant. Maybe your HA automation expects a different field name, or you want to add extra context like weather data or shift schedule info. In that case, you put Node-RED or n8n between the camera and Home Assistant.
The flow looks like this:
| Step | Component | Action |
|---|---|---|
| 1 | Camera | Sends raw JSON to Node-RED Webhook URL |
| 2 | Node-RED | Receives JSON, transforms fields, adds context |
| 3 | Node-RED | Forwards modified JSON to Home Assistant Webhook URL |
| 4 | Home Assistant | Triggers automation based on received data |
This three-layer approach gives you maximum flexibility. The camera handles detection. Node-RED handles data transformation. Home Assistant handles action. Each layer does one job well.
MQTT as an Alternative
If your Home Assistant setup already relies heavily on MQTT (which is common in IoT-heavy deployments), our cameras also support MQTT3 publishing. You can configure the camera to publish alarm events to a specific MQTT topic, and Home Assistant subscribes to that topic. This is lighter on resources than HTTP Post and works better when you have dozens of cameras reporting to the same broker.
But for most small-to-medium projects — say, 1 to 15 cameras — HTTP Post Webhook is simpler to set up and debug. You don’t need to run a separate MQTT broker. You just point the camera at a URL and go.
How Do I Configure the HTTP Header and Authentication for My Secure Cloud Server?
Security is not optional. If your Webhook endpoint sits on a cloud server with a public IP, you need authentication. Otherwise, anyone who discovers your URL can send fake alarm data and trigger your automations. I’ve seen this happen, and it’s not fun to troubleshoot at 2 AM.
You can configure HTTP headers and authentication directly in the camera’s Web UI under the Event Linkage settings. The camera supports both Basic and Digest authentication for Webhook Post requests. You can also set custom headers, including API keys or Bearer tokens, to match the security requirements of your cloud server or API gateway.
 HTTP header and authentication configuration for Webhook
Where to Find the Settings
On our PTZ cameras, the configuration path is typically:
Web UI → Event → Linkage Method → HTTP Post
On this page, you’ll see the following fields:
- Server URL: The full endpoint, including protocol, IP or domain, port, and path. Example:
https://api.yourserver.com:443/v1/camera-alerts - HTTP Method: Post (default and recommended for Webhook).
- Authentication Type: None, Basic, or Digest.
- Username / Password: Used for Basic or Digest auth.
- Custom Headers: You can add key-value pairs. For example,
X-API-Key: your-secret-key-here.
Basic vs. Digest Authentication
Let me break down the two options so you can pick the right one for your project.
Basic authentication5 sends your username and password encoded in Base64 with every request. It’s simple and widely supported. But Base64 is not encryption — it’s just encoding. If someone intercepts the traffic, they can decode your credentials easily. So if you use Basic auth, always use HTTPS (TLS encryption) to protect the transport layer.
Digest authentication6 is more secure over plain HTTP. Instead of sending the password directly, the camera and server perform a challenge-response handshake. The password never travels over the wire in readable form. This is a better choice if, for some reason, you can’t use HTTPS — for example, on a local network where you haven’t set up TLS certificates.
HTTPS and TLS
For any cloud-facing Webhook, I strongly recommend HTTPS. Our cameras support TLS 1.24, which means the entire Post request — headers, body, credentials — is encrypted end-to-end. Even if someone taps the 4G connection, they see only encrypted gibberish.
Custom Headers for API Gateways
Many cloud platforms (AWS API Gateway, Azure Functions, Cloudflare Workers) use API keys passed in custom headers for authentication. Our cameras let you add these headers directly. Here’s a common setup:
| Header Key | Header Value | Purpose |
|---|---|---|
X-API-Key | sk_live_abc123xyz | Authenticates the camera to the API gateway |
Content-Type | application/json | Tells the server to expect JSON |
X-Device-ID | CAM-PTZ-4G-0032 | Identifies which camera sent the alert |
This is especially useful when you manage a fleet of cameras across multiple sites. Each camera can carry its own device ID in the header, so your backend knows exactly which unit triggered the alarm without even parsing the JSON body.
A Note on Firewall Rules
If your Webhook server sits behind a firewall, you need to whitelist the camera’s outbound IP. For 4G cameras, this IP is assigned by the carrier and may change. In that case, consider using a VPN tunnel or a static IP SIM card. Some of our integrator partners use Tailscale7 or WireGuard to create a persistent, encrypted tunnel between the camera and their cloud server. This solves both the firewall problem and the security problem in one step.
Will the Camera Retry the Webhook Post if the Initial Network Handshake Fails?
This is the question that separates a demo from a production deployment. In a lab, the network is perfect. In the field — especially on 4G in a rural area — packets drop, signals fade, and handshakes fail. If your camera gives up after one failed attempt, you lose alarms. And lost alarms mean lost trust with your end customer.
Yes, the camera includes a configurable retry mechanism for failed Webhook Post attempts. If the initial TCP handshake or HTTP request fails — due to network timeout, server unavailability, or DNS resolution error — the camera will automatically retry the Post request based on the retry count and interval you’ve set in the configuration. This ensures alarm delivery even on unstable 4G or satellite links.
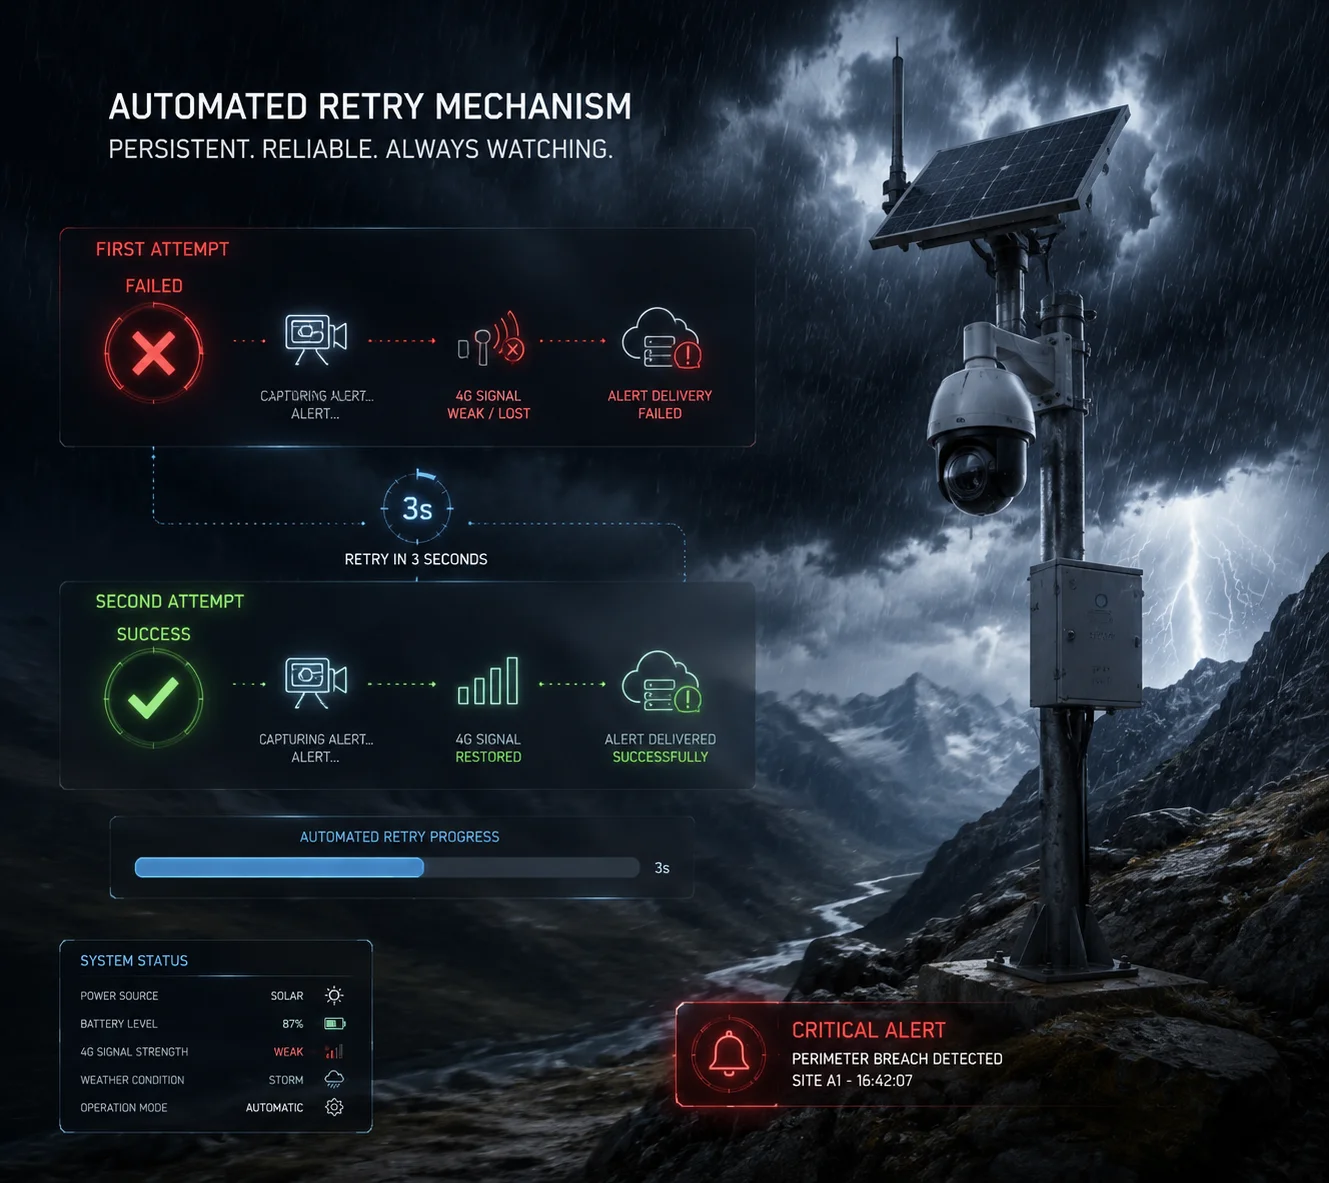 Webhook retry mechanism for unreliable network connections
How the Retry Logic Works
When the camera fires a Webhook and doesn’t receive a 200 OK response within the timeout window (typically 5–10 seconds), it marks the attempt as failed. Then it waits for a configurable interval — say, 3 seconds — and tries again. It repeats this process up to the maximum retry count you’ve set.
Here’s the sequence:
- First attempt: Camera sends Post. No response within 5 seconds. Marked as failed.
- Wait 3 seconds.
- Second attempt: Camera sends Post again. Server responds with
200 OK. Success. Event delivered.
If all retry attempts fail, the camera logs the failure locally. Depending on your configuration, it can also trigger a secondary linkage action — like saving a snapshot to the SD card or sending an email alert through a different channel.
What Causes Failures in the Field?
I want to be honest about this. In my experience supporting off-grid deployments, here are the most common reasons a Webhook Post fails:
- 4G signal drop: The camera is on a solar mast in a valley. Cell signal fluctuates between 2 bars and zero. A brief dropout during the Post attempt kills the connection.
- Server overload: Your Node-RED instance is running on a Raspberry Pi, and it’s busy processing another camera’s request. The TCP connection queue is full.
- DNS timeout: The camera is trying to resolve a domain name (like
api.yourserver.com), but the DNS server on the 4G network is slow. The lookup takes longer than the timeout window. - TLS handshake failure: The server’s SSL certificate expired, or there’s a version mismatch. The camera can’t complete the HTTPS handshake.
Best Practices for Reliable Delivery
Based on years of field deployments, here’s what I recommend:
Use IP addresses instead of domain names for the Webhook URL when possible. This eliminates DNS as a failure point. If you must use a domain, make sure the camera’s DNS server is fast and reliable.
Set the retry count to at least 3. This covers most transient failures. Setting it higher (like 5 or 10) is fine for critical alarms, but be aware that each retry consumes bandwidth and battery — important for solar-powered setups.
Set the retry interval to 3–5 seconds. Too short (like 1 second) and you might hit the server before it recovers. Too long (like 30 seconds) and the alarm loses its urgency.
Use MQTT as a backup channel. If your deployment is in an area with very poor connectivity, configure the camera to publish alarms via MQTT in addition to HTTP Post. MQTT is designed for unreliable networks. It uses persistent sessions and QoS levels to guarantee delivery even when the connection drops and reconnects.
Edge Storage as a Safety Net
Even with retries, there’s always a small chance that a Webhook Post fails completely — maybe the 4G network goes down for 10 minutes during a storm. In that case, the camera’s local storage acts as a safety net. The alarm event, along with the associated video clip and snapshot, is saved to the onboard SD card8. When the network comes back, you can retrieve the footage manually or through the camera’s FTP upload feature.
This layered approach — Webhook first, retry on failure, local storage as backup — gives you the kind of reliability that enterprise customers demand. It’s the difference between a product that works in a showroom and a product that works on a mountain.
Conclusion
Our PTZ cameras send HTTP Post Webhooks to any third-party IoT gateway with full support for JSON payloads, authentication, custom headers, and automatic retries — giving you reliable, real-world automation from detection to action.
1. Learn the basics of webhooks and how they enable real-time communication between systems. ↩︎ 2. Explore Node-RED, a flow-based development tool for wiring together hardware devices and APIs. ↩︎ 3. MQTT is a lightweight messaging protocol ideal for constrained networks and IoT devices. ↩︎ 4. TLS 1.2 provides encrypted communication to protect webhook data in transit. ↩︎ 5. Basic authentication sends credentials encoded in Base64; always pair with HTTPS for security. ↩︎ 6. Digest authentication uses a challenge-response handshake, avoiding sending the password in plain text. ↩︎ 7. Tailscale creates a secure mesh VPN, simplifying connectivity between cameras and cloud servers. ↩︎ 8. SD cards provide low-cost, reliable local storage for video clips and event logs. ↩︎